Mini Spiral Crochet Christmas Tree for the Holiday Table
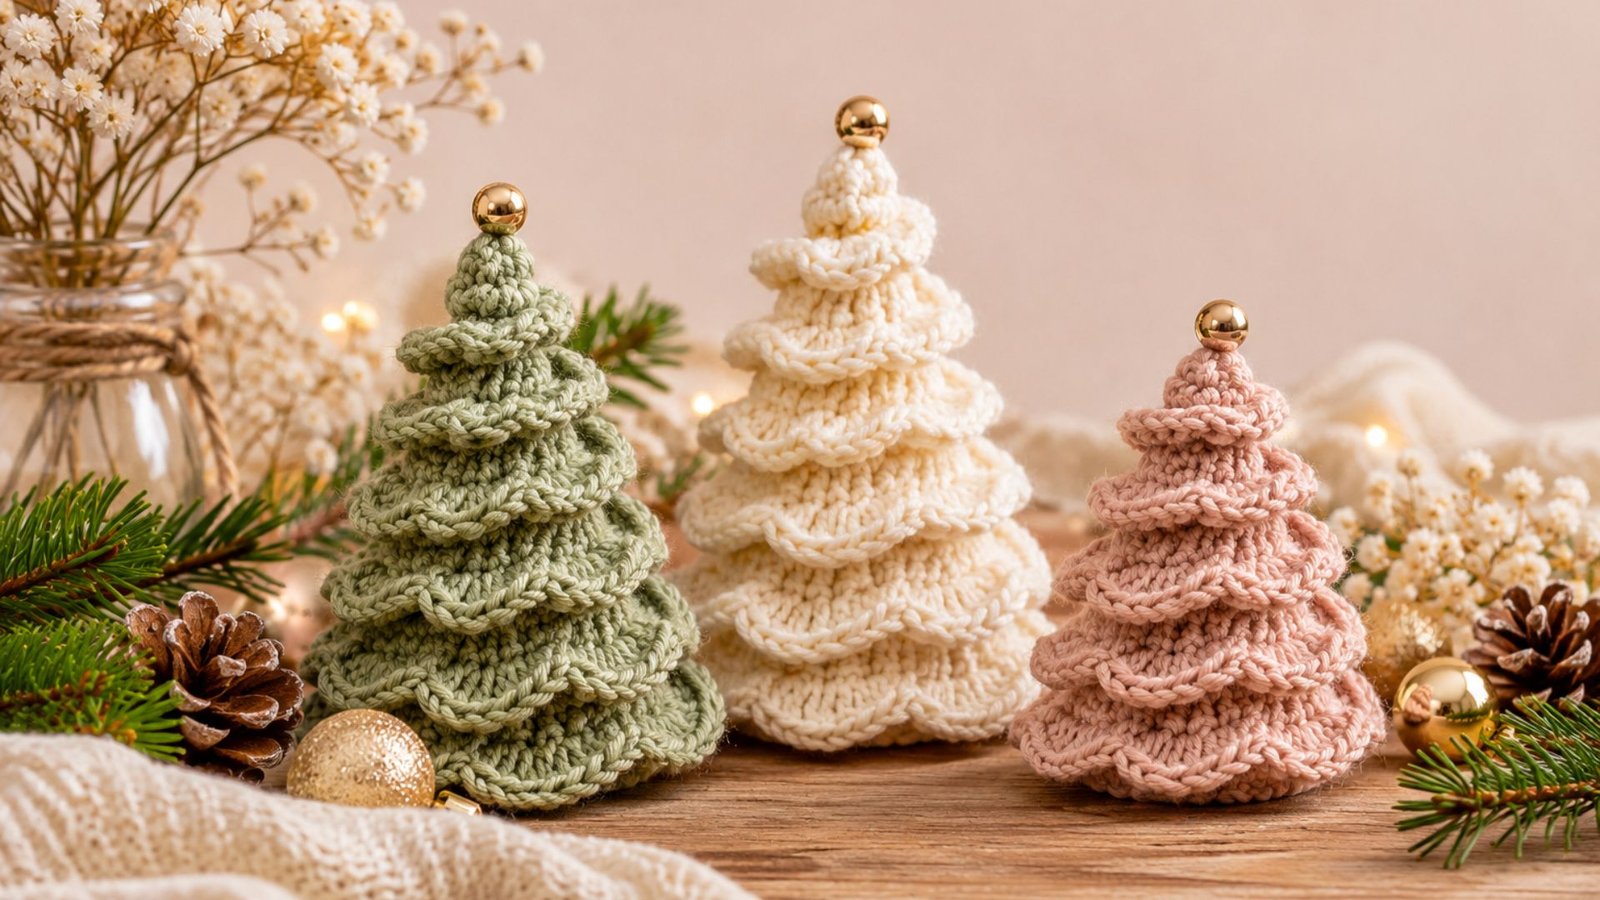
I always love adding little handmade touches to my home during Christmas, especially when they bring warmth and personality to the holiday table.
Last year, I wanted to create something a little different from the usual Christmas decorations, and these adorable mini spiral crochet trees were just what I had in mind.
They are delicate, charming, and surprisingly simple to make, even if you are still building your crochet skills. I love how the beautiful spiral texture gives each little tree a lovely layered appearance.
They are perfect for decorating your dining table, mantel, shelves, or even gifting to someone special.
Why You’ll Love This Mini Spiral Crochet Christmas Tree
If you enjoy making handmade Christmas decorations, this little crochet project is one worth adding to your holiday crafting list.
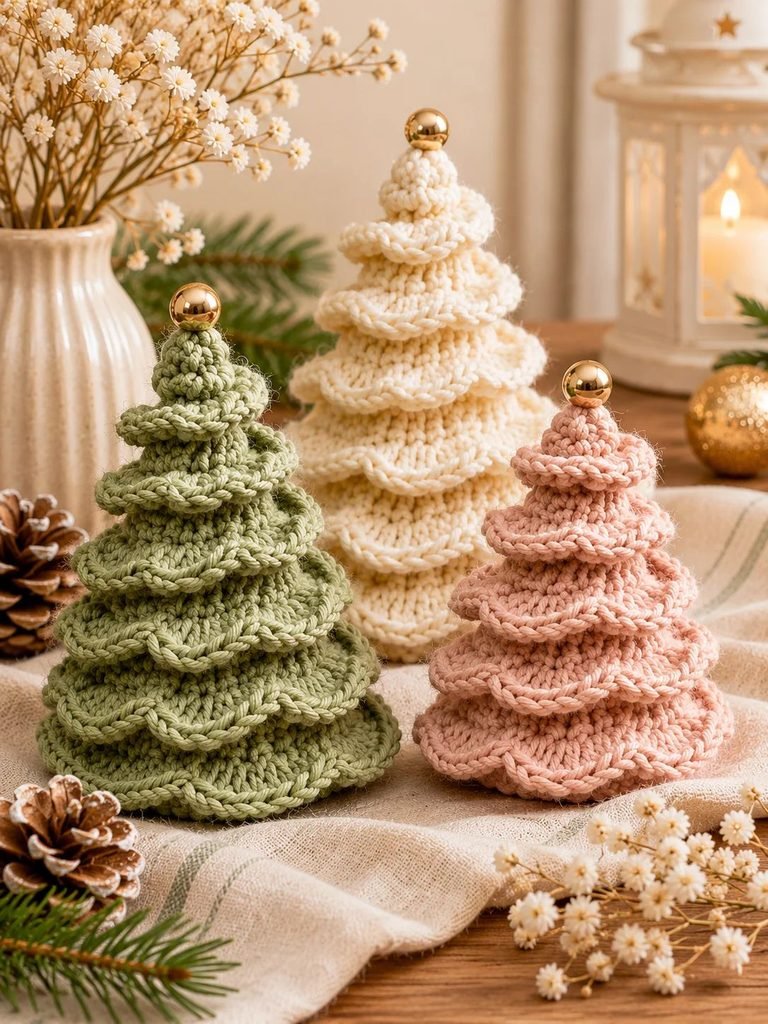
Unlike traditional flat crochet Christmas trees, this design has a lovely three-dimensional shape. It features a simple cone-shaped center with beautiful spiral ruffles crocheted around the outside. The result is a textured miniature tree that looks elegant from every angle.
Here are a few reasons I think you will love making these trees:
- Beginner-friendly techniques: You only need basic crochet stitches, increases, and the ability to work into specific loops.
- Beautiful spiral texture: The layered ruffles create the appearance of tiny evergreen branches.
- Perfect for scrap yarn: You only need small amounts of yarn, making this a wonderful stash-busting project.
- Customizable sizes: Make a collection of small, medium, and large trees for a lovely Christmas display.
- Lovely handmade gifts: These little trees make thoughtful gifts for friends, family, neighbors, and crochet lovers.
- Reusable decorations: Unlike disposable seasonal decorations, you can bring these handmade trees out every Christmas.
I especially love making a little collection in coordinating colors. A combination of sage green, warm ivory, and soft gold looks beautiful on a natural wooden table or a cream-colored Christmas table runner.
Materials You’ll Need
Before starting, gather your crochet supplies and prepare a comfortable crafting space.
You don’t need many materials for this project, and most of them may already be in your crochet basket.
Crochet Supplies
- DK-weight yarn in your preferred Christmas colors.
- 3 mm crochet hook.
- Polyester fiberfill stuffing.
- 6–8 mm decorative gold beads for the tree toppers.
- Tapestry needle for sewing and weaving in ends.
- Stitch marker to identify the beginning of each round.
- Scissors.
- Small piece of firm cardboard or a lightweight plastic disc for optional base support.
Recommended Yarn Colors
For a soft, cozy Christmas look, I recommend choosing three complementary shades.
- Sage green for a natural evergreen appearance.
- Cream or ivory for a neutral winter-inspired tree.
- Soft gold for a little festive sparkle.
You can also use traditional forest green, cranberry red, snowy white, or dusty pink.
Choosing the Right Yarn
For this project, smooth DK cotton or cotton-blend yarn is a lovely choice.
Cotton yarn gives the stitches a crisp appearance and helps the spiral ruffles maintain their shape. Acrylic DK yarn can also work beautifully, especially if you prefer a softer finish.
I recommend avoiding very fluffy, fuzzy, or chenille yarn because it can make it difficult to see the individual stitches and locate the front loops needed for the spiral decoration.
Skill Level and Finished Size
Skill level: Easy to advanced beginner.
You should be comfortable making a magic ring, single crochet stitches, increases, and working in continuous rounds.
The pattern includes three sizes:
| Tree size | Approximate height | Base diameter |
|---|---|---|
| Small | 4 inches | 2.25 inches |
| Medium | 5 inches | 2.75 inches |
| Large | 6 inches | 3.25 inches |
Each tree takes approximately 1–2 hours, depending on your crochet speed and experience.
You can make just one tree or create all three sizes for a coordinated holiday centerpiece.
Crochet Abbreviations
This tutorial uses standard US crochet terminology.
| Abbreviation | Meaning |
|---|---|
| ch | Chain |
| sc | Single crochet |
| hdc | Half double crochet |
| dc | Double crochet |
| sl st | Slip stitch |
| st | Stitch |
| sts | Stitches |
| MR | Magic ring |
| BLO | Back loop only |
| FLO | Front loop only |
| inc | Increase (2 sc in one stitch) |
| dec | Decrease |
| rep | Repeat |
Understanding BLO and FLO
Two techniques are especially important for this pattern.
Back Loop Only (BLO): Instead of inserting your hook under both loops at the top of a stitch, insert it under the back loop only.
Front Loop Only (FLO): Insert your hook under the front loop only.
Working the center cone in BLO leaves the front loops exposed. These exposed loops become the foundation for the decorative spiral ruffles later.
Don’t worry if this sounds a little complicated at first. Once you understand how the loops work, the construction becomes much easier.
Before You Begin: How the Spiral Tree Is Made
The tree is created in three main stages.
- Crochet the inner cone from the pointed top down toward the wider base.
- Lightly stuff the cone and crochet a separate circular base to close the bottom.
- Attach yarn to the exposed front loops and crochet the decorative spiral ruffles from the bottom toward the top.
This construction gives the tree its lovely dimensional appearance without needing to crochet complicated branches individually.
Important tip: Work in continuous rounds unless instructed otherwise. Avoid joining each round with a slip stitch because this can create visible seams.
Use a stitch marker to keep track of the first stitch in every round.
How to Crochet a Mini Spiral Christmas Tree
Step 1: Crochet the Inner Tree Cone
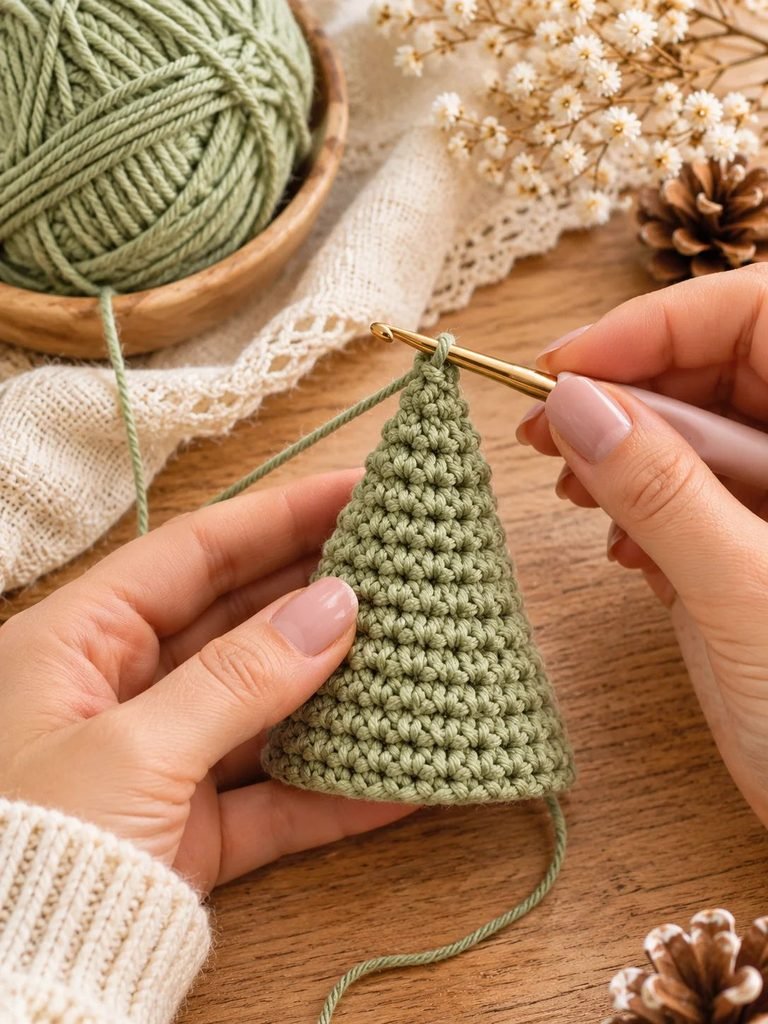
Start by making the pointed center of your Christmas tree.
This section creates the structure that supports the decorative spiral layers.
Small Tree – 4 Inches
Using your chosen yarn and crochet hook:
- Round 1: Make a magic ring and crochet 4 sc into the ring. (4 sts)
- Round 2: BLO, repeat [1 sc, inc] twice. (6 sts)
- Round 3: BLO, repeat [2 sc, inc] twice. (8 sts)
- Round 4: BLO, repeat [3 sc, inc] twice. (10 sts)
- Round 5: BLO, repeat [4 sc, inc] twice. (12 sts)
- Round 6: BLO, repeat [5 sc, inc] twice. (14 sts)
- Round 7: BLO, repeat [6 sc, inc] twice. (16 sts)
- Round 8: BLO, repeat [7 sc, inc] twice. (18 sts)
- Round 9: BLO, repeat [8 sc, inc] twice. (20 sts)
- Round 10: BLO, repeat [9 sc, inc] twice. (22 sts)
- Round 11: BLO, repeat [10 sc, inc] twice. (24 sts)
- Round 12: BLO, crochet 1 sc in every stitch around. (24 sts)
Slip stitch to finish the edge and fasten off, leaving a long yarn tail for sewing.
Medium Tree – 5 Inches
Follow the small tree instructions through Round 11.
Continue with:
- Round 12: BLO, repeat [11 sc, inc] twice. (26 sts)
- Round 13: BLO, repeat [12 sc, inc] twice. (28 sts)
- Round 14: BLO, repeat [13 sc, inc] twice. (30 sts)
- Round 15: BLO, crochet 1 sc in every stitch around. (30 sts)
Slip stitch to finish and fasten off, leaving a long yarn tail.
Large Tree – 6 Inches
Follow the medium tree instructions through Round 14.
Continue with:
- Round 15: BLO, repeat [14 sc, inc] twice. (32 sts)
- Round 16: BLO, repeat [15 sc, inc] twice. (34 sts)
- Round 17: BLO, repeat [16 sc, inc] twice. (36 sts)
- Round 18: BLO, crochet 1 sc in every stitch around. (36 sts)
Slip stitch to finish and fasten off, leaving a long yarn tail.
Helpful tip: Keep your tension consistent as you work. The cone should feel firm enough to support the ruffles without looking stiff or stretched.
You should now have a small, medium, or large cone with a pointed top and a wider bottom.
Step 2: Crochet the Flat Bottom
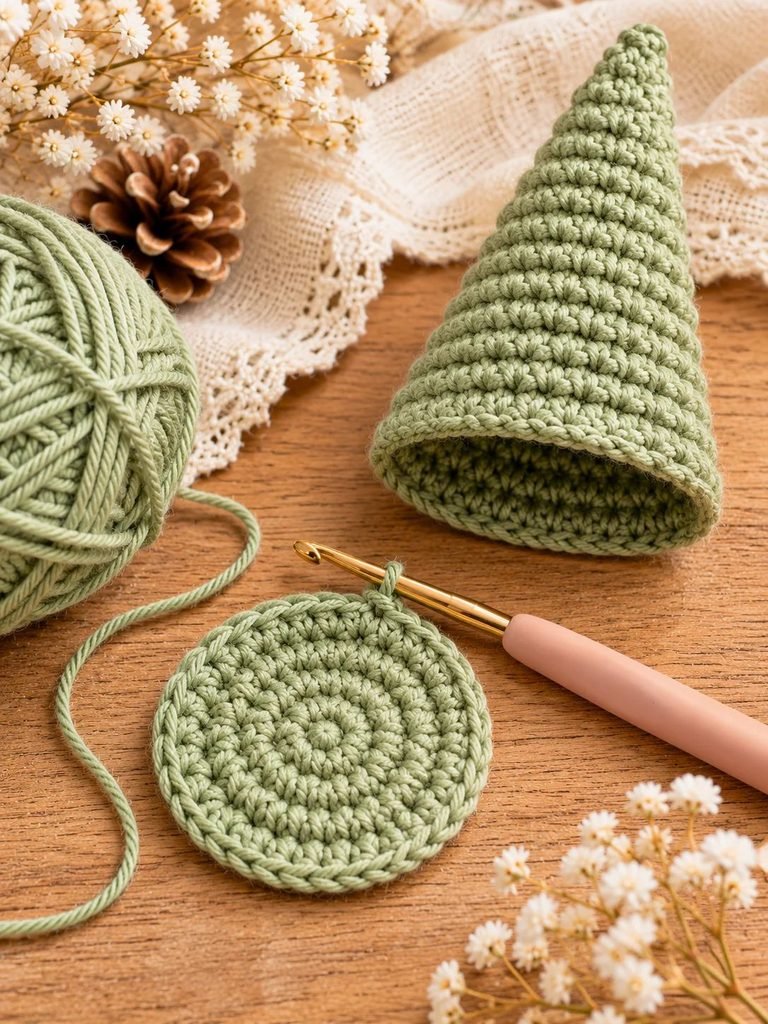
Now it’s time to make the circular base.
The base closes the bottom of the cone and helps your finished Christmas tree stand upright.
Work in continuous rounds using both loops of each stitch.
Small Tree Base
- Round 1: Make a magic ring and work 6 sc into it. (6 sts)
- Round 2: Inc in every stitch around. (12 sts)
- Round 3: Repeat [1 sc, inc] six times. (18 sts)
- Round 4: Repeat [2 sc, inc] six times. (24 sts)
Slip stitch to the first stitch and fasten off.
Medium Tree Base
Work Rounds 1–4 of the small tree base.
Then continue:
- Round 5: Repeat [3 sc, inc] six times. (30 sts)
Slip stitch to finish and fasten off.
Large Tree Base
Work Rounds 1–5 of the medium tree base.
Then continue:
- Round 6: Repeat [4 sc, inc] six times. (36 sts)
Slip stitch to finish and fasten off.
Your base should now be a flat circle that matches the bottom opening of your tree cone.
Read How to Crochet a Double-Thick Potholder – Thermal Stitch Single Crochet, Free Pattern
Step 3: Stuff and Assemble the Tree
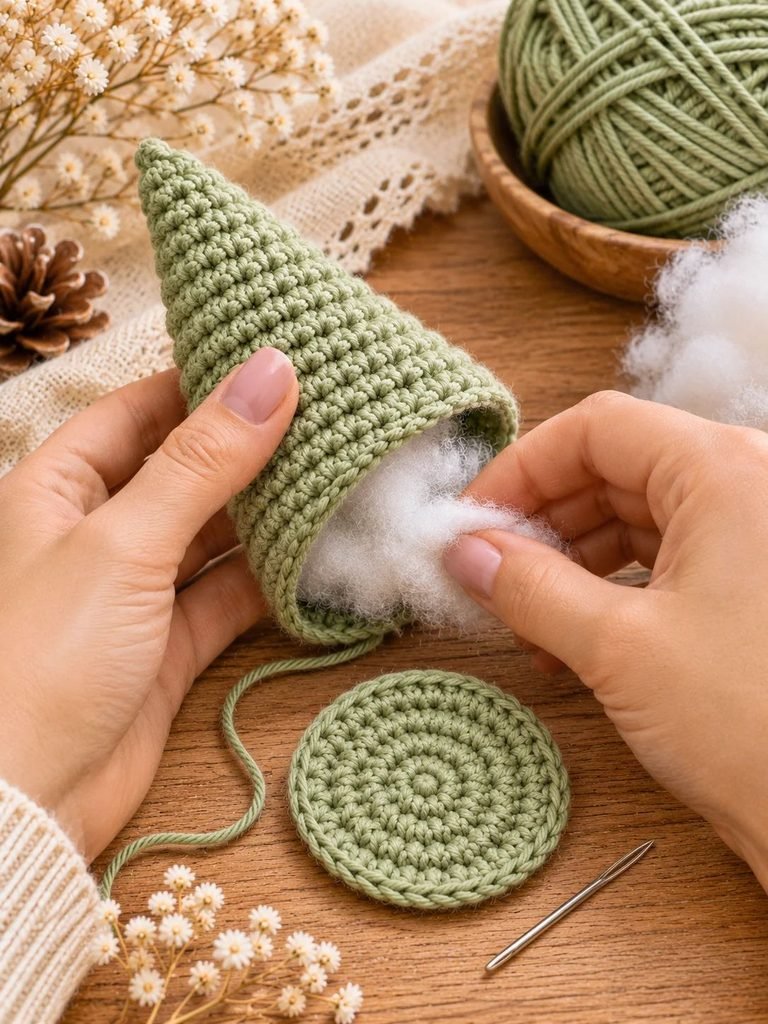
Before adding the decorative ruffles, you need to give your tree some shape.
Take your crochet cone and gently fill the inside with polyester fiberfill.
Start with a small amount of stuffing near the pointed top, then gradually work your way toward the wider bottom.
Avoid adding too much stuffing. Overfilling can stretch the crochet stitches and make the base look rounded instead of flat.
Once the cone is filled, place the circular base over the opening.
Using the long yarn tail from the cone and your tapestry needle, sew the base to the bottom edge of the cone.
Work carefully around the entire circle, matching each stitch with its corresponding stitch on the base.
Before closing the final few stitches, check that the stuffing is evenly distributed.
If you want your tree to stand more firmly, you can add a small piece of firm cardboard or a lightweight plastic disc inside the bottom before finishing the seam.
Secure the yarn and weave in any loose ends.
Step 4: Crochet the Beautiful Spiral Ruffles
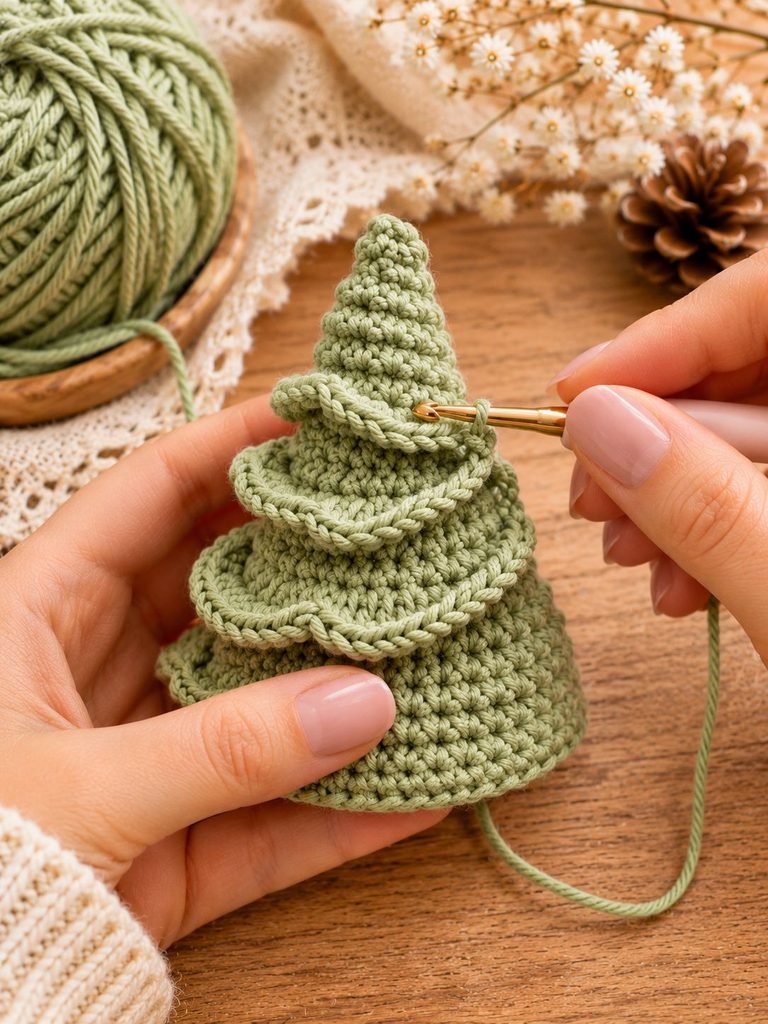
This is my favorite part of the project!
The decorative spiral is what gives the little Christmas tree its beautiful layered, evergreen appearance.
Remember those front loops you left unworked when making the cone? You will now use them to create the ruffles.
Turn the tree upside down so that the base faces you and the pointed top faces downward.
Attach your yarn to the exposed front loop nearest the bottom edge.
For the small tree, begin at the front loop of the final cone round. Do the same for the medium and large trees.
How to Make a Spiral Ruffle Shell
Work the following stitches into one front loop:
- 1 single crochet.
- 1 half double crochet.
- 1 double crochet.
- 1 half double crochet.
All four stitches go into the same front loop.
This creates a small textured shell that naturally curves outward.
Continue the Spiral Pattern
Once you have made your first shell, follow this sequence:
- Work one spiral ruffle shell into the next available front loop.
- Skip the following front loop.
- Work 1 sc into the next front loop.
- Skip the following front loop.
- Repeat the sequence around the cone, following the exposed spiral ridge.
Continue working upward toward the pointed top.
As you crochet, the shells will begin to overlap and form beautiful little layers.
Don’t pull the stitches too tightly. The ruffles need a little room to spread outward and create their decorative shape.
Finishing the Top
As you approach the final few loops near the tip, the space becomes smaller.
For the last few available front loops, work a tighter finishing section:
[1 sc, 2 hdc, 1 sc] into each indicated loop.
This helps create a fuller little flourish at the top of the tree.
Slip stitch near the tip, fasten off, and carefully weave the yarn tail into the center of the cone.
Use your fingers to gently separate and arrange the ruffles from top to bottom.
You should now see a lovely spiral pattern running around your little Christmas tree.
Step 5: Add a Decorative Tree Topper
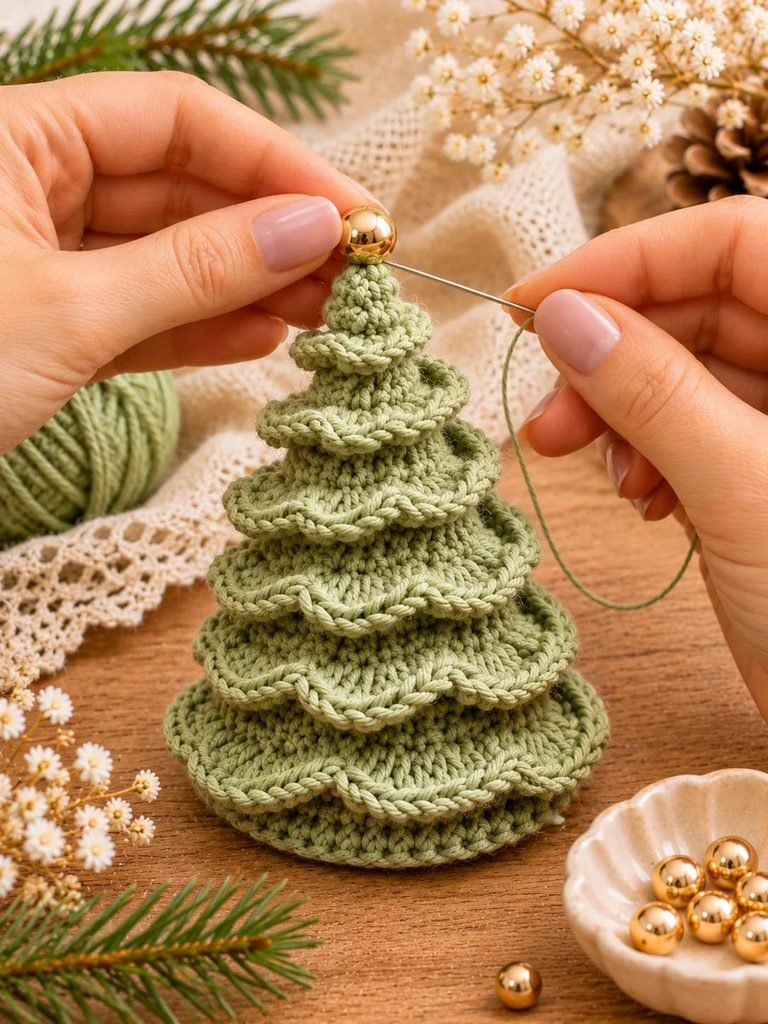
A little decorative topper is a beautiful finishing touch.
For a simple and elegant look, use a small gold bead.
Thread a piece of matching yarn or gold sewing thread through your tapestry needle.
Pass the needle through the bead and position it at the very top of your crochet tree.
Sew through a few stitches at the tip to secure the bead firmly.
Tie a secure knot inside the cone and hide the loose thread.
You can also use:
- A tiny crocheted star.
- A small wooden star.
- A miniature felt star.
- A little embroidered gold star.
- A small decorative bow.
For a neutral Christmas theme, I love the look of a tiny gold bead against sage green or ivory yarn.
Safety note: If your decorations will be handled by young children or pets, avoid small detachable beads and choose securely sewn, child-appropriate decorations instead.
Helpful Tips for Making Beautiful Crochet Christmas Trees
A few small adjustments can make a big difference in how your finished trees look.
1. Keep Your Stitches Tight
The inner cone should be dense enough that the stuffing does not show through.
If you notice gaps between your stitches, try using a smaller crochet hook.
2. Use a Stitch Marker
Because the cone is worked in continuous rounds, it can be easy to lose track of where each round begins.
A stitch marker will help you keep your increases organized.
3. Don’t Overstuff the Cone
Too much fiberfill can stretch the stitches and affect the shape of your tree.
Add small amounts gradually and distribute them evenly.
4. Make Your Ruffles Consistent
Try to maintain the same tension when working each shell.
If some ruffles are tighter than others, the finished spiral may look uneven.
5. Choose Yarn That Holds Its Shape
Smooth cotton yarn is particularly lovely for this project because it creates clear, defined stitches.
6. Arrange the Ruffles by Hand
Once the spiral is complete, gently fluff each layer with your fingers.
This makes the tree look fuller and helps the decorative pattern stand out.
Creative Ways to Customize Your Mini Crochet Christmas Trees
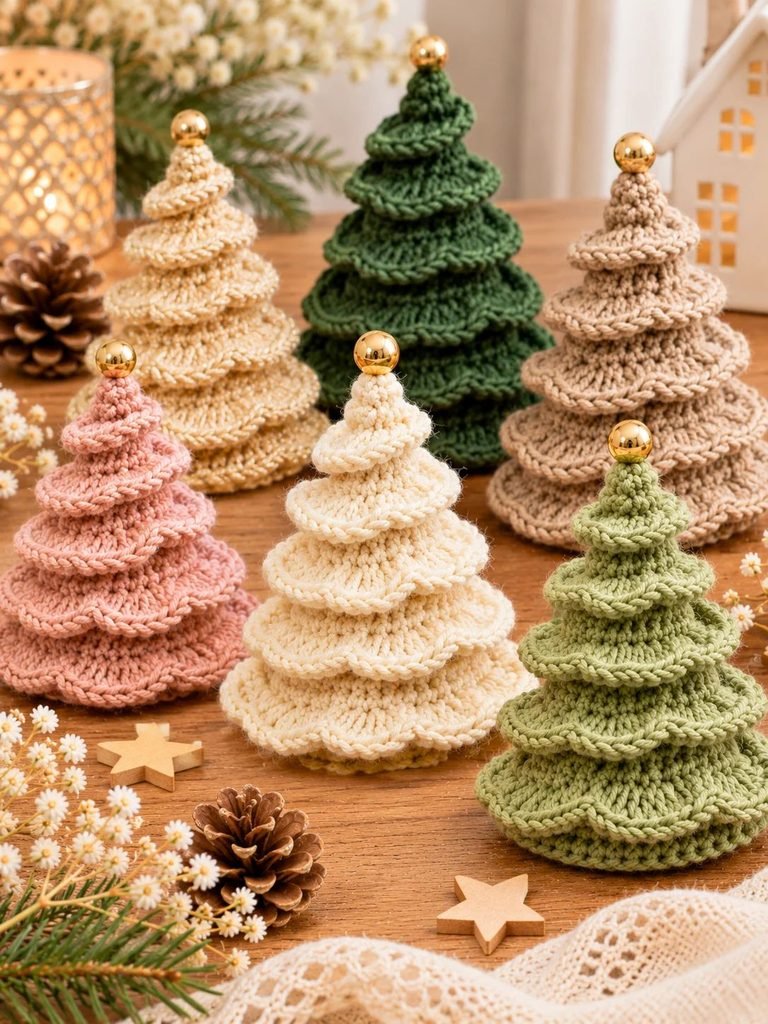
One of the nicest things about this pattern is how easy it is to personalize.
You can change the yarn colors, add little decorations, or adjust the sizes to create something that suits your home.
Here are a few ideas I would love to try.
1. Traditional Christmas Trees
Use deep forest green, classic red, and touches of gold.
These colors create a traditional Christmas look that works beautifully with red table linens and festive decorations.
2. Neutral Scandinavian Trees
Choose cream, oatmeal, beige, and soft taupe yarn.
Keep the decorations simple with wooden beads or tiny natural stars.
These trees look especially lovely in minimalist homes.
3. Pastel Christmas Trees
For something a little softer, try blush pink, dusty lavender, pale blue, and ivory.
This combination creates a sweet, feminine holiday display.
4. Sparkly Christmas Trees
Use yarn with a subtle metallic thread or add a few tiny gold details.
A little sparkle can make your crochet trees look especially pretty when placed beside candles and festive table decorations.
5. Make Different Heights
You don’t have to stop at three trees.
Try making a collection with several different heights and arrange them together to create a miniature crochet Christmas forest.
How to Decorate Your Holiday Table With Crochet Christmas Trees
Once your trees are finished, there are so many lovely ways to display them.
Create a Christmas Table Centerpiece
Arrange three trees of different heights along the middle of your dining table.
Place them on a natural linen runner and add a few pinecones, dried orange slices, and small wooden decorations.
This creates a warm, handmade centerpiece without making the table feel crowded.
Use Them as Individual Place Settings
Place one small crochet tree beside each guest’s dinner plate.
You can add a little name tag or ribbon to make each one feel like a personalized table favor.
Decorate a Christmas Mantel
Arrange your crochet trees alongside candles, miniature houses, and greenery.
Vary the heights to create a balanced display.
Style Your Shelves
These little trees are perfect for adding seasonal charm to bookshelves, side tables, and small decorative corners.
Make Handmade Christmas Gifts
Wrap one or two trees in a small kraft gift box with tissue paper and a ribbon.
They make lovely handmade gifts for crochet lovers, neighbors, teachers, and friends.
Common Crochet Problems and How to Fix Them
Even simple crochet projects can have little challenges. Here are some common issues you might encounter while making your spiral Christmas tree.
Why Is My Tree Leaning to One Side?
This usually happens when the increases are uneven or the stuffing is distributed more heavily on one side.
How to fix it: Check your stitch counts and make sure the stuffing is evenly spread throughout the cone. A small weighted disc inside the base can also help.
Why Are My Ruffles Too Flat?
Your stitches may be too tight, or you may not be adding enough stitches into each shell.
How to fix it: Loosen your tension slightly and make sure you are working all four stitches into the same front loop.
Why Can I See the Stuffing?
This can happen when the crochet fabric is too loose.
How to fix it: Use a smaller hook or crochet with slightly firmer tension. Avoid stretching the stitches while stuffing.
Why Does My Spiral Look Uneven?
Uneven stitch placement or accidentally skipping the wrong front loops can affect the appearance of the spiral.
How to fix it: Follow the exposed front-loop ridge carefully. Use a stitch marker to identify where you started, and check your work every few rounds.
Why Won’t My Tree Stand Upright?
The base may be too soft, or the cone may be overstuffed.
How to fix it: Make sure your base is flat and consider adding a firm cardboard or plastic support inside the bottom.
How to Care for Your Crochet Christmas Trees
Because these are handmade decorations, a little care will help them look beautiful for many Christmas seasons.
- Cleaning: Gently spot-clean with a damp cloth and mild soap when necessary.
- Drying: Allow the tree to air-dry completely before storing it.
- Reshaping: Gently arrange flattened ruffles with your fingers. If necessary, use very light steam from a safe distance, following the yarn manufacturer’s care instructions.
- Storage: Place your trees in a sturdy storage box and wrap them loosely in tissue paper.
- Protection: Avoid placing heavy decorations on top of them, as this can flatten the spiral layers.
Always test any cleaning or steaming method on a small, inconspicuous area first.
Frequently Asked Questions
1. Are Mini Spiral Crochet Christmas Trees Suitable for Beginners?
Yes! This is a lovely project for advanced beginners who understand basic crochet stitches. You should know how to make a magic ring, single crochet, and simple increases. The BLO and FLO techniques are also easy to learn with a little practice.
2. How Much Yarn Do I Need?
These trees use relatively small amounts of DK-weight yarn. As a general guide, allow approximately 45 yards for the small tree, 65 yards for the medium tree, and 90 yards for the large tree.
Actual usage will vary depending on your tension, yarn, and ruffle fullness.
3. Can I Use Acrylic Yarn Instead of Cotton?
Absolutely! DK acrylic yarn works well for this project. Choose a smooth yarn with good stitch definition so that the decorative ruffles remain easy to see.
4. Can I Make the Trees Bigger?
Yes. You can continue adding increase rounds to the inner cone and make a matching larger base. You will also need to extend the spiral decoration to cover the additional exposed loops.
5. Can I Make These Trees Without Stuffing?
The stuffing helps the cone maintain its three-dimensional shape, so I recommend using it. You can experiment with a firmer insert, but the finished appearance may be different.
6. Can I Sell the Finished Crochet Trees?
You can make finished crochet decorations for personal use or gifting. If you intend to sell them, check the terms of any pattern you follow and make sure you have permission where required.
7. What Is the Best Yarn for the Spiral Ruffles?
Smooth DK cotton or cotton-blend yarn is a wonderful choice. It gives the ruffles a neat, defined appearance and helps the layers hold their shape.
Final Thoughts
I hope you enjoy making these adorable mini spiral crochet Christmas trees as much as I enjoy the idea of having them scattered around the house during the holidays.
They are such a lovely way to use leftover yarn while creating something special for your Christmas decorations. Whether you make one little tree for your dining table or a whole collection for your mantel, each one brings a beautiful handmade touch to your home.
Don’t be afraid to experiment with different colors, sizes, and toppers. Sometimes the simplest handmade decorations become the ones we look forward to bringing out every Christmas. Happy crocheting!