DIY Clay Lighters: How to Make Cute and Creative Clay Lighter Covers
Have you ever looked at an everyday item and thought it could use a little personality? That’s exactly how I feel about these adorable clay lighter designs! I love how a little clay, some colourful paint, and a bit of creativity can turn an ordinary object into something fun and unique.
From silly monster faces to cheerful sunshine and dreamy moon designs, these DIY clay lighter covers are such a lovely little crafting project.
If you enjoy making handmade accessories and experimenting with miniature clay decorations, you’re going to have so much fun exploring these ideas with me.
What Are DIY Clay Lighters?
DIY clay lighters are decorative lighter covers made using modelling clay and colourful designs. Instead of leaving a plain disposable lighter looking ordinary, you can create a miniature piece of artwork inspired by your favourite characters, colours, and creative themes.
The idea is to make a decorative clay sleeve or cover that fits around the outside of a lighter’s body. You can sculpt different shapes, add raised facial features, create textured patterns, and paint everything in beautiful colours.
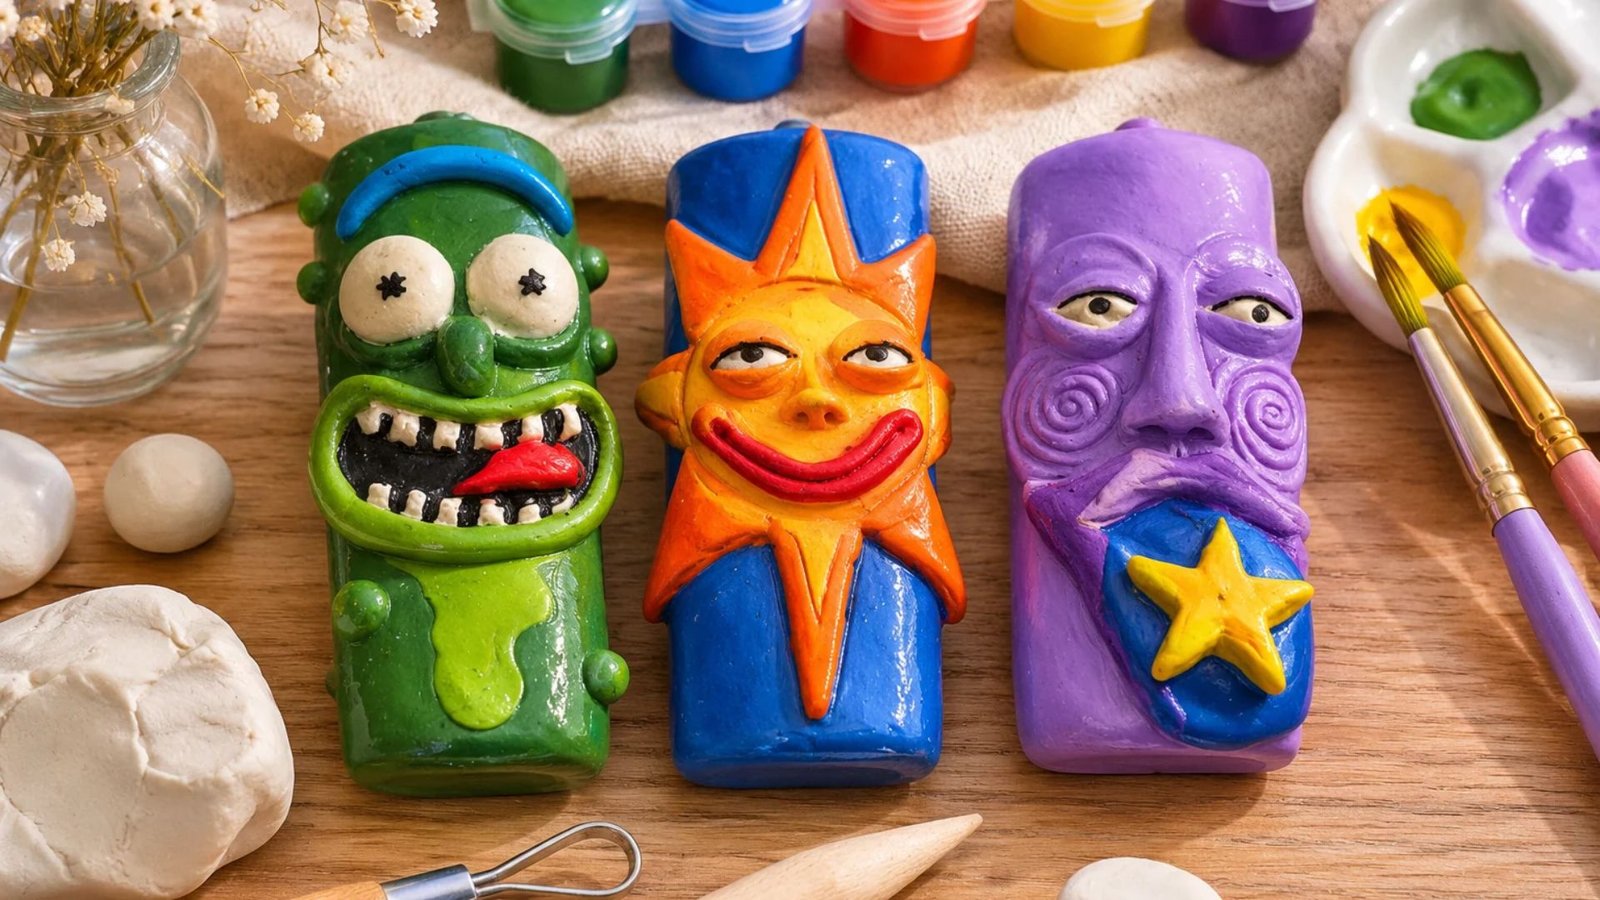
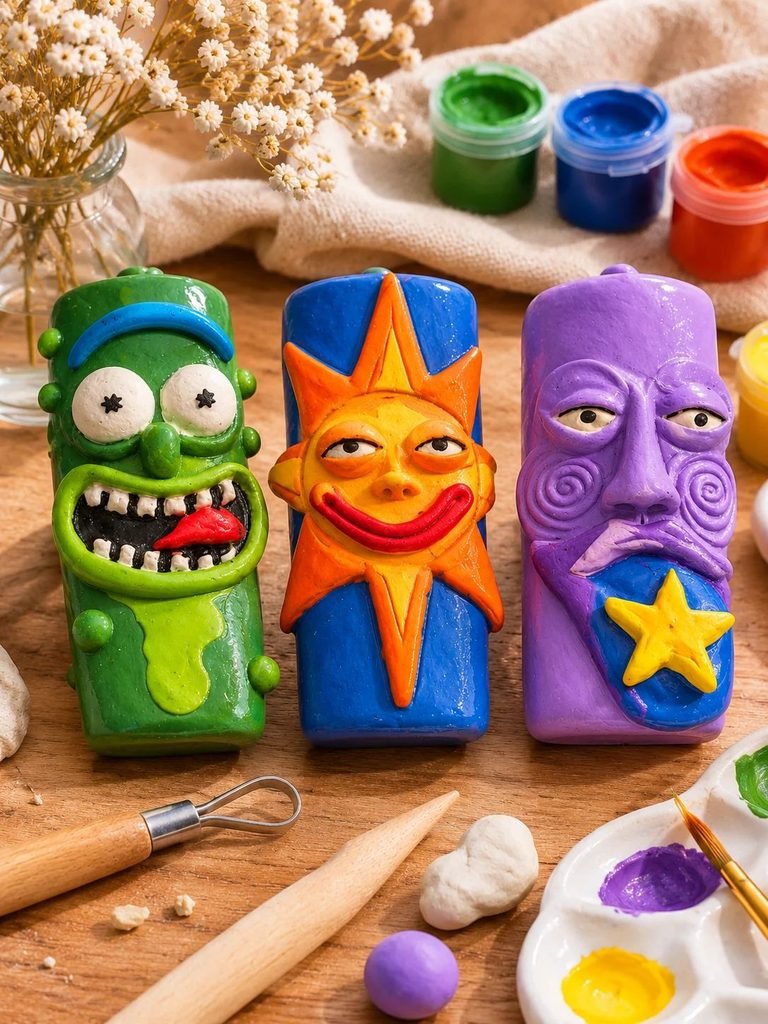
The designs in my inspiration photo are particularly fun because they feature three different characters:
- Green monster lighter: A playful green character with big white eyes, a wide mouth, little teeth, and a bright blue detail.
- Smiling sunshine lighter: A cheerful orange sun with pointed rays, expressive eyes, and a lovely smile against a blue background.
- Purple moon lighter: A dreamy purple character with a crescent-inspired face, spiral details, and a bright yellow star.
Each design has its own personality, which makes this project especially enjoyable if you love experimenting with colours and miniature decorations.
Important safety note: A clay lighter cover should be treated as a decorative craft, not as a functional accessory while the lighter is being operated. Clay, paint, varnish, and decorative attachments can interfere with the ignition mechanism, trap heat, or create a fire hazard.
Make your designs on a separate, non-functional model or empty template of similar dimensions, and display them separately from working lighters. Never cover a working lighter with clay or use a lighter while wearing a homemade clay cover.
Read DIY Clay Gnome
Materials You Will Need
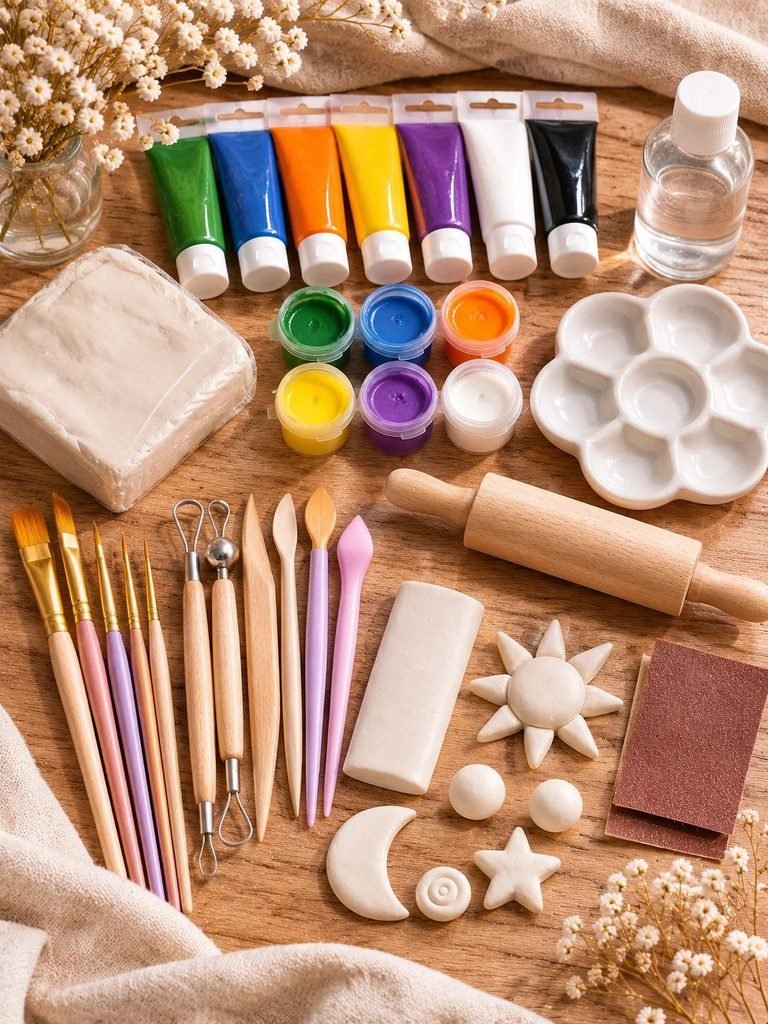
Before getting started, gather your supplies. You don’t need an expensive collection of crafting tools to make these cute miniature designs.
Here are the materials I recommend:
1. Air-Dry Clay or Suitable Modelling Clay
Choose a clay suitable for miniature decorative sculptures. Air-dry clay is a beginner-friendly option because it doesn’t require baking.
You can use it to create:
- Small decorative faces.
- Raised eyes and noses.
- Tiny stars and decorative shapes.
- Textured details.
- Character-inspired embellishments.
For this project, create the decorations on a separate display base or non-functional template rather than directly on a working lighter.
2. Acrylic Paint
Acrylic paint is perfect for adding colour to your finished clay decorations.
For the three inspiration designs, consider gathering:
- Dark and light green.
- Bright blue.
- Orange.
- Yellow.
- Purple.
- White.
- Black.
- Red.
- Cream.
These colours will help you recreate the playful appearance of the original designs.
3. Sculpting Tools
A few simple clay tools will help you achieve neat details.
Useful options include:
- Small silicone sculpting tools.
- Wooden modelling tools.
- A rounded ball tool.
- A toothpick for tiny decorative details.
- A small craft knife for shaping clay before it dries.
Use tools carefully and keep sharp objects away from children.
4. Paintbrushes
You’ll need a small selection of brushes for painting the larger areas and adding tiny details.
A flat brush is useful for larger surfaces, while fine-detail brushes help with eyes, teeth, smiles, and decorative lines.
5. Sandpaper
Fine-grit sandpaper can help smooth rough edges after the clay has dried completely.
Choose a fine grade and work gently to avoid damaging delicate sculpted details.
6. Protective Craft Sealer
A suitable water-based craft sealer can help protect a decorative sculpture from dust and minor surface marks.
Choose a product specifically recommended for your clay and paint. Allow everything to dry fully before applying it.
A sealer does not make the decoration fireproof or safe to use around a flame.
7. Other Helpful Supplies
You may also want:
- A clean crafting mat.
- A small rolling pin.
- A ruler.
- A pencil.
- A mixing palette.
- A cup of clean water for suitable water-based clay.
- A soft cloth.
- Baking paper for keeping your workspace clean.
Choosing Your Clay Lighter Design
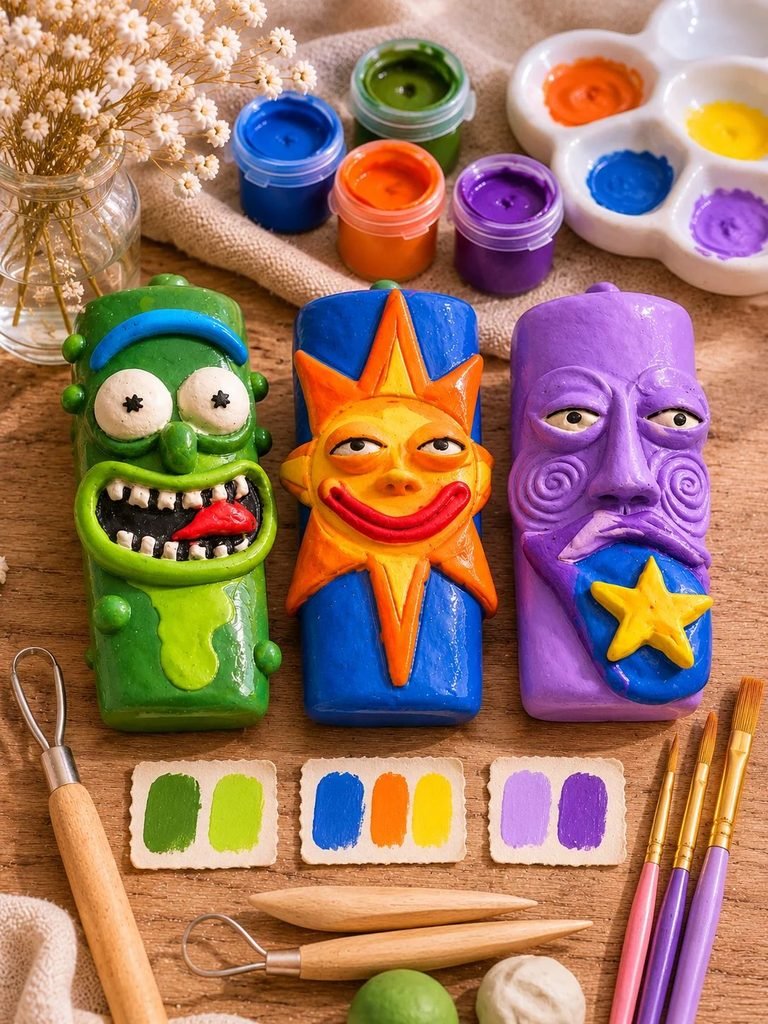
One of my favourite things about this project is how easily you can change the appearance of each design.
Rather than making all your decorations look the same, you can experiment with different characters and colour combinations.
Here are three lovely designs inspired by your reference photo.
1. DIY Green Monster Clay Design
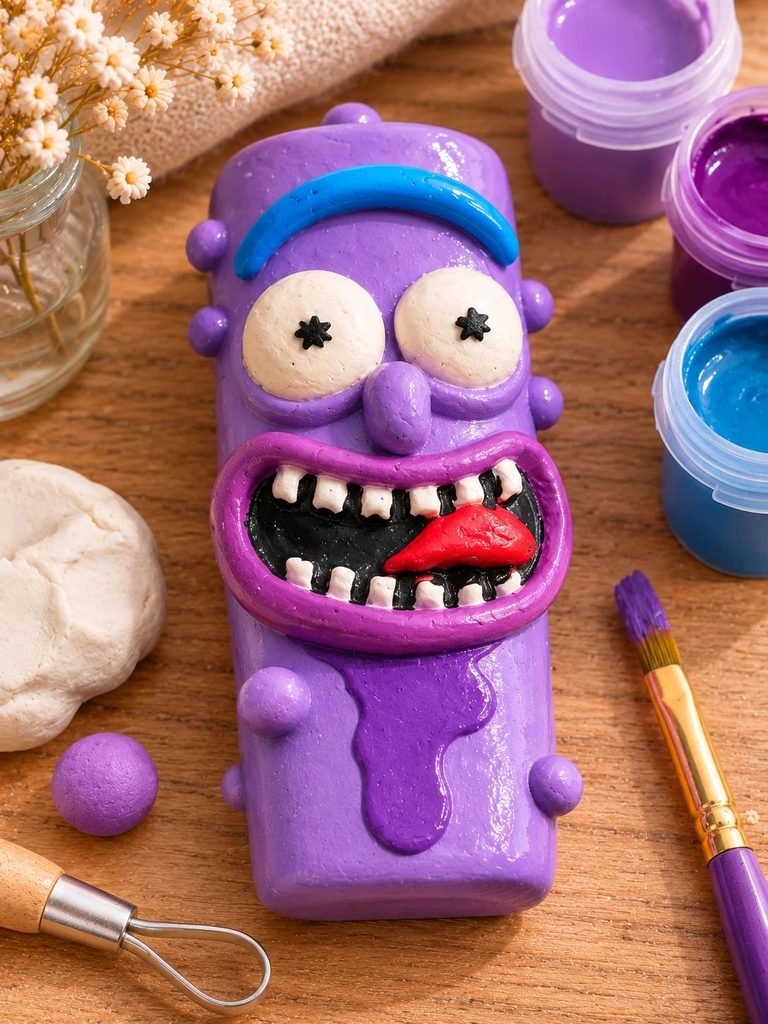
The green monster is probably the most playful design of the three. It has oversized eyes, a funny expression, a wide mouth, and little teeth that give it a wonderfully silly personality.
This is a great design if you enjoy sculpting small facial features.
Colours to use:
- Dark green.
- Light green.
- White.
- Black.
- Red.
- Bright blue.
How to create the look:
Start by preparing a separate miniature display base with a rounded rectangular shape. Smooth the clay with your fingers or a modelling tool until the surface looks neat.
Allow the base to dry according to the clay manufacturer’s instructions.
Once dry, paint the main surface dark green. You can add a few irregular light-green patches to give the character a playful monster-inspired appearance.
Next, make two small rounded white clay pieces for the eyes. Allow them to dry separately before attaching them to the decorative display base with an appropriate craft adhesive.
Add tiny black pupils using a fine paintbrush.
For the mouth, sculpt a slightly curved, elongated shape using dark clay. Add small white teeth along the edges and a little red tongue to make the expression more interesting.
Finally, add a raised green eyebrow or curved detail around the eyes to make the character look more expressive.
Helpful tip: Don’t worry about making the monster perfectly symmetrical. Slightly uneven eyes and a funny smile can make the character look even more charming.
Read How to Make Air-Dry Clay Christmas Ornaments by Embossing Them
2. DIY Smiling Sunshine Clay Design
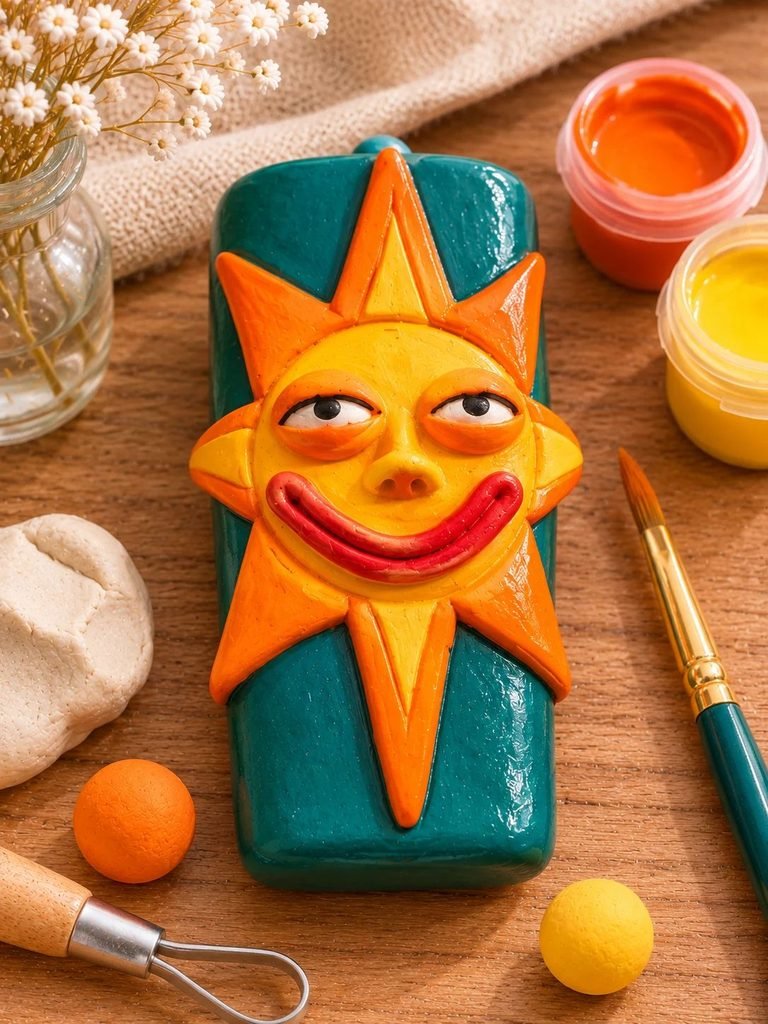
The sunshine design is cheerful, bright, and surprisingly easy to customise.
I especially love the combination of orange and blue because it makes the sun stand out beautifully.
Colours to use:
- Bright orange.
- Warm yellow.
- White.
- Black.
- Red.
- Royal blue.
How to create the look:
Begin by preparing a small rounded rectangular display base.
Sculpt a circular sun face from orange or yellow clay. Smooth the edges with your fingers and create a slightly raised surface in the centre.
Next, create several pointed sun rays using small pieces of orange clay. Make each ray slightly elongated, with a pointed end.
Arrange the rays around the circular face on your separate decorative base, leaving a little space between them for a neat appearance.
After the clay has dried, paint the sun’s face using a warm orange or golden-yellow shade.
Add two small white eye shapes and carefully paint black pupils.
For the smile, use red or dark pink paint to create a curved line. You can also add a tiny nose and subtle cheek details.
Paint the surrounding display area bright blue to recreate the colourful contrast in the reference image.
Helpful tip: Use a fine paintbrush to create the facial expression. It’s much easier to control small details with a thin brush than with a larger one.
3. DIY Purple Moon and Star Clay Design
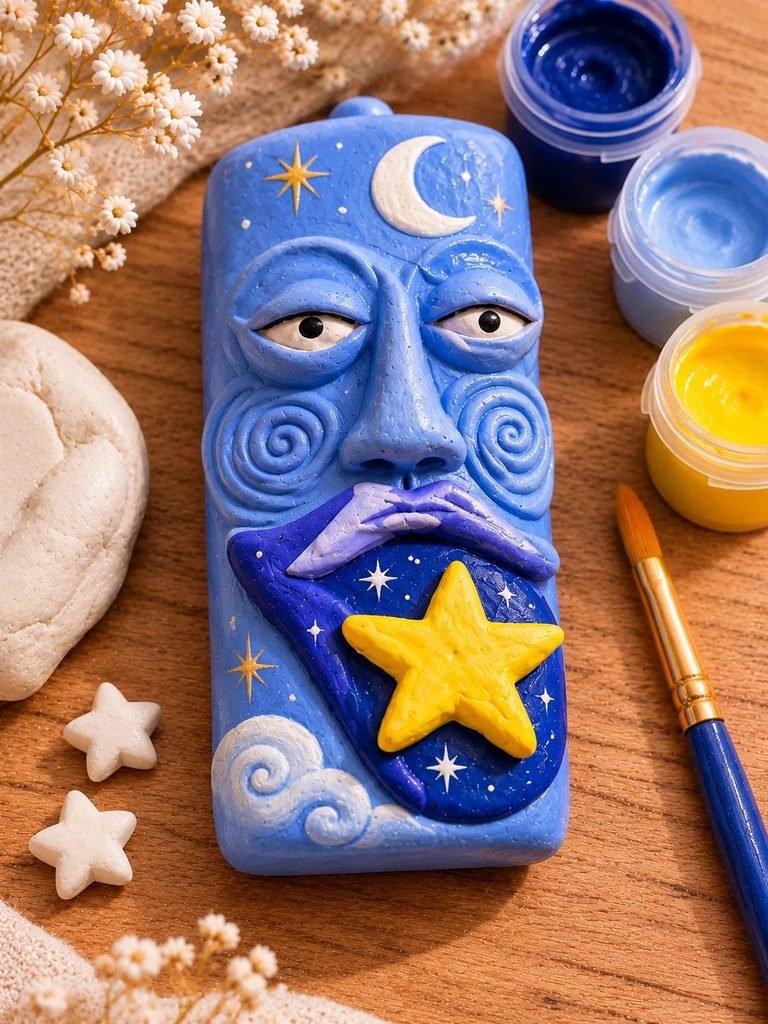
The purple moon design has a dreamy, whimsical appearance. It’s a lovely choice if you enjoy celestial decorations and softer colour combinations.
The spiral details and bright yellow star make this design especially interesting.
Colours to use:
- Lavender.
- Deep purple.
- White.
- Black.
- Yellow.
- Blue.
How to create the look:
Start with a small decorative base made from air-dry clay. Smooth the surface and allow it to dry completely.
Sculpt a raised purple crescent-inspired face using a separate piece of clay. Give it a gentle curved shape and position it on the display base.
Create two small eye shapes and add dark pupils after the clay has dried.
For the decorative swirls, roll thin pieces of purple clay into tiny coils. Arrange them around the character’s face to create a raised spiral effect.
Next, sculpt a small five-pointed star from yellow clay.
You can make the star slightly raised to give it a beautiful three-dimensional appearance.
Paint the surrounding background blue, and use different shades of purple to create depth around the moon’s face.
Finish the eyes with white and black paint to make them stand out.
Helpful tip: Lavender, lilac, and deep purple work beautifully together. You can mix different shades to create a softer, more interesting celestial design.
How to Make Decorative Clay Lighter Covers: Step-by-Step Crafting Guide
Once you’ve chosen your favourite character, it’s time to start creating.
For safety, the following instructions use a separate decorative display model rather than a working lighter.
Step 1: Prepare Your Workspace
Start by cleaning your crafting table and laying down a protective mat.
Gather all your clay, sculpting tools, paintbrushes, and colours so everything is within easy reach.
It’s also helpful to keep a small container of water nearby if you’re working with air-dry clay that can be smoothed with water.
Make sure your workspace is well ventilated, particularly when using paint, adhesives, or sealers.
Step 2: Create Your Decorative Base
Take a small piece of clay and gently shape it into a rounded rectangular form.
You can use a non-functional display template to help you achieve the general proportions you want.
Smooth the surface using your fingers or a sculpting tool.
Check the edges carefully and remove any unwanted fingerprints or rough sections.
The base should look neat before you begin adding the character details.
Step 3: Sculpt the Character Features
This is where the project becomes exciting!
Choose the face you want to create and prepare the individual pieces separately.
For the monster, make the eyes, mouth, teeth, and tongue.
For the sunshine, prepare the circular face and pointed rays.
For the moon, create the curved face, small eyes, decorative swirls, and star.
Working with separate pieces gives you more control over the final design.
Step 4: Add Texture and Dimension
One thing that makes the inspiration designs so appealing is their raised, three-dimensional appearance.
Instead of painting every feature flat onto the base, use small clay additions to create depth.
You can make:
- Raised eyebrows.
- Rounded cheeks.
- Little bumps.
- Spiral decorations.
- Textured borders.
- Raised stars and flowers.
Use a small sculpting tool to smooth the joins between clay pieces where appropriate.
Step 5: Allow the Clay to Dry
Drying is one of the most important parts of working with air-dry clay.
Follow the drying instructions provided by your clay manufacturer.
Depending on the thickness, humidity, and type of clay, drying may take several hours or a few days.
Avoid rushing this process with excessive heat.
Check that the entire decoration is dry before moving on to painting.
Step 6: Smooth the Surface
Once your clay is fully dry, inspect it for rough patches or uneven edges.
Use fine-grit sandpaper to gently smooth any areas that need attention.
Work slowly, particularly around delicate features such as teeth, eyes, and thin decorative details.
Remove the dust with a soft, dry brush before painting.
Step 7: Paint the Main Colours
Begin by painting the largest areas first.
For example:
- Paint the monster green.
- Paint the sunshine blue and orange.
- Paint the moon lavender and purple.
Allow each coat to dry before adding another.
Two thin coats often produce a smoother finish than one thick coat.
Step 8: Add the Tiny Details
Once the main colours are completely dry, use a fine brush to add the facial features.
Pay particular attention to:
- Eye pupils.
- Teeth.
- Smiles.
- Eyebrows.
- Spiral decorations.
- Star outlines.
Take your time with these details. They are what give each character its personality.
Step 9: Apply a Decorative Finish
If you want your finished sculpture to have a slightly glossy appearance, apply a compatible water-based craft sealer.
Follow the product instructions carefully and allow the coating to dry fully.
Remember that decorative sealers are not heat-resistant or fireproof.
Step 10: Display Your Finished Designs
Once all the components are completely dry, arrange your finished clay decorations on a small craft display stand.
You can make a collection featuring all three characters or experiment with different designs.
Keep the decorative sculptures separate from working lighters, flames, and heat sources.
More Cute Clay Lighter Design Ideas to Try
Once you’ve tried the monster, sunshine, and moon designs, you can experiment with other fun characters.
Here are some additional ideas:
1. Cute Pink Smiley Face
Create a round pink face with oversized eyes, rosy cheeks, and a little smile.
2. Mini Strawberry Character
Use red clay for the strawberry shape, green for the leaves, and tiny white or yellow details for the seeds.
3. Pastel Rainbow
Create a colourful rainbow with raised clouds at each end.
4. Little Mushroom Character
Use a rounded red or blush mushroom cap, a cream stem, and tiny painted spots.
5. Purple Butterfly
Sculpt two pairs of wings and decorate them with small raised dots and delicate painted patterns.
6. Sleepy Cloud
Use white or pale blue clay to make a fluffy cloud with closed eyes and pink cheeks.
7. Daisy Flower
Create a yellow centre surrounded by small white petals.
8. Cute Ghost
Make a simple white ghost shape with two tiny black eyes and a playful expression.
9. Blue Star Character
Create a raised blue star with a little face and contrasting yellow details.
10. Miniature Cat Face
Use cream, blush, or grey clay to create a cat-inspired character with little ears, whiskers, and a tiny nose.
Tips for Getting a Beautiful Clay Finish
If you want your finished designs to look neat and professional, there are a few little things worth keeping in mind.
Work with small amounts of clay. Miniature projects are easier to control when you add details gradually.
Keep your hands clean. Clay easily picks up dust, paint, and other colours, especially when you’re working with lighter shades.
Make the details separately. Creating the eyes, stars, teeth, and other decorative elements separately gives you more control.
Use thin layers of paint. Applying several thin coats helps prevent visible brush marks and uneven patches.
Choose colours carefully. A balanced colour palette can make even a simple character look beautiful.
Allow enough drying time. Never paint or seal clay that is still damp.
Take photographs as you work. This is especially helpful if you’re making several designs and want to remember how you arranged the individual pieces.
Common Mistakes to Avoid
Even simple clay projects can have a few challenges. Here are some mistakes to watch out for.
1. Making Decorative Details Too Thick
Large clay details can take longer to dry and may crack if the moisture escapes unevenly.
Try to keep miniature features reasonably thin and proportionate.
2. Painting Before the Clay Is Dry
Painting damp air-dry clay can cause problems with the finish.
Always allow the clay to dry fully before adding acrylic paint.
3. Using Too Much Water
A little water can help smooth suitable air-dry clay, but too much can make it sticky and difficult to shape.
Use water sparingly.
4. Applying Thick Layers of Sealer
Thick coats can create an uneven finish or visible drips.
Follow the manufacturer’s directions and apply thin, even coats.
5. Making the Design Too Complicated
It’s tempting to add lots of little details, but too many decorations can make a miniature project look crowded.
Choose one main character feature and build the design around it.
6. Attaching Decorations to a Working Lighter
This is an important mistake to avoid.
Clay decorations, paint, adhesives, and protective coatings can interfere with a lighter’s operation and create additional fire and heat risks.
Never attach homemade clay covers to a functioning lighter for use. Keep your finished creations as separate decorative sculptures.
Frequently Asked Questions
Can You Use Air-Dry Clay to Make Clay Lighter Covers?
Yes, air-dry clay can be used to make decorative miniature sculptures inspired by lighter covers. It is easy to shape and doesn’t require baking. However, the finished clay should remain a separate decorative piece rather than being attached to a working lighter.
Do I Need Special Sculpting Tools?
No. You can get started with basic modelling tools, a small rolling pin, a toothpick, and your fingers.
Specialist silicone tools are helpful for creating finer details, but they aren’t essential.
Can I Paint Air-Dry Clay With Acrylic Paint?
Yes. Acrylic paint is commonly used to decorate fully dried air-dry clay. Apply thin coats and allow each layer to dry before adding more details.
How Long Does Air-Dry Clay Take to Dry?
Drying time depends on the brand, thickness, humidity, and surrounding temperature.
Small, thin decorations may dry relatively quickly, while thicker sculptures can take several days. Always follow the manufacturer’s instructions.
How Can I Make My Clay Designs Look Glossy?
You can use a compatible water-based glossy craft sealer to give a decorative clay sculpture a shiny finish.
Make sure the paint and clay are completely dry before applying it.
Can Beginners Make These Designs?
Absolutely! These designs are suitable for beginners who want to practise basic clay sculpting techniques.
Start with simple shapes such as the sunshine or smiling cloud before moving on to more detailed characters like the green monster.
Are Clay Lighter Covers Safe to Use?
Homemade clay covers should not be used on working lighters. Clay and decorative coatings can interfere with operation, retain heat, or come into contact with the flame.
Keep the finished creations as decorative display pieces, away from working lighters and heat sources.
Final Thoughts
I absolutely love how much personality you can create with a little clay and a few beautiful colours. The green monster, cheerful sunshine, and dreamy purple moon are wonderful examples of how simple sculpting techniques can turn an ordinary craft idea into something special. If you’re just starting with miniature clay projects, don’t worry about getting every detail perfect on your first try. Experiment with different expressions, colours, and shapes, and enjoy the creative process. You might even discover a whole collection of adorable little clay characters you’d love to make next!
A little reminder: Keep your finished clay creations as decorative sculptures and never use them as covers on functioning lighters. Creativity is always more enjoyable when safety comes first.