10 Air Dry Clay Bird Ideas for a Unique Craft Style

I have always loved how little handmade decorations can make a home feel warmer and more personal.
Birds are especially lovely because their delicate shapes, beautiful colors, and natural charm fit so many decorating styles.
If you enjoy creating something with your hands, air-dry clay birds are a wonderful project to try. You don’t need a pottery wheel or a kiln, just a little clay, a few simple tools, and some imagination.
Whether you prefer soft cottagecore decorations, colorful garden-inspired designs, or sweet little ornaments, these air-dry clay bird ideas will help you create pieces that feel special and uniquely yours.
Why Make Birds with Air-Dry Clay?

Air-dry clay is a fantastic material for beginners because it hardens naturally without requiring a kiln. It is easy to shape by hand, making it suitable for creating simple bird figures, decorative ornaments, and more detailed sculptures.
Birds are also wonderfully versatile. You can make them realistic, playful, minimalist, or whimsical depending on your preferred style. A small clay bird can decorate a bookshelf, brighten a windowsill, sit beside a houseplant, or become a thoughtful handmade gift.
Here are a few reasons to try this craft:
- Beginner-friendly: Most bird designs can be made with simple shapes and basic tools.
- Easy to personalize: Experiment with colors, textures, patterns, and different bird shapes.
- Budget-friendly: You can create several decorations from one package of clay.
- Perfect for gifting: Handmade birds make charming birthday gifts, seasonal decorations, and small keepsakes.
- Suitable for different styles: Choose rustic, modern, Scandinavian, cottagecore, or colorful designs.
The best part is that your birds don’t need to look perfect. Small handmade details often give each piece its own character.
Supplies You’ll Need
Before starting your projects, gather a few basic materials. You probably won’t need every tool for every design, so begin with what you already have.
Essential supplies
- Air-dry clay, white or natural-colored
- A small rolling pin or smooth bottle
- A craft knife or plastic modeling tool
- A wooden skewer or toothpick
- A small cup of water
- A soft paintbrush
- Acrylic paints in your preferred colors
- Fine-grit sandpaper
- Clear acrylic sealer or suitable craft varnish
- Baking paper or a nonstick work surface
Optional decorative supplies
- Small texture stamps
- Rubber stamps
- Ribbon or twine
- Fine brushes for details
- Gold or metallic acrylic paint
- Craft glue for appropriate finishing attachments
Keep a damp cloth nearby to clean your fingers and tools. Avoid adding too much water to the clay because excess moisture can make shaping difficult and may contribute to cracking during drying.
1. Minimalist White Clay Birds

[Image suggestion: A collection of small ivory air-dry clay birds arranged on a warm wooden shelf with dried flowers and neutral pottery.]
If you love a calm, neutral home, minimalist white clay birds are a beautiful place to begin. Their simple shapes and understated finish look elegant without overwhelming your existing decor.
This design works especially well with Scandinavian, modern farmhouse, and cottagecore interiors.
What you’ll need
- White air-dry clay
- A wooden skewer
- A little water
- Fine sandpaper
- Optional matte varnish
How to make them
Step 1: Shape the body. Take a small piece of clay and roll it into an oval. Gently taper one end to create the tail.
Step 2: Form the head. Pinch the opposite end upward to create a rounded head. You can also add a small ball of clay if you prefer a more defined neck.
Step 3: Add the beak. Pinch a tiny triangular point at the front. Keep it short and simple for a soft, elegant appearance.
Step 4: Define the wings. Use your fingertip or a modeling tool to create shallow curved lines on either side of the body.
Step 5: Smooth the surface. Lightly smooth fingerprints and rough edges with a barely damp finger.
Allow the bird to dry completely according to the clay manufacturer’s instructions. Once dry, lightly sand any rough areas and leave the bird natural or apply a suitable matte finish.
Styling tip: Make three birds in slightly different sizes and arrange them together on a mantel or floating shelf.
2. Cottagecore Floral Clay Birds

[Image suggestion: Cream clay birds decorated with delicate blush flowers, tiny green leaves, and subtle botanical details on a linen-covered craft table.]
Floral clay birds are perfect if you love soft colors, delicate patterns, and romantic handmade decorations. They combine the charm of little bird sculptures with the beauty of garden-inspired details.
You can decorate these birds with tiny flowers, painted leaves, or raised botanical shapes.
How to make them
- Shape the body from an oval piece of clay and form a small head and beak.
- Flatten two small pieces of clay into teardrop-shaped wings.
- Attach the wings by lightly scoring both surfaces, applying a small amount of water, and pressing them into place.
- Create tiny flowers using small clay balls or flattened petals.
- Arrange the flowers along the wings, chest, or head.
- Smooth the joins gently without flattening the flower details.
Allow the bird to dry thoroughly before painting. Use ivory or cream as the base color, then add blush pink flowers and sage-green leaves.
For an even simpler version, paint the flowers directly onto the dried bird using a fine brush.
Styling tip: Place a floral clay bird beside a small vase of dried flowers or use it as part of a spring-inspired shelf display.
Read 15 Functional Air Dry Clay Projects You’ll Actually Use
3. Colorful Painted Songbirds
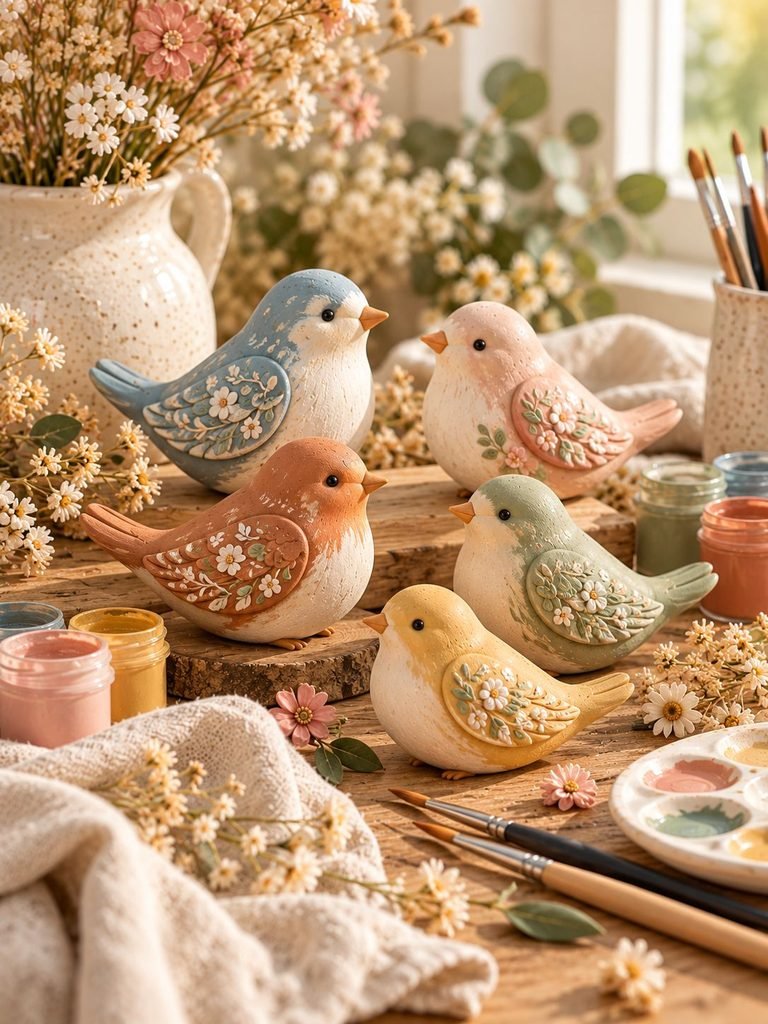
[Image suggestion: Small handmade clay songbirds painted in dusty blue, terracotta, mustard yellow, sage green, and muted pink.]
If you enjoy working with color, painted songbirds are a lovely way to experiment with different palettes. You can take inspiration from robins, bluebirds, finches, or your favorite garden visitors without needing to reproduce every detail accurately.
These little birds look especially cheerful when displayed together.
How to make them
Step 1: Shape a rounded body with a slightly raised head and a pointed tail.
Step 2: Add a small beak and shallow wing shapes. Keep the features simple so the paint can do most of the work.
Step 3: Dry the sculpture completely. Larger or thicker pieces may need several days, depending on the clay and humidity.
Step 4: Apply a thin base coat of acrylic paint. Choose one main color for the body.
Step 5: Paint contrasting wings, a lighter chest, and a small beak.
Step 6: Add two tiny eyes with the tip of a fine brush or a toothpick.
Let each layer dry before adding another. Two thin coats usually produce a more even finish than one thick coat.
Color idea: Try dusty blue with a cream chest, terracotta with a pale peach belly, or sage green with mustard-yellow wings.
Styling tip: Display several different colors in a wooden bowl or arrange them along a windowsill for a playful handmade collection.
4. Rustic Textured Clay Birds
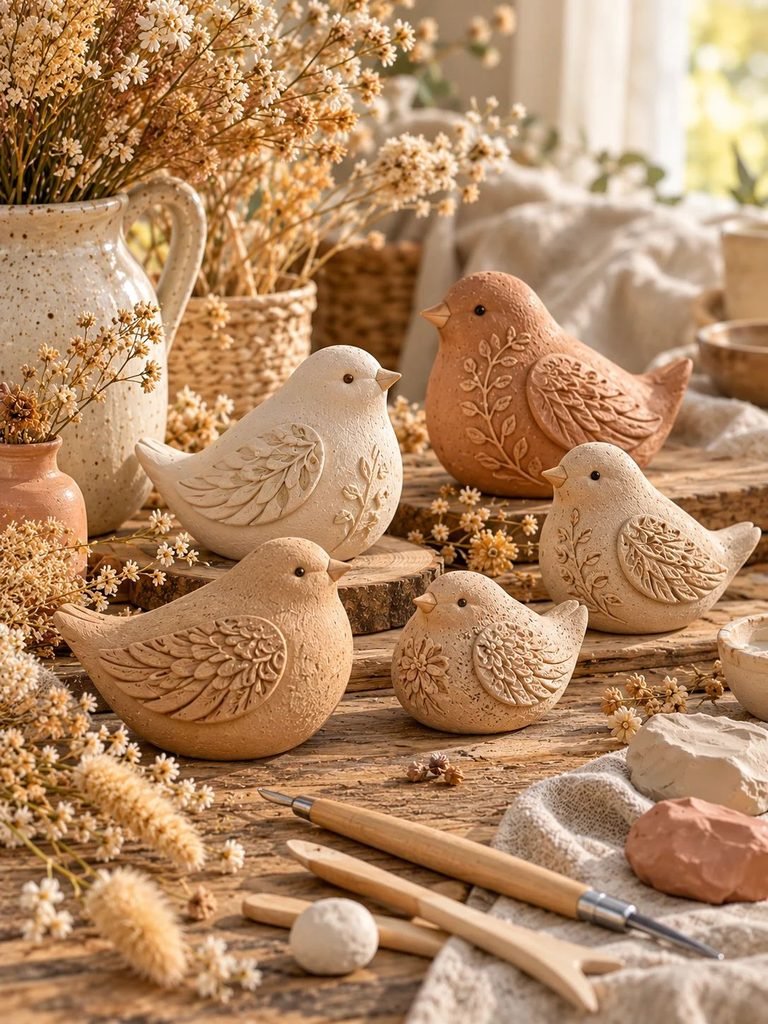
[Image suggestion: Natural beige clay birds with carved feather lines, subtle speckling, and earthy textures arranged beside linen fabric and dried grasses.]
Rustic clay birds have a wonderfully natural appearance. Instead of relying on bright colors or elaborate decoration, this design uses texture to create interest.
It is a good choice if you prefer earthy materials and simple, organic shapes.
How to make them
- Roll your clay into a rounded oval.
- Shape one end into a head and the other into a small tail.
- Use a wooden skewer to draw gentle curves where the wings would sit.
- Add short lines to suggest feathers, working in the same direction for a natural look.
- Press a small piece of textured fabric or a leaf gently against the clay to create a subtle surface pattern.
- Smooth any unwanted marks around the beak and head.
Avoid pressing too deeply because thin carved areas can weaken as the clay dries.
Once completely dry, leave the bird in its natural color or apply a thin wash of diluted brown or beige acrylic paint. Wipe away some of the paint while it is still workable to emphasize the texture.
Styling tip: Pair rustic birds with wooden trays, woven baskets, dried grasses, and neutral ceramics.
5. Tiny Clay Bird Ornaments
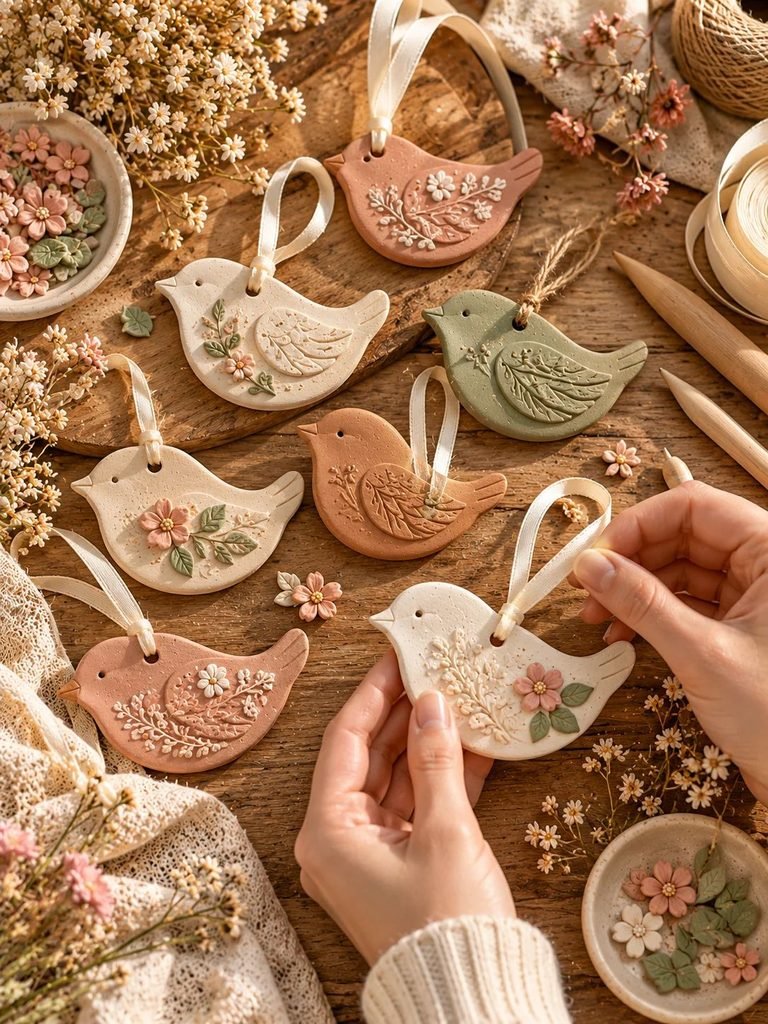
[Image suggestion: Small handmade clay bird ornaments with neat hanging holes, cream ribbon, delicate painted details, and natural twine.]
Tiny clay birds are ideal for seasonal decorating, handmade gift wrapping, and personalized keepsakes. Because they are small, you can experiment with several designs without using much clay.
These ornaments can be made in simple bird silhouettes or shaped as miniature three-dimensional figures.
How to make them
Step 1: Roll out the clay. Aim for an even thickness so the ornament dries consistently.
Step 2: Cut the shape. Use a bird-shaped cutter if you have one, or shape the outline by hand with a craft knife.
Step 3: Add details. Press in wing outlines, small feather marks, or a simple floral pattern.
Step 4: Make a hanging hole. Use a straw or skewer to create a hole near the top before the clay dries. Keep enough clay around the hole so it does not tear.
Step 5: Dry completely. Turn the ornament carefully if the underside needs additional drying time.
Step 6: Paint and finish. Use soft pastel shades, neutral colors, or seasonal patterns. Thread ribbon or twine through the hole only after the ornament is fully dry.
These ornaments can also become gift tags. You can stamp a short name or initial into the clay before drying.
Important: Air-dry clay ornaments are decorative rather than waterproof, so keep them away from rain and damp conditions.
6. Boho-Inspired Clay Birds with Gold Details
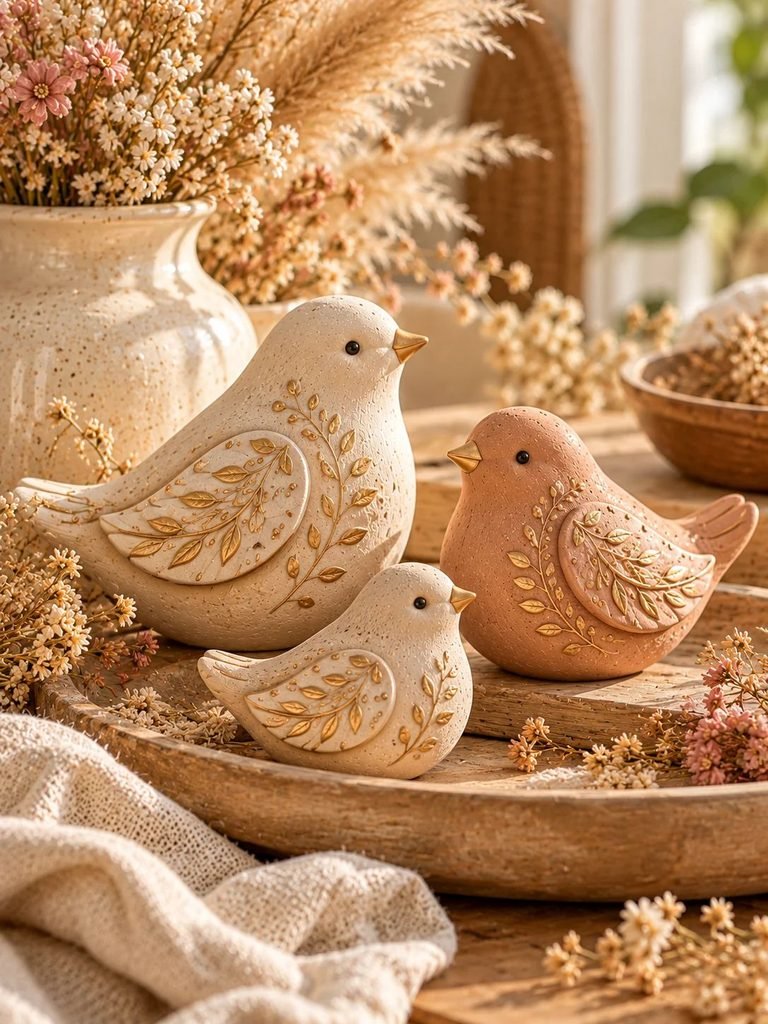
[Image suggestion: Sculpted cream clay birds with simple feather patterns and delicate gold accents displayed on a neutral decorative tray.]
For a more sophisticated look, try boho-inspired birds with warm neutral colors and small metallic details. This style works beautifully with natural wood, woven textures, linen, and simple decorative objects.
The trick is to use gold sparingly so the birds feel elegant rather than overly decorated.
How to make them
- Shape a bird with a rounded body, gently curved head, and short tail.
- Add simple wing outlines using a modeling tool.
- Let the clay dry completely.
- Sand any rough edges lightly.
- Paint the bird in cream, beige, warm white, or pale terracotta.
- Once the paint is dry, use a fine brush to add small gold lines along the wings or tail.
- Finish with a compatible clear varnish if desired.
You can also create tiny dots around the wings or add a narrow gold line along the back.
Design tip: Use matte paint for the main body and metallic paint only for the accents. The contrast gives the finished bird a polished appearance.
Styling tip: Place a gold-accented bird on a bedside table, a decorative tray, or a shelf with neutral books and a small vase.
7. Sweet Little Robin Clay Birds
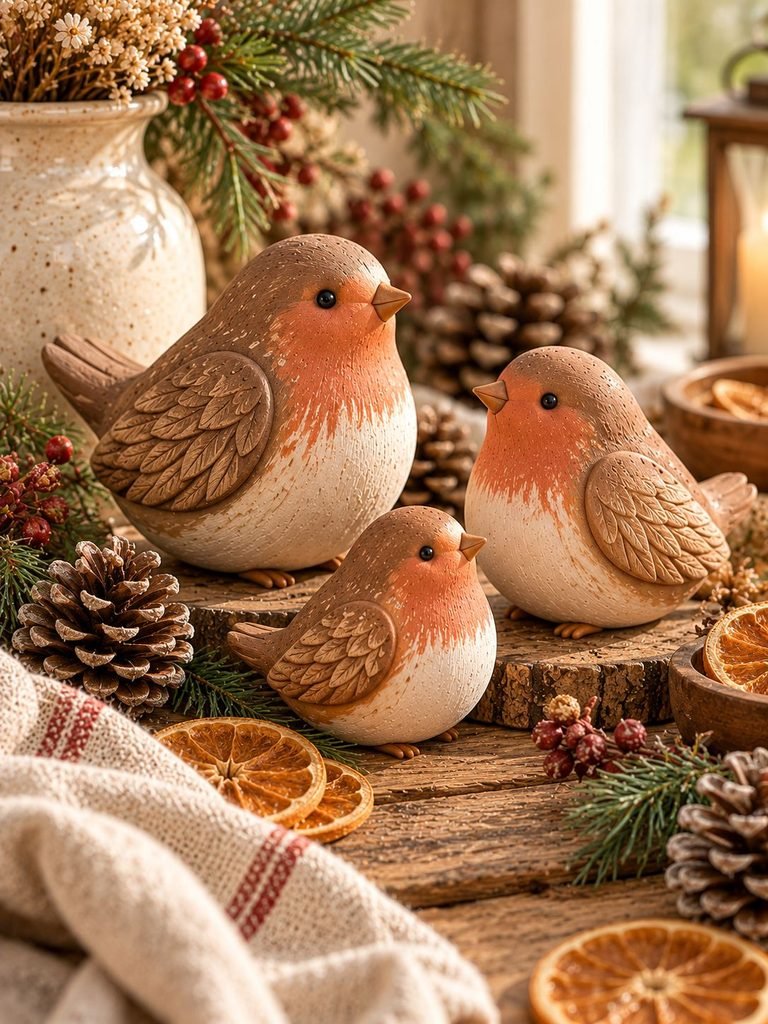
[Image suggestion: A group of handmade clay robins with warm brown backs, soft cream bellies, and muted terracotta-red chests.]
Robins are a lovely source of inspiration because their rounded bodies and warm chest colors make them easy to recognize. A handmade robin is especially charming during autumn and winter, although it can be displayed throughout the year.
How to make them
Step 1: Shape a plump oval body and raise the front slightly to form the head.
Step 2: Add a tiny pointed beak. Keep it proportional to the body.
Step 3: Form two small wings from flattened pieces of clay and attach them securely.
Step 4: Dry the sculpture completely before painting.
Step 5: Paint the back and wings brown, the belly cream, and the chest a muted rusty orange.
Step 6: Add small black eyes and a darker line beneath the beak if you want extra definition.
For a softer cottage-style finish, choose muted brown and terracotta instead of very bright colors.
You can make a small family of robins in different sizes to create a sweet seasonal display.
Styling tip: Pair these birds with pinecones, dried orange slices, or natural greenery for a cozy winter arrangement.
8. Modern Geometric Clay Birds

[Image suggestion: Contemporary sculptural clay birds with simplified angular wings, smooth surfaces, and monochromatic cream, charcoal, and terracotta finishes.]
If you prefer a more modern decorating style, geometric clay birds offer a fresh alternative to traditional rounded figures. Their simple lines and sculptural shapes make them look like small pieces of contemporary art.
This design is also helpful for beginners because it does not require intricate feather details.
How to make them
- Roll the clay into a compact oval or rounded triangular shape.
- Flatten the bottom slightly to create a stable base.
- Shape the head as part of the body rather than attaching a separate piece.
- Pinch one end into a short beak and taper the other end into a tail.
- Press two shallow angular lines into the sides to suggest wings.
- Smooth the surfaces and check that the bird stands upright.
If you need to attach separate pieces, score the joining surfaces and use a little clay slip made from the same clay mixed with water. Press the pieces together and blend the edges.
Once dry, paint the birds in a single color or use two complementary shades.
Color combinations to try:
- Warm white and charcoal
- Terracotta and cream
- Sage green and ivory
- Dusty blue and pale gray
Styling tip: Display one larger bird beside two smaller ones on a clean shelf. Leaving space around the sculptures helps emphasize their shape.
9. Whimsical Fantasy Clay Birds
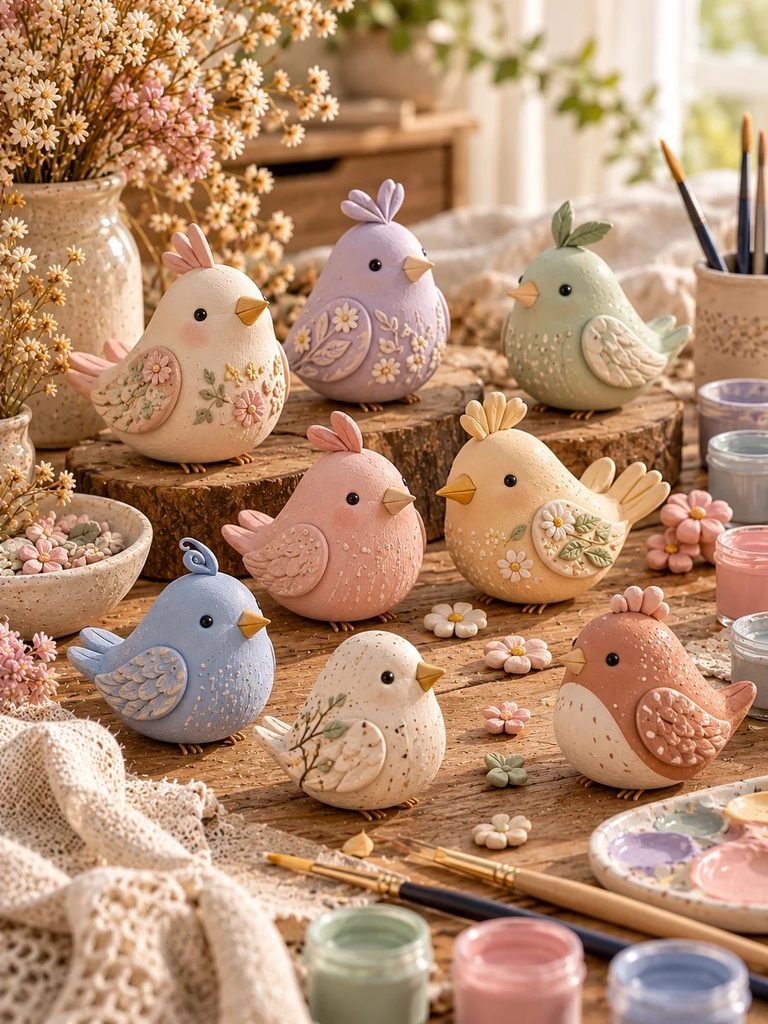
[Image suggestion: Imaginative handmade clay birds with oversized heads, tiny wings, pastel colors, playful crests, and decorative dots.]
Not every bird needs to look realistic. Whimsical birds are a wonderful opportunity to let your imagination lead the way.
You can create birds with oversized heads, unusual beaks, little crests, patterned wings, or colors inspired by a favorite storybook.
This is one of my favorite styles to recommend to anyone who feels nervous about making their sculpture look perfect. With a whimsical design, unusual shapes and playful details become part of the charm.
How to make them
Step 1: Create a playful body. Start with a rounded or pear-shaped piece of clay.
Step 2: Add an oversized head. Form a separate rounded piece and attach it using scoring and clay slip.
Step 3: Shape the beak. Try a long pointed beak, a tiny triangular beak, or a curved beak.
Step 4: Add character. Create a small crest, a curled tail, or exaggerated wings.
Step 5: Decorate the surface. Press in dots, lines, tiny hearts, or flower shapes.
Step 6: Dry and paint. Choose pastel pink, lavender, mint green, pale yellow, or any color combination you love.
A simple pair of black eyes and rosy cheeks can make a tiny sculpture feel full of personality.
Styling tip: These birds make adorable desk decorations, handmade gifts, and playful additions to a craft room.
10. Clay Bird Families for Shelf Decor
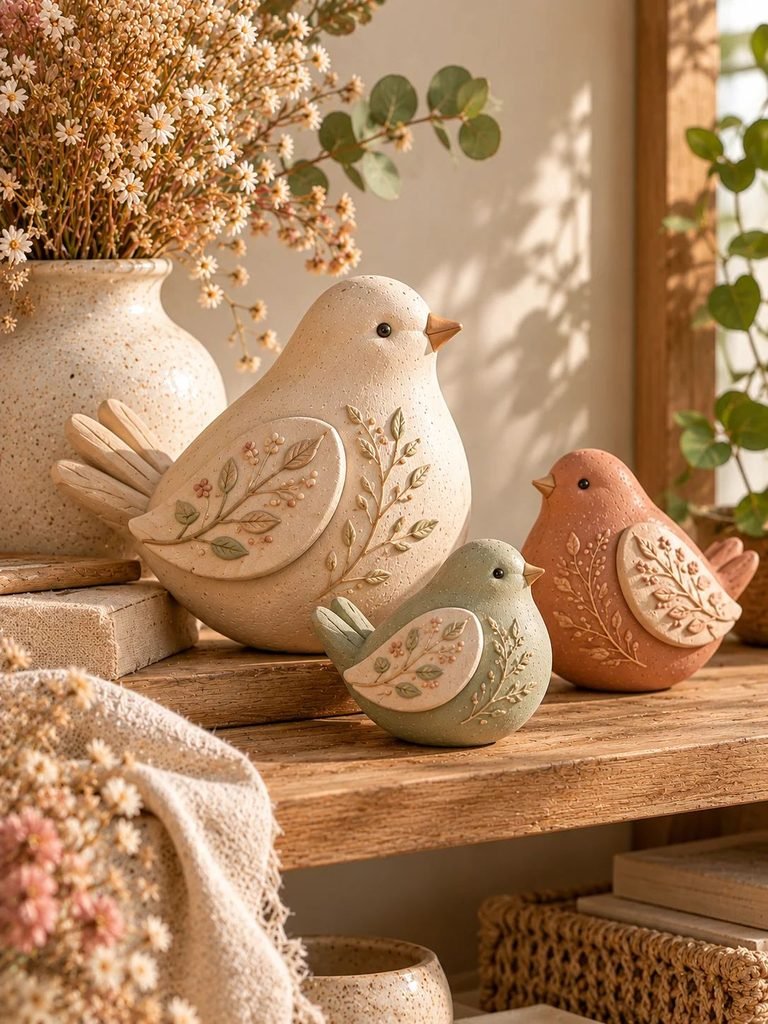
[Image suggestion: A coordinated family of three air-dry clay birds in different sizes, painted in cream, sage green, and muted terracotta, arranged on a wooden shelf.]
If you cannot choose just one design, why not create a little bird family? A coordinated set allows you to combine different shapes and finishes while keeping the overall look consistent.
This idea is particularly lovely for a mantel, bookshelf, console table, or seasonal centerpiece.
How to make them
- Decide on a theme, such as minimalist neutrals, garden birds, or soft cottagecore colors.
- Divide your clay into three or more portions of different sizes.
- Shape each piece into a bird, varying the head position, tail, or wing details slightly.
- Check that every bird has a stable base and can stand without support.
- Add a consistent detail across the collection, such as carved wings, tiny beaks, or painted eyes.
- Dry each sculpture completely before sanding and painting.
- Apply the same finishing style to all the birds so the collection looks cohesive.
You can make a large parent bird with two smaller birds beside it, or create three birds of equal size with different colors.
For a more natural appearance, keep the shapes slightly different rather than making every sculpture identical.
Styling tip: Arrange the birds in a loose group, leaving a little space between them. Add a small vase, a stack of books, or a wooden tray to complete the display.
Tips for Making Beautiful Air-Dry Clay Birds
Regardless of which design you choose, a few simple techniques can make your finished pieces look much better.
1. Keep the shapes reasonably thick and even
Very thin wings, beaks, and tails can break easily. Avoid making delicate parts excessively thin, especially if the bird will be handled regularly.
2. Attach separate pieces properly
When adding wings, heads, or beaks, lightly scratch both joining surfaces. Apply a small amount of clay slip or water as appropriate for your clay, then press the pieces together and blend the edges.
Simply placing a dry piece against another piece of wet clay may not create a strong bond.
3. Use water sparingly
A barely damp finger can smooth fingerprints and seams. Too much water can make the surface sticky or weaken the shape.
4. Dry the birds slowly
Place your sculptures on a flat, protected surface in a well-ventilated area away from direct heat and strong sunlight. Follow the instructions on your clay packaging.
Drying times vary depending on the clay brand, sculpture thickness, and humidity. Small pieces may dry relatively quickly, while thicker sculptures can take several days or longer.
Turning a sculpture carefully during drying, when appropriate, can help the underside dry evenly.
5. Sand only when completely dry
If you want a smooth, polished finish, use fine-grit sandpaper after the sculpture has dried thoroughly. Work gently to avoid damaging the beak, wings, or other delicate details.
Wear a suitable dust mask and avoid inhaling sanding dust. Clean the dust away before painting.
6. Paint in thin layers
Acrylic paint is a practical choice for decorative clay birds. Apply thin coats and allow each coat to dry before adding the next.
For small details, use a fine brush or the pointed end of a wooden skewer.
7. Seal the finished piece if needed
A compatible clear sealer or varnish can help protect the paint and make the surface easier to clean. Choose a matte finish for a natural look or a gloss finish for a polished appearance.
However, sealing does not make ordinary air-dry clay fully waterproof. Keep finished birds indoors and away from standing water, rain, and damp areas.
Common Mistakes to Avoid
Even simple clay crafts can be frustrating when the details do not turn out as expected. Here are a few problems to watch for.
Making the beak too thin: A very narrow beak can snap during drying or handling. Make it slightly thicker than you think you need, then refine its shape gently.
Adding too many details: Tiny feathers and elaborate decorations can be difficult to attach securely. Start with simple wing shapes and add details only where they improve the design.
Using too much water: Excess moisture can make the clay difficult to control and may contribute to uneven drying. Use only what you need.
Painting before the clay is dry: Paint applied too early may not adhere or dry as expected. Make sure the entire sculpture, including the base, is fully dry.
Ignoring balance: A beautiful bird that continually tips over can be difficult to display. Flatten the bottom gently and test its balance before leaving it to dry.
Rushing the finishing process: Applying paint or varnish before the previous layer has dried can lead to an uneven finish. Patience makes a noticeable difference.
Frequently Asked Questions
Can beginners make air-dry clay birds?
Absolutely. Start with a simple oval body, a small beak, and shallow wing details. You can create attractive birds without advanced sculpting skills, and more detailed designs become easier with practice.
How long do air-dry clay birds take to dry?
Drying time depends on the clay brand, thickness, and surrounding humidity. Small, thin pieces may dry in a day or two, while larger sculptures can take several days or longer. Follow the manufacturer’s guidance and check that the underside is completely dry before painting.
What paint works best on air-dry clay birds?
Acrylic paint is a popular option because it comes in many colors and works well for decorative projects. Apply it to completely dry clay and use thin layers for a smoother finish.
Can I put my clay birds outside?
Ordinary air-dry clay is generally best suited to indoor decorations. Even when sealed, it may absorb moisture, soften, or deteriorate outdoors. For longer-lasting outdoor ornaments, choose a material specifically designed for exterior use.
How can I stop my clay birds from cracking?
Keep the thickness reasonably even, avoid excessive water, attach separate parts securely, and allow the sculpture to dry gradually. Avoid placing it beside a heater or in direct sunlight to speed up the process.
If a small crack appears, you may be able to fill it with a little compatible clay slip or fresh clay, then let the repair dry completely before finishing.
Can I make air-dry clay birds without special tools?
Yes. Your hands, a toothpick, and a smooth bottle or rolling pin can be enough for many designs. Household objects with interesting textures can also be useful, provided they are clean and safe to use.
Final Thoughts
Making air-dry clay birds is a lovely way to bring a little handmade charm into your home. From minimalist white sculptures and floral cottagecore birds to colorful songbirds and playful fantasy creations, there are so many ways to make each project your own.
You do not need expensive equipment or years of crafting experience to get started. Choose one design that catches your eye, gather a few basic supplies, and take your time shaping and decorating your bird.
Remember, the goal is not to make a perfectly identical copy of a real bird. It is to create something that reflects your creativity and personal style. Once you finish your first little bird, you may find yourself dreaming up an entire collection to display, share, or give as thoughtful handmade gifts.