Cute Clay Christmas Mitten Ornaments: An Easy and Charming DIY Holiday Craft
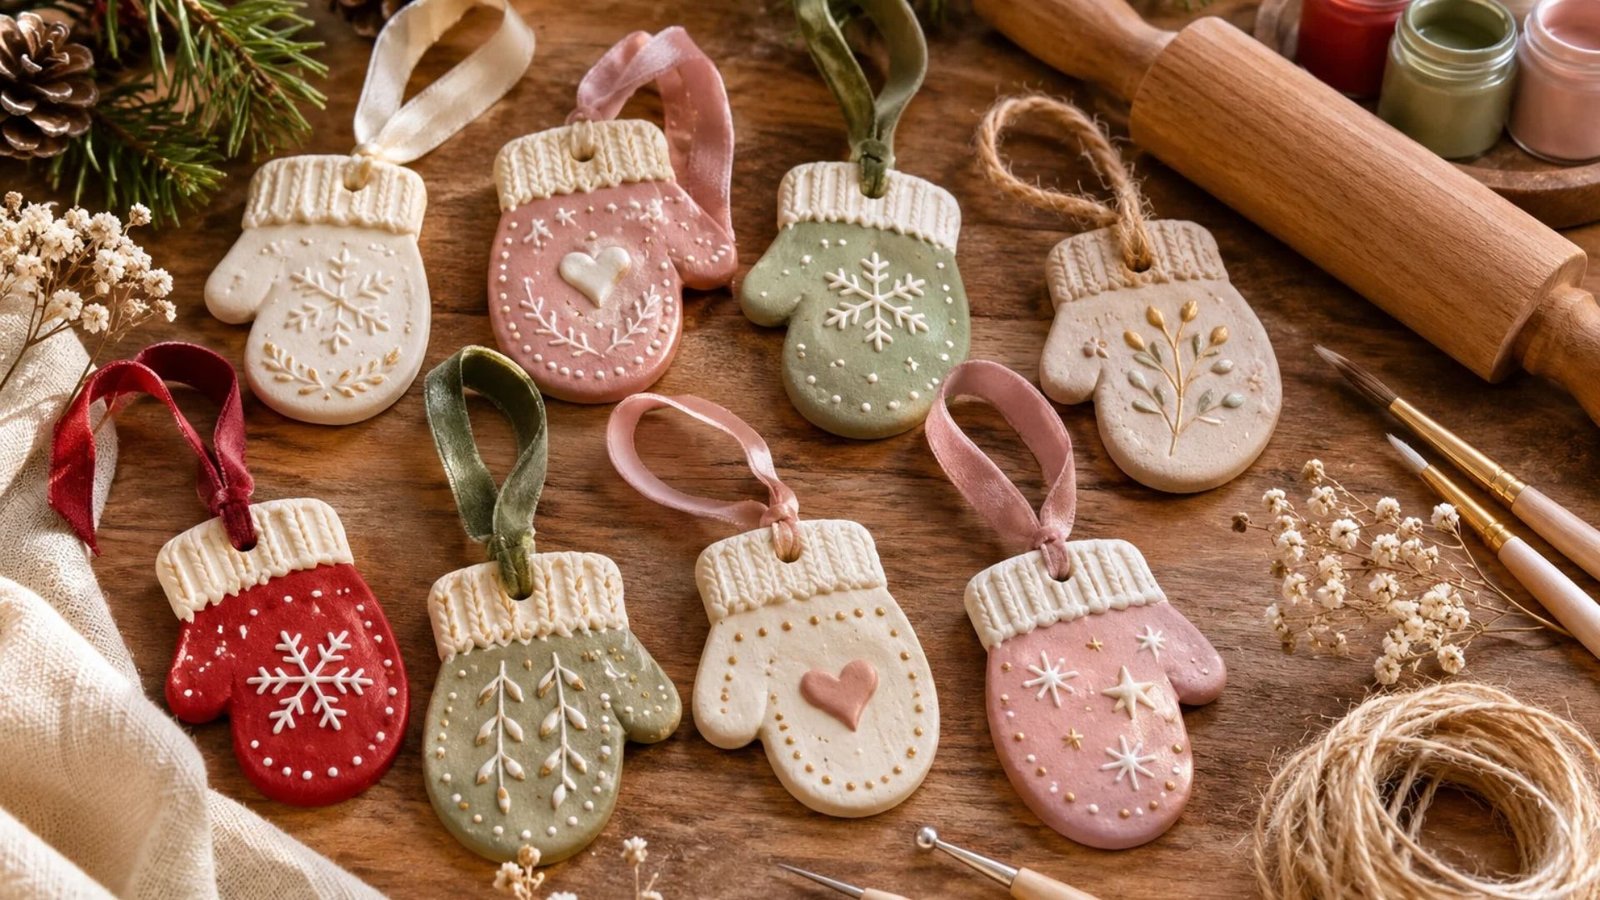
Handmade Christmas decorations have a special way of making the holidays feel warmer and more personal.
I especially love little ornaments that bring a touch of handmade charm to the Christmas tree, and these cute clay Christmas mitten ornaments are such a sweet project to make.
With a little air-dry clay, a few simple tools, and some pretty ribbons, you can create adorable miniature mittens that look beautiful hanging on your tree or tied to Christmas gifts.
Whether you’re crafting on a cosy afternoon or making keepsakes with loved ones, these little mittens are a lovely way to add something personal to your holiday decorations.
Why You’ll Love These Clay Christmas Mitten Ornaments

If you enjoy simple DIY Christmas crafts, these clay mitten ornaments are definitely worth adding to your holiday crafting list. They have a charming handmade appearance, require only a few basic supplies, and can be customised in so many lovely ways.
Here are a few reasons I think you’ll enjoy making them:
- Beginner-friendly: You don’t need advanced sculpting skills or expensive equipment. A few household tools and some patience are enough to get started.
- Easy to personalise: You can decorate your mittens with tiny hearts, snowflakes, stars, initials, names, or delicate botanical details.
- Lovely handmade gifts: Attach one to a wrapped present for a thoughtful finishing touch, or make a matching set for friends and family.
- Beautiful Christmas decorations: Their cosy mitten shape looks especially pretty alongside traditional Christmas ornaments, wooden decorations, and soft fabric bows.
- Budget-friendly: Air-dry clay is affordable, and you can make several ornaments from one small packet.
The best part is that every mitten can look a little different. You might prefer simple ivory mittens with delicate white details, or perhaps blush pink and sage green decorations with little gold accents. There really isn’t one right way to make them.
Materials You’ll Need
Before getting started, gather your supplies and prepare a comfortable crafting space. I recommend working on a smooth surface covered with baking parchment or a reusable craft mat to prevent the clay from sticking.
Essential materials:
- Air-dry clay: White or natural-coloured air-dry clay is ideal. Choose a smooth, good-quality clay that is easy to roll and shape.
- Rolling pin: A small acrylic or wooden rolling pin helps you create an even sheet of clay.
- Mitten-shaped template: You can draw a simple mitten shape on paper and cut it out, or use a small mitten cookie cutter.
- Craft knife: Useful for cutting around a paper template. Always use it carefully and keep it away from children.
- Straw or small round tool: This will help you make a hole for hanging your finished ornament.
- Acrylic paints: Choose festive shades such as ivory, blush pink, sage green, dusty blue, or warm red.
- Small paintbrushes: Fine brushes are useful for adding little decorative details.
- Fine-grit sandpaper: Helps smooth rough edges once the clay has dried.
- Ribbon or twine: Velvet ribbon, satin ribbon, or natural jute twine makes a beautiful hanger.
- Clay sealer: A suitable clear acrylic varnish or clay sealer protects the painted surface from light handling and dust.
Optional decorating supplies:
- Small letter or alphabet stamps
- Snowflake and star stamps
- Embossing tools
- Gold or champagne-coloured paint
- White paint pens
- Small decorative beads
- Fine detailing brushes
You don’t need every item on this list. Start with the basics and use whatever decorative supplies you already have at home.
Choosing the Right Clay for Your Ornaments
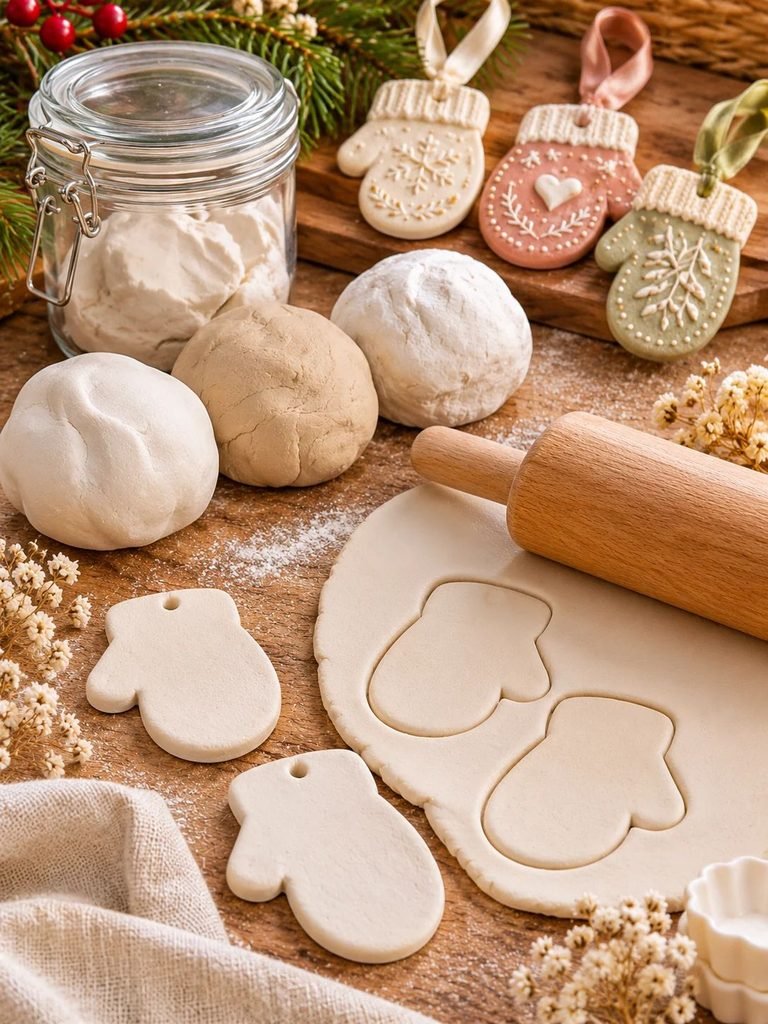
Air-dry clay is one of my favourite materials for this project because it is easy to work with and doesn’t require a kiln or oven. It dries naturally when exposed to air, making it a convenient choice for home crafting.
There are a few things to consider when choosing your clay.
White air-dry clay is a lovely option if you want a clean, traditional Christmas look. It also provides a beautiful base for pastel colours, metallic accents, and delicate painted details.
Natural air-dry clay has a slightly warmer appearance and works wonderfully for rustic or Scandinavian-inspired decorations. You can leave it unpainted and simply seal it once completely dry.
Lightweight air-dry clay can be useful when making several ornaments because it produces decorations that are comfortable to hang on a Christmas tree.
Whichever clay you choose, make sure it is suitable for decorative projects and follow the manufacturer’s instructions for drying and handling.
One little tip I always recommend is keeping unused clay wrapped in an airtight bag or container. Air-dry clay begins losing moisture when exposed to air, and keeping it covered will make it easier to work with throughout your project.
Read 18+ Festive Christmas Clay Ideas for Easy DIY Ornaments
How to Make Cute Clay Christmas Mitten Ornaments
Difficulty: Beginner · Preparation: 15–20 minutes · Drying: According to clay instructions · Makes: Approximately 6–10 ornaments, depending on size
Let’s get to the fun part! These little mittens are surprisingly simple to make, and you can experiment with different shapes and decorations once you get comfortable with the process.
Step 1: Prepare Your Crafting Surface
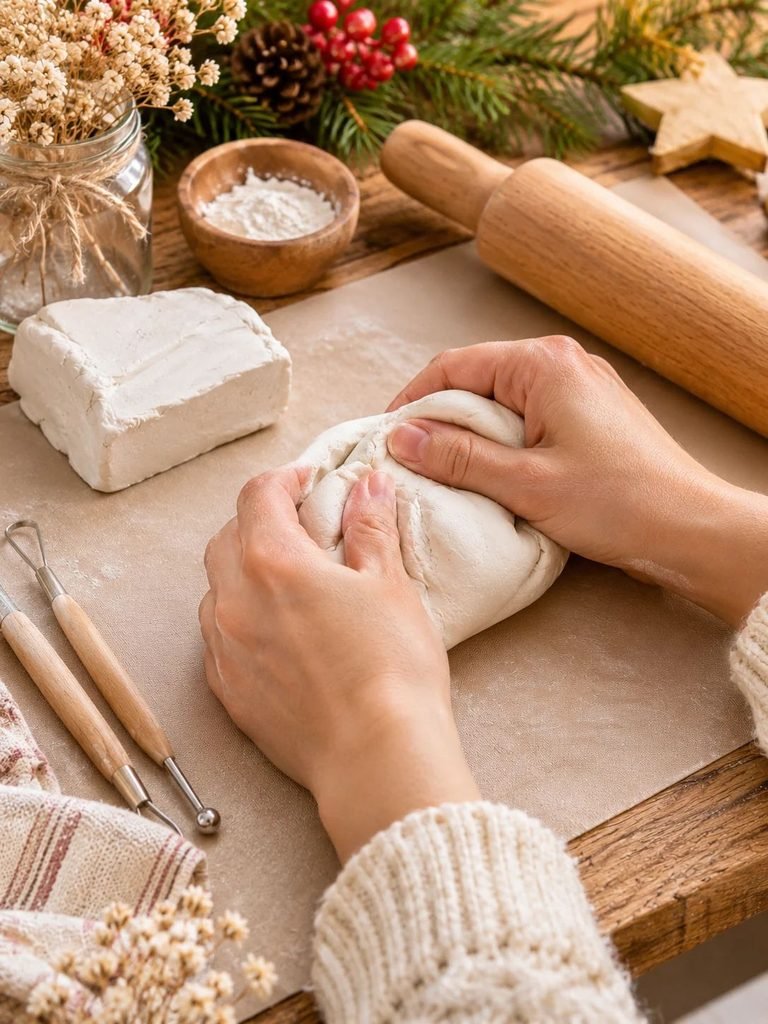
Start by cleaning your work surface and placing a sheet of baking parchment or a non-stick craft mat over it.
Take your air-dry clay and gently knead a small portion between your hands. This helps soften the material and makes it easier to roll without creating unnecessary cracks.
If the clay feels slightly stiff, work it gently rather than adding too much water. A tiny amount of water can help soften some clay types, but too much moisture may make the clay sticky and weaken the finished ornament.
Keep the remaining clay covered while you work.
Step 2: Roll Out the Clay
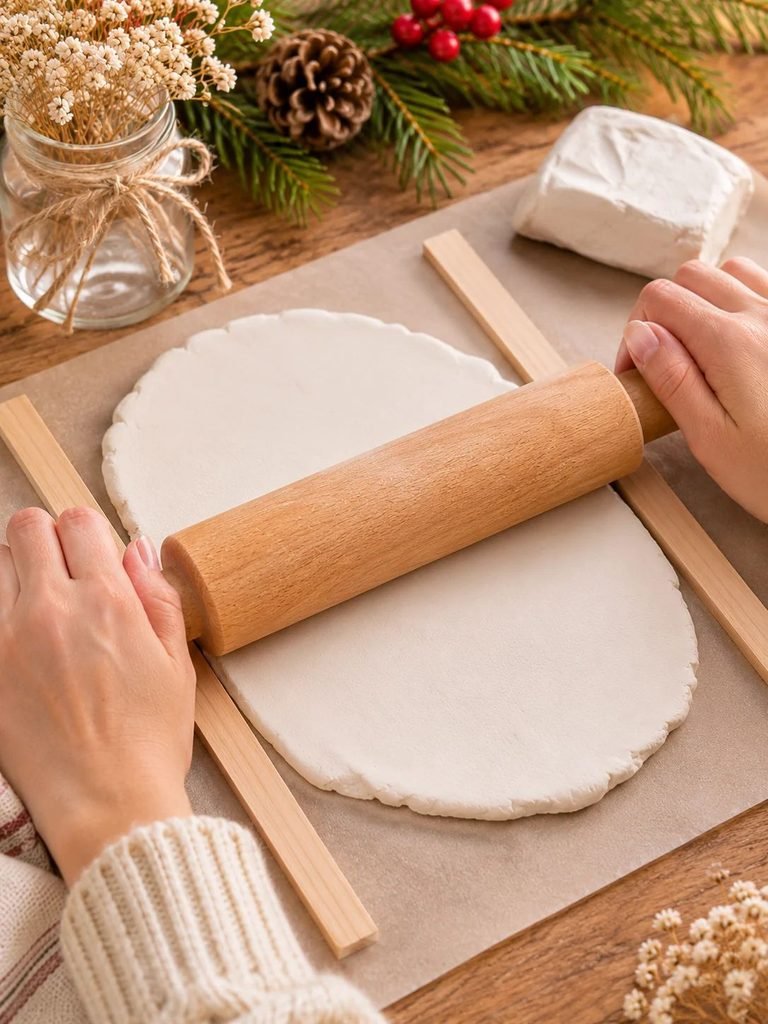
Place your clay on the prepared surface and use a rolling pin to flatten it into an even sheet.
Aim for a thickness of approximately 4–5 mm. This gives the mittens enough body to hold their shape without becoming too heavy.
Try to keep the thickness consistent across the entire sheet. If some areas are much thinner than others, they may dry unevenly or become more fragile.
If the clay sticks to your rolling pin, gently lift it and reposition it on the parchment. Avoid pulling it too roughly, as this can stretch the shape.
Read Clay Sewn Ornaments: How to Make Beautiful Handmade Clay Ornaments with a Sewn Finish
Step 3: Cut Out the Mitten Shapes
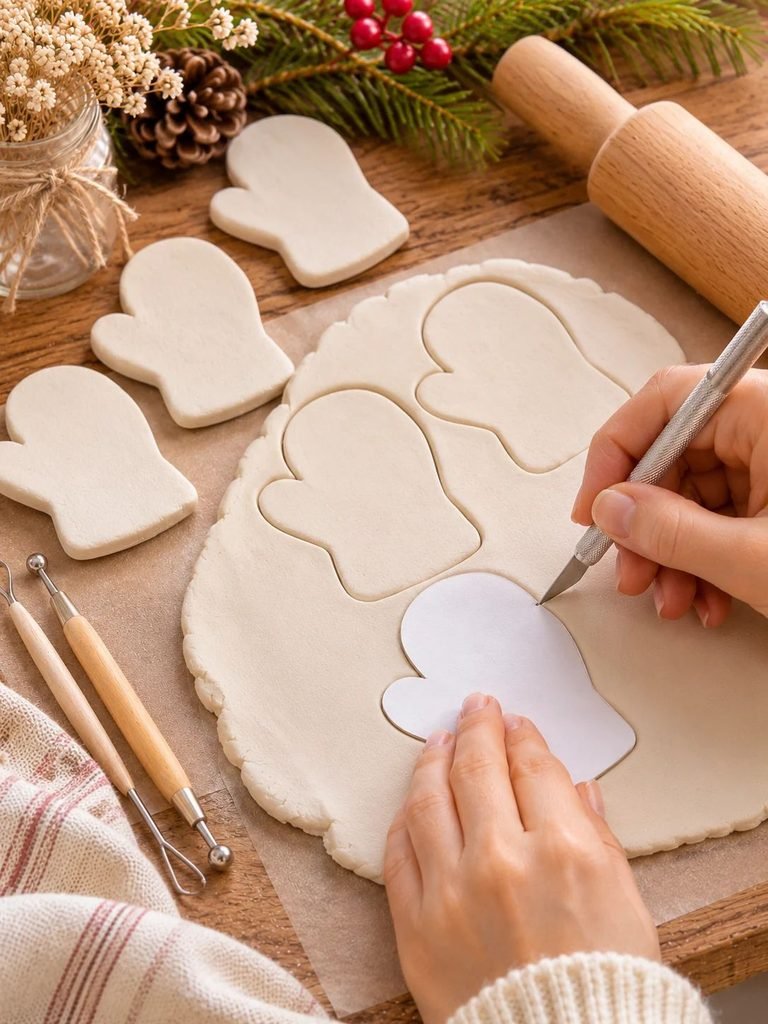
Now it’s time to create the adorable mitten shapes!
You can draw a mitten outline on a piece of paper and cut it out to use as a template. A simple design with a rounded top, curved thumb, and slightly wider wrist works beautifully.
Place your template over the rolled clay and carefully cut around it using a craft knife.
For a lovely matching set, try making your mittens approximately the same size. You can also create a mixture of small and medium mittens for a more interesting Christmas tree display.
Once you’ve cut out each shape, gently remove the excess clay around the edges.
Don’t worry if the first few aren’t perfectly identical. Handmade ornaments look especially charming when they have subtle differences.
Step 4: Smooth the Edges

Carefully inspect each mitten for rough edges, fingerprints, or small imperfections.
Use a slightly damp fingertip or a soft clay tool to smooth the edges. Work gently around the thumb and wrist areas, as these are the places where small cracks or uneven edges can appear.
If you notice a tiny crack, smooth it while the clay is still workable. Avoid using too much water because this can make the surface difficult to control.
You can also gently round the corners of the mitten to give it a softer, more realistic handmade appearance.
Read 15 Celestial Air Dry Clay Projects for a Whimsigoth Home
Step 5: Create the Hanging Hole

Before the clay dries, make a small hole near the top of the mitten.
A drinking straw, small clay tool, or round wooden skewer can work well. Position the hole close enough to the top for the ornament to hang neatly, but leave enough clay around it to prevent the hole from tearing.
Make sure the opening is large enough for your chosen ribbon or twine to pass through.
This step is important because trying to make a hanging hole after the clay has dried can cause cracking or breakage.
Check that each hole is completely open and remove any little pieces of clay left inside.
Step 6: Add Decorative Details
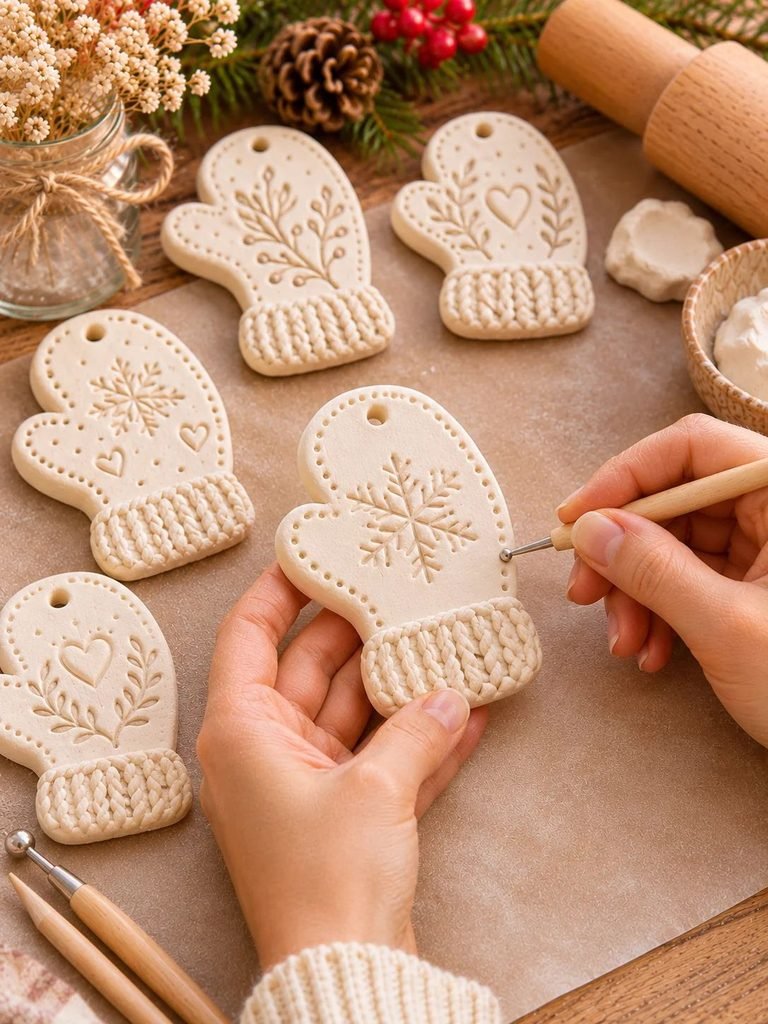
This is my favourite part because you can give each mitten its own personality.
Use a small wooden tool, toothpick, or clay modelling tool to add simple decorative patterns.
Here are some lovely ideas:
- Tiny snowflakes: Add delicate snowflake impressions across the centre of the mitten.
- Little hearts: Press a small heart shape into the clay for a sweet, romantic Christmas design.
- Knitted-style lines: Use a pointed tool to create short lines that resemble the texture of a cosy knitted mitten.
- Botanical details: Add tiny leaf impressions or simple floral patterns.
- Personalised initials: Use alphabet stamps to add a family member’s initial.
- Decorative cuffs: Create a ribbed effect around the wrist using repeated vertical lines.
Try not to press too deeply into the clay. Shallow, delicate impressions are usually easier to paint and look lovely once finished.
You can also leave some mittens completely plain for a minimalist collection.
Read DIY Mushroom Clay Jewelry Holder: How to Make a Whimsical Fairy Garden Jewelry Organizer
Step 7: Allow the Clay to Dry Completely

Place your finished mitten shapes on a flat, non-stick surface and leave them to dry according to the clay manufacturer’s instructions.
Drying time depends on the clay brand, thickness, room temperature, and humidity. Many air-dry clay projects need at least 24–72 hours, and thicker pieces may take longer.
For the best results:
- Keep the ornaments away from direct heat.
- Allow air to circulate around them.
- Turn them carefully when the surface is firm enough to handle.
- Avoid stacking the ornaments while they are drying.
- Check that the backs and edges are completely dry before painting.
If the ornaments still feel cool, damp, or noticeably soft, give them more time.
Patience is important here. Painting clay before it has dried completely can trap moisture and affect the finish.
Step 8: Smooth and Paint Your Mittens
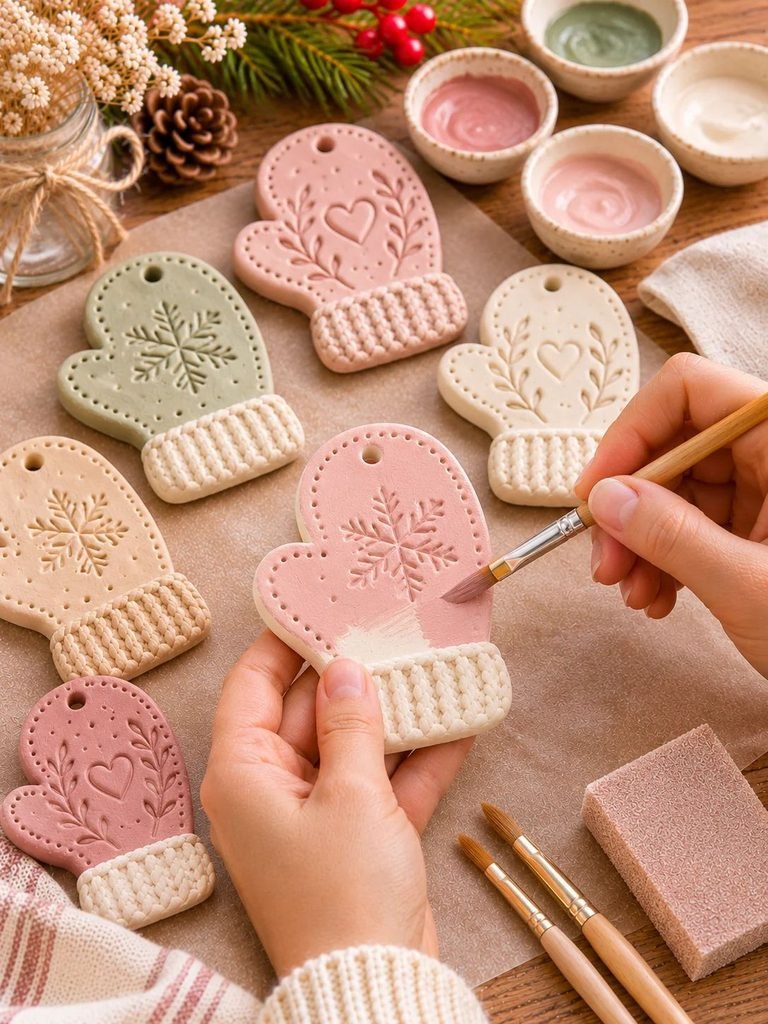
Once your ornaments are completely dry, gently sand any rough edges using fine-grit sandpaper.
Wipe away the dust with a dry, soft cloth before painting.
Now you can choose your favourite Christmas colours!
For a cosy feminine collection, I love the idea of combining:
- Warm ivory
- Soft blush pink
- Muted sage green
- Dusty rose
- Champagne gold
- Natural beige
Apply thin coats of acrylic paint using a small brush. Allow each coat to dry before applying another one if additional coverage is needed.
For a traditional Christmas collection, you could also use deep red, forest green, snowy white, and subtle gold.
Remember to paint the edges as well as the front and back for a neat, finished appearance.
Step 9: Add the Finishing Touches
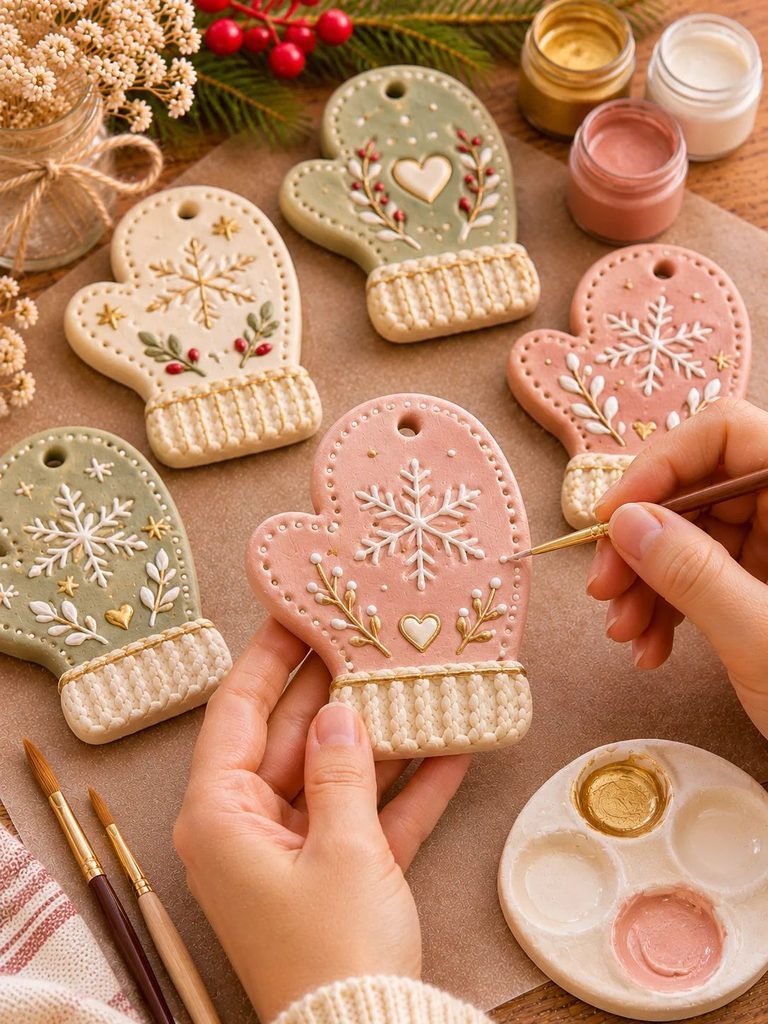
Once the base paint is dry, add your final decorative details.
Use a fine brush to paint tiny white snowflakes, delicate dots, miniature hearts, or small stars.
You could also add a little champagne-gold detail around the cuff or paint a small decorative border along the mitten.
If you want a personalised ornament, write a name or year on the front using a fine paint pen or carefully applied lettering.
Allow all painted details to dry thoroughly before sealing.
Step 10: Seal and Add the Ribbon
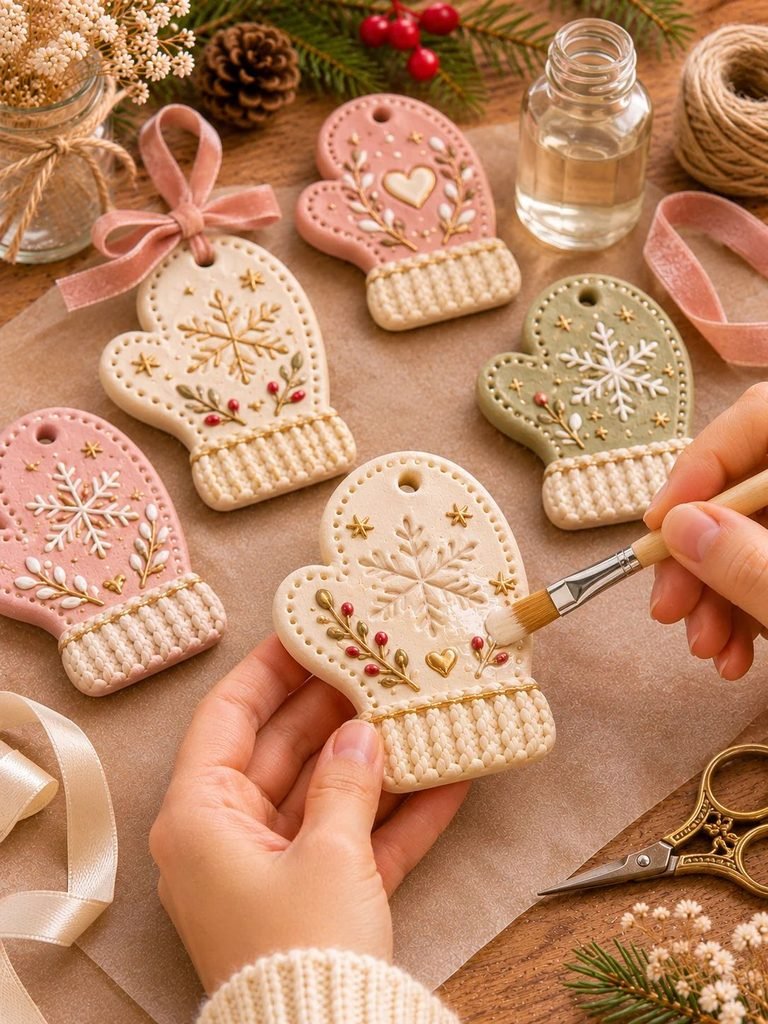
Apply a suitable clear sealer or varnish that is compatible with your clay and acrylic paint. Follow the product instructions, including the recommended number of coats and drying time.
A sealer can help protect the painted finish from dust and light handling, but remember that ordinary air-dry clay is not waterproof simply because it has been varnished.
Once the sealer has fully cured, thread a pretty ribbon or piece of twine through the hanging hole and tie a small loop.
And just like that, your cute clay Christmas mitten ornaments are ready to display!
Beautiful Design Ideas for Your Clay Mitten Ornaments

Once you’ve mastered the basic mitten shape, you can have so much fun experimenting with different styles. I love using a mixture of neutral colours and traditional Christmas shades because they create a collection that feels both festive and timeless.
Here are some designs worth trying.
1. Classic Snowflake Mittens
Paint your mittens creamy white and add delicate snowflakes using white or silver paint. Finish with a little satin ribbon for a soft, snowy appearance.
2. Blush Pink Mittens
Use dusty rose or blush pink paint, then decorate with tiny white hearts and champagne-gold dots. These look especially pretty with blush velvet ribbon.
3. Sage Green Mittens
Choose a muted sage green base and add cream-coloured cuffs. A few little snowflake impressions give these ornaments a beautiful winter-inspired finish.
4. Rustic Neutral Mittens
Leave the clay in its natural beige shade and add simple botanical impressions. Finish with jute twine for a lovely rustic farmhouse look.
5. Traditional Christmas Mittens
Combine deep Christmas red with creamy white cuffs and tiny snowflake decorations. These are perfect for a traditional Christmas tree.
6. Personalised Family Mittens
Add family names, initials, or the year using alphabet stamps or a fine paint pen. They make lovely keepsakes to bring out every Christmas.
How to Make Your Clay Mittens Look Like Knitted Christmas Mittens
One of the sweetest ways to decorate these ornaments is by creating a knitted texture. It gives the little mittens a cosy winter appearance without requiring any actual knitting.
Start by rolling your clay to the desired thickness and cutting out the mitten shape.
For the cuff, use a clay modelling tool or toothpick to create several short, evenly spaced vertical lines across the wrist area. You can then add tiny diagonal marks between the lines to create a woven or knitted effect.
For the main mitten section, try making small repeated V-shaped impressions. Work slowly and keep the marks relatively shallow so you don’t weaken the clay.
Once the ornament is dry, paint the cuff in a contrasting colour. Cream cuffs look beautiful against blush pink, sage green, red, and dusty blue.
A little dry-brushing with a lighter shade can also help highlight the raised texture.
The finished effect is particularly lovely when you want your decorations to resemble miniature handmade winter accessories.
Helpful Tips for Getting the Best Results
Even though this is a beginner-friendly craft, a few simple techniques can make a noticeable difference to the finished ornaments.
Keep your clay thickness even. Uneven clay can dry inconsistently and may become more prone to cracking. Use guides on either side of your rolling pin if you have difficulty maintaining an even thickness.
Don’t make the mittens too thin. Very thin ornaments can become fragile, particularly around the thumb and hanging hole. A thickness of around 4–5 mm is a useful starting point.
Be gentle when handling wet clay. Freshly cut ornaments can stretch or lose their shape if you lift them carelessly. Support the entire mitten when moving it.
Allow enough drying time. Never rush the drying process with direct heat. Slow, even drying helps reduce the risk of cracking and warping.
Use thin layers of paint. Several light coats usually produce a smoother finish than one thick coat. Thick paint can hide the delicate impressions you’ve worked hard to create.
Choose your ribbon carefully. A lightweight ribbon is ideal because it won’t put unnecessary pressure on the small hanging hole.
Make a few extra ornaments. It’s always useful to have spare pieces in case one cracks or doesn’t turn out as expected.
Common Mistakes to Avoid
If this is your first time working with air-dry clay, you might encounter a few little challenges. Thankfully, most of them are easy to prevent.
| Common mistake | How to avoid it |
|---|---|
| Rolling clay too thin | Aim for approximately 4–5 mm thickness |
| Using too much water | Smooth gently with slightly damp fingers |
| Making the hanging hole too close to the edge | Leave enough clay surrounding the hole |
| Drying ornaments too quickly | Allow natural, even air-drying |
| Painting damp clay | Wait until the entire ornament is dry |
| Applying thick paint | Use several thin coats |
| Forgetting the hanging hole | Make it before the clay dries |
| Using too much decoration | Keep details balanced and delicate |
One problem worth paying special attention to is cracking around the thumb area. Because this part of the mitten has a narrower connection to the main shape, it can be more delicate.
Try to create a smooth, rounded connection between the thumb and the rest of the mitten. Avoid sharp corners, and don’t make the thumb section too narrow.
Creative Ways to Use Your Finished Clay Mitten Ornaments
These little decorations aren’t just for hanging on your Christmas tree. Once you’ve made a collection, there are several other lovely ways to use them around your home during the holidays.
1. Decorate your Christmas tree
Hang your mittens alongside wooden stars, clay hearts, dried orange slices, and traditional Christmas baubles. A mixture of different shapes creates a beautiful handmade look.
2. Add them to Christmas gift wrapping
Tie a little clay mitten onto a wrapped present using velvet ribbon or natural twine. It makes the gift feel extra thoughtful, and the recipient can keep the ornament long after opening the package.
3. Create a festive garland
Make several mittens in complementary colours and thread them along a longer piece of ribbon or twine. Alternate them with wooden beads or small fabric bows to create a charming Christmas garland.
4. Use them as personalised gift tags
Write a recipient’s name or initials on the front and attach the ornament to their Christmas present. It’s a lovely alternative to ordinary paper gift tags.
5. Add them to a festive table display
Arrange a few mittens around a seasonal centrepiece, decorative pinecones, and greenery. Just keep clay decorations away from open flames and hot surfaces.
6. Make a handmade Christmas keepsake collection
Create one mitten for each family member and personalise it with their name and the year. You could make this a yearly Christmas tradition, adding a new ornament to your collection every December.
How to Store Your Clay Christmas Mitten Ornaments
After spending time creating your beautiful decorations, you’ll want to keep them in good condition for future Christmas celebrations.
The most important thing is to make sure the ornaments are completely dry and that any sealer has fully cured before storing them.
Wrap each ornament individually in tissue paper or soft bubble wrap to prevent scratches and accidental breakage.
Place them in a sturdy storage box with separate compartments if possible. This prevents the ornaments from rubbing against one another.
Keep the box somewhere cool and dry, away from excessive moisture and direct sunlight.
Although a suitable sealer helps protect the painted surface, air-dry clay ornaments are still decorative items rather than waterproof decorations. Avoid leaving them outside or exposing them to damp conditions.
When Christmas comes around again, unpack them carefully and check for any damage before hanging them on your tree.
Frequently Asked Questions
Can I make Christmas mitten ornaments with air-dry clay?
Absolutely! Air-dry clay is an excellent material for making decorative Christmas mitten ornaments. It is easy to shape, doesn’t require a kiln, and can be painted and decorated once completely dry.
How thick should clay Christmas ornaments be?
A thickness of approximately 4–5 mm is a good starting point for small mitten ornaments. This provides enough strength while keeping the decorations relatively lightweight.
How long do air-dry clay mitten ornaments take to dry?
Drying time depends on the clay brand, thickness, humidity, and room temperature. Many projects take between 24 and 72 hours, although thicker ornaments may need longer. Always follow the manufacturer’s instructions and check that the entire piece is dry before painting.
Can I use polymer clay instead of air-dry clay?
Yes! Polymer clay is another option for making Christmas mitten ornaments. However, it requires baking according to the manufacturer’s instructions rather than natural air-drying. Use a dedicated oven thermometer if recommended by the manufacturer, and never exceed the specified baking temperature.
Do I need to seal air-dry clay Christmas ornaments?
Sealing is recommended because it helps protect the painted surface from dust and light handling. Choose a compatible clear varnish or clay sealer and follow its application instructions. Remember that sealing does not make ordinary air-dry clay completely waterproof.
What paint works best for clay Christmas ornaments?
Acrylic paint is a popular choice because it comes in many colours, offers good coverage, and is easy to apply with small brushes. You can also use acrylic paint pens for names, snowflakes, and other fine details.
Can children make clay Christmas mitten ornaments?
Yes! This is a lovely supervised Christmas crafting activity for children. Adults can help with cutting the mitten shapes and making the hanging holes, while children can enjoy painting and decorating the dried ornaments. Use age-appropriate materials and supervise the use of sharp tools.
How can I stop my clay mitten ornaments from cracking?
Use fresh clay, maintain an even thickness, avoid excessive water, and allow the ornaments to dry slowly and evenly. Smooth any small cracks while the clay is still workable, and take extra care around the thumb and hanging hole.
Final Thoughts
Making cute clay Christmas mitten ornaments is such a lovely way to bring a little handmade charm into your holiday decorating.
I love how a simple piece of clay can become something so special with just a few thoughtful details, pretty colours, and a little creativity.
Whether you choose traditional red and white mittens, soft blush designs, or beautiful neutral decorations, each ornament can have its own personality. You can hang them on your Christmas tree, add them to gift wrapping, or make personalised keepsakes for the people you love.
So gather your supplies, put on some Christmas music, and enjoy creating something beautiful by hand!