DIY Wooden Log Christmas Gnome: How to Make a Rustic Woodland Gnome

Christmas decorating feels extra special when you add handmade pieces that bring warmth, personality, and a little bit of woodland charm into your home.
One project I absolutely love is this adorable DIY wooden log Christmas gnome. Made with a simple piece of wood, a fluffy faux-fur beard, a wooden bead nose, and a soft green felt hat, this little character looks like he belongs in a cozy Christmas forest.
The best part is that you don’t need complicated crafting skills or expensive supplies to make one. With a few basic materials and a little creativity, you can create a beautiful rustic decoration for your mantel, entryway, Christmas shelf, or holiday table.
Why You’ll Love This DIY Wooden Log Christmas Gnome

If you enjoy rustic Christmas decorations, this little woodland gnome is such a lovely project to add to your holiday crafting list. It combines natural textures with soft, cozy materials, creating a decoration that feels both festive and timeless.
Here are a few reasons to give this project a try:
- Beginner-friendly: You don’t need advanced woodworking or sewing skills to make this gnome.
- Budget-friendly: You can use a leftover log or reclaimed piece of wood and inexpensive craft supplies.
- Naturally rustic: The real tree bark gives the gnome a beautiful woodland appearance.
- Customizable: You can change the hat color, beard length, and decorations to match your Christmas theme.
- Lovely handmade gift: These little gnomes make thoughtful gifts for friends, family, and anyone who loves handmade Christmas decorations.
I also love how each gnome can have its own personality. A tall green hat creates a traditional woodland look, while a cream or burgundy hat gives the decoration a completely different feel.
Materials You’ll Need
Before starting, gather everything you need. Most of these supplies are available at craft stores, and you may already have a few of them at home.
Supplies
- Wooden log: Choose a small, sturdy log approximately 6–10 inches tall. A diameter of around 3–4 inches works nicely.
- Green felt or craft wool: This will become the gnome’s pointed hat. Choose a medium-weight felt that holds its shape.
- White or ivory faux fur: This creates the fluffy beard. A long-pile faux fur gives the gnome a lovely, soft appearance.
- Wooden bead: A small unfinished wooden bead, approximately ¾–1 inch wide, works well for the nose.
- Mini pinecone: Use a small natural or artificial pinecone to decorate the hat.
- Artificial evergreen sprig: A tiny piece of faux pine adds a festive woodland detail.
- Hot glue gun and glue sticks: These help attach the beard, hat, nose, and decorations.
- Sandpaper: Medium and fine-grit sandpaper will help smooth the top and bottom of the log.
- Craft scissors: Useful for trimming the faux fur and felt.
- Measuring tape or ruler: Helps you measure the hat and beard before cutting.
Optional Decorations
You can also gather a few small extras to personalize your gnome:
- Small wooden stars
- Miniature bells
- Rustic twine
- Tiny fabric flowers
- Artificial berries
- Gold or cream decorative accents
Try not to add too many decorations. The natural bark, fluffy beard, and soft felt hat are already beautiful together.
Step 1: Prepare Your Wooden Log
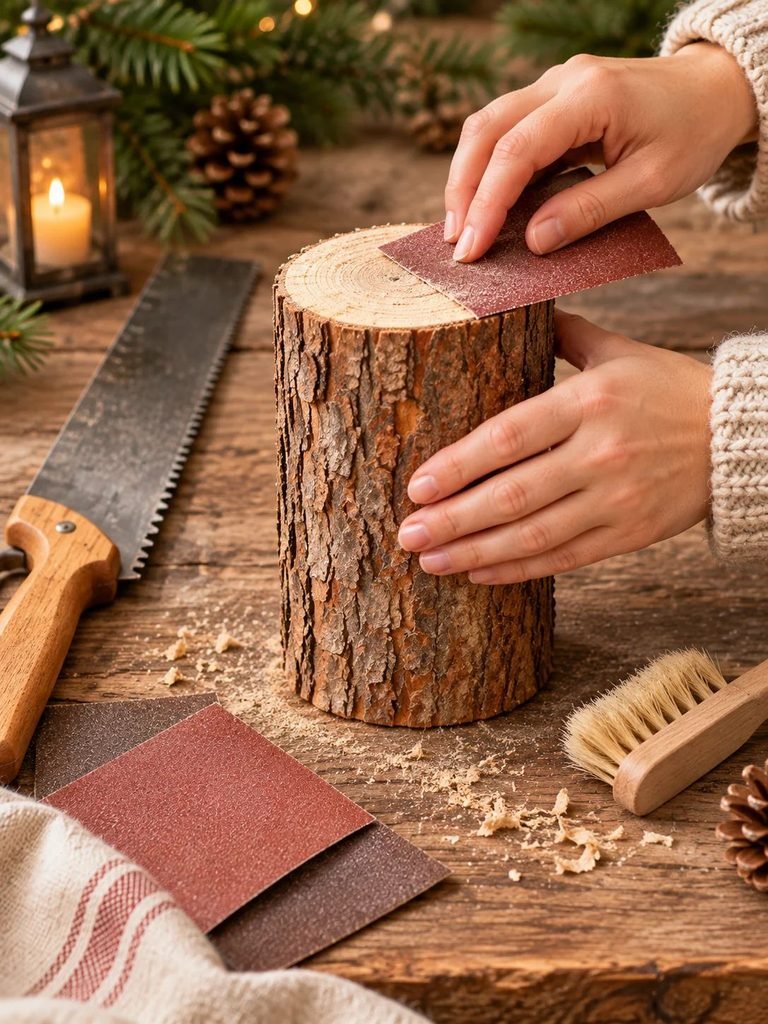
The wooden log is the foundation of your Christmas gnome, so it’s worth taking a little time to prepare it properly.
Choose a log with interesting natural bark and a relatively flat top and bottom. The bark gives your gnome its rustic appearance, so look for a piece that is firmly attached rather than peeling away.
If you’re cutting your own log, use an appropriate saw and work carefully on a stable surface. If you’re not comfortable cutting wood, ask someone experienced to prepare the piece for you.
Once you have your log, follow these steps:
- Remove loose dirt, leaves, and debris from the bark.
- Check that the bark is firmly attached and remove any pieces that are already loose.
- Use medium-grit sandpaper to smooth the top and bottom surfaces.
- Switch to fine-grit sandpaper to remove rough edges and splinters.
- Wipe away the sawdust with a dry cloth.
- Allow the wood to dry completely before decorating.
Your log should stand upright without wobbling. If the bottom is uneven, sand it gently until the gnome has a stable base.
Helpful tip: Make sure the wood is properly seasoned and dry. Freshly cut wood contains moisture and may crack, shrink, or develop mold as it dries. Avoid using damp or rotten logs for indoor decorations.
Read DIY Mini Acorn Fairy Houses: The Cutest Cottagecore Craft
Step 2: Cut and Prepare the Faux-Fur Beard

The fluffy beard is one of my favorite details because it gives the gnome so much character.
For this project, choose white, ivory, or cream faux fur. A slightly longer pile creates that traditional Scandinavian Christmas gnome appearance.
Start by measuring the front of your wooden log. Your beard should cover most of the front surface while leaving enough space near the top for the nose and hat.
Follow these steps:
- Place the faux fur on your work surface with the backing facing upward.
- Measure a beard shape that is approximately 3–5 inches long, depending on your log.
- Draw a gentle rounded or tapered shape on the backing.
- Cut carefully through the backing material without cutting deeply into the fur fibers.
- Gently separate the fur with your fingers to create a natural, fluffy edge.
You can make the beard slightly wider near the top and narrower toward the bottom for a traditional gnome appearance.
If you want a more natural-looking beard, avoid making the edges too perfectly straight. A softly uneven shape gives the finished decoration a lovely handmade appearance.
Helpful tip: Always cut faux fur from the backing side. Cutting directly through the fluffy fibers can create blunt edges and leave you with a lot of loose fur.
Read 15 Plastic-Free DIY Christmas Gifts for a Sustainable Holiday
Step 3: Attach the Beard to the Wooden Log

Once your beard is prepared, it’s time to attach it to the log.
Position the fur on the front of the wooden log, leaving a little room at the top for the nose and hat.
Before applying glue, hold the beard in place and check that it hangs evenly.
When you’re happy with the placement:
- Apply a small amount of hot glue to the upper section of the beard backing.
- Press it gently against the wooden log.
- Work your way down, adding glue in small sections if necessary.
- Hold the beard in place until the glue sets.
- Gently fluff the fur with your fingers to give it a fuller appearance.
Be careful not to use too much glue. Excessive glue can seep through the backing and make the fur stiff.
If your log has an uneven surface, attach the beard gradually so it follows the natural shape of the wood.
Safety note: Hot glue can cause burns. Work carefully, keep your fingers away from the glue nozzle, and use a low-temperature glue gun if appropriate for your materials.
Read 15 DIY Christmas Ornament Ideas That Look Beautifully Handmade and Cozy
Step 4: Add the Little Wooden Nose

A small wooden bead is the perfect finishing touch for your gnome’s face.
The nose should sit near the upper part of the beard, slightly below where the hat will rest.
To attach it:
- Choose a smooth, unfinished wooden bead.
- Position it in the center of the beard, close to the top.
- Check that it looks balanced from the front.
- Add a small amount of hot glue to the back of the bead.
- Press it gently into place.
- Hold it until the glue has completely set.
I recommend leaving the wooden bead in its natural color. Its warm, neutral finish looks beautiful against the white beard and green felt.
If you prefer a slightly different style, you can paint the bead ivory, soft beige, or even a muted blush color.
Read 6 DIY Cottage Pen Holder Ideas to Make Your Desk Feel Cozy and Beautiful
Step 5: Make the Green Felt Gnome Hat
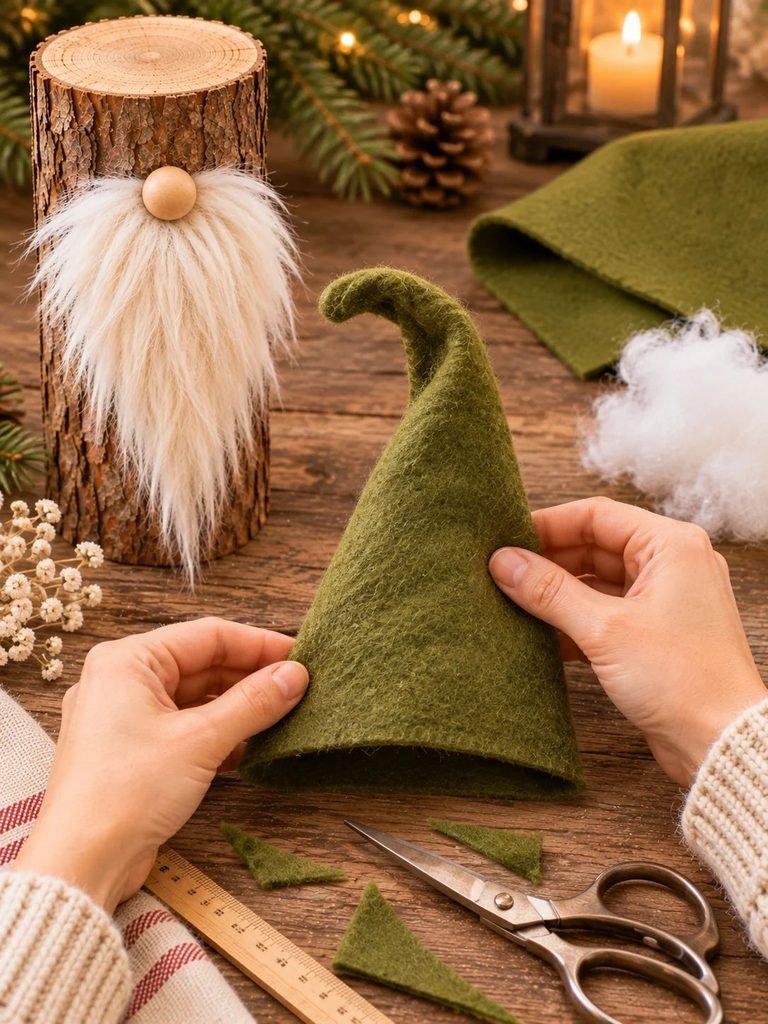
Now comes the fun part! The pointed green hat is what gives this little decoration its classic Christmas gnome look.
You can use green felt, wool felt, or another sturdy fabric that holds its shape.
How to Make the Hat
- Measure around the upper part of your wooden log.
- Cut a piece of green felt into a large triangle or cone-shaped pattern.
- Curve the bottom slightly so it sits comfortably around the top of the log.
- Bring the two straight sides together to create a cone.
- Glue or stitch the edges together.
- Allow the adhesive to dry.
- Gently bend the pointed end to one side to create a soft, floppy appearance.
The hat should fit over the upper part of the wooden log without covering the entire beard.
If you want a fuller hat, use slightly thicker felt or add a small amount of soft stuffing inside before closing the bottom.
Helpful tip: Don’t make the hat too tight. A slightly relaxed fit creates a softer, more natural appearance and makes it easier to position the hat exactly where you want it.
Step 6: Attach the Hat to Your Gnome
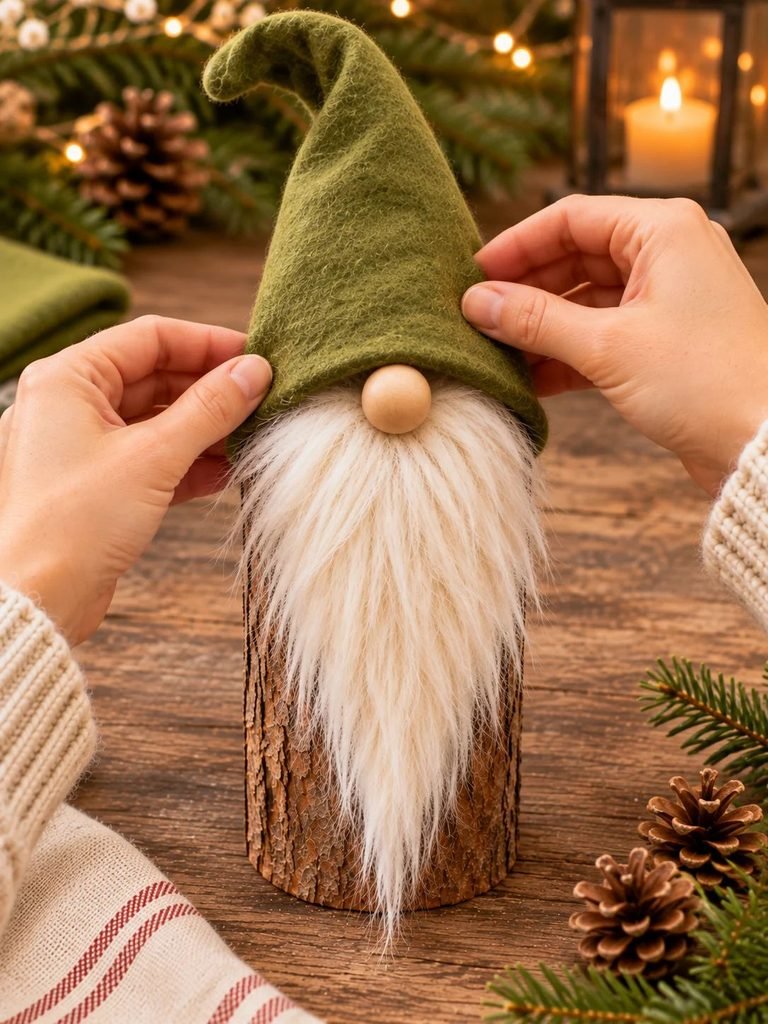
Once your hat is ready, place it over the top of the wooden log.
The bottom edge should sit just above the wooden nose, allowing the nose to peek out from underneath.
Follow these steps:
- Position the hat over the top of the log.
- Adjust the pointed end so it bends slightly to one side.
- Check that the hat sits evenly and doesn’t cover the nose.
- Apply small dots of hot glue around the inside lower edge.
- Press the hat gently against the wood.
- Hold it in place until secure.
You can pull the front edge down slightly to create a cozy, oversized hat appearance.
If you want the gnome to look more playful, bend the tip farther to one side. For a traditional woodland style, keep the hat mostly upright with a gentle curve.
Step 7: Decorate the Hat With a Pinecone

A tiny pinecone is the perfect decoration for this rustic Christmas gnome.
It adds a natural woodland detail and helps tie the green hat to the bark-covered wooden body.
To decorate the hat:
- Choose a small, lightweight pinecone.
- Check that it is clean and completely dry.
- Select a position near the side of the hat.
- Add a small amount of hot glue to the base of the pinecone.
- Press it gently against the felt.
- Hold it until secure.
You can also tuck a tiny artificial evergreen sprig beside the pinecone.
For an extra festive look, add a miniature wooden bead, a small fabric leaf, or a tiny decorative berry.
Keep the arrangement simple so the pinecone remains visible.
Step 8: Finish and Style Your Wooden Log Gnome

Your little woodland gnome is almost ready!
Before displaying it, take a moment to inspect all the details.
Check that:
- The beard is securely attached.
- The wooden nose is positioned in the center.
- The hat sits comfortably on the log.
- The pinecone decoration is firmly attached.
- The bottom of the log stands securely on a flat surface.
- There are no sharp edges or loose splinters.
Gently fluff the beard and adjust the hat until you love the overall appearance.
You can also add a little faux snow around the base or place the gnome beside some artificial evergreen branches.
I love the idea of making several gnomes in different sizes and arranging them together. They look especially charming when displayed as a little woodland Christmas family.
Creative Ways to Customize Your Christmas Gnome
One of the nicest things about this project is how easy it is to personalize. You don’t have to stick with the traditional green hat and white beard.
Here are a few lovely variations to try.
1. Traditional Red Christmas Gnome
Replace the green felt with deep red felt. Add a tiny gold bell or miniature holly decoration for a classic Christmas look.
2. Scandinavian Neutral Gnome
Use cream or oatmeal-colored felt with an ivory beard and natural wooden nose. This version is perfect for minimalist Christmas decorating.
3. Rustic Woodland Gnome
Keep the natural bark, use a forest-green hat, and decorate it with pinecones, faux greenery, and small wooden stars.
4. Blush Pink Christmas Gnome
Choose soft blush felt and a creamy white beard. Add a delicate fabric flower or a tiny champagne-gold accent for a feminine Christmas decoration.
5. Mini Christmas Gnome
Use smaller wooden pieces to create miniature gnomes. These are adorable for tiered trays, small shelves, and Christmas table decorations.
Where to Display Your Wooden Log Christmas Gnome
Once your gnome is finished, you’ll find plenty of lovely places to display it.
Here are some ideas:
- Christmas mantel: Place it beside greenery, candles, and other woodland decorations.
- Entryway table: Let it welcome guests alongside a small Christmas wreath.
- Coffee table: Display it on a wooden tray with pinecones and seasonal greenery.
- Bookshelf: Add it between Christmas books and small decorative trees.
- Dining table: Use it as part of a rustic holiday centerpiece, keeping it away from flames and heat.
- Tiered tray: Make a smaller version to add a handmade touch to your Christmas display.
For a particularly cozy look, place your gnome beside warm fairy lights, dried orange slices, and natural evergreen branches.
Common Mistakes to Avoid
Although this is a fairly simple craft, a few small mistakes can affect the finished result.
Using wet or freshly cut wood: Damp wood can shrink, crack, or develop mold. Always choose dry, properly seasoned wood.
Cutting the faux fur incorrectly: Cutting through the fur fibers can create blunt edges. Cut from the backing side to preserve its fluffy appearance.
Making the beard too short: A very short beard may leave too much of the wooden log exposed. Measure before cutting and allow enough length for the traditional gnome look.
Making the hat too small: A tight hat can be difficult to position and may not cover the upper part of the log properly. Measure the log before making your pattern.
Using too much glue: Excess glue can create visible marks or stiffen the faux fur. Apply it in small amounts and allow each section to set.
Adding too many decorations: The beauty of this design comes from its natural simplicity. A few carefully chosen details usually look better than an overcrowded hat.
Frequently Asked Questions
1. What type of wood is best for making a wooden log gnome?
You can use several types of wood, including birch, pine, and other suitable untreated timber. Choose a dry log with firmly attached bark and a flat base. Avoid rotten or damp wood.
2. Can I make this Christmas gnome without sewing?
Absolutely! This design can be made without a sewing machine or hand stitching. Felt, faux fur, and small decorations can be attached using craft glue or a hot glue gun.
3. What can I use instead of faux fur for the beard?
You can use white yarn, chunky wool, cotton rope, brushed fabric, or synthetic craft fibers. Faux fur gives the closest appearance to the fluffy beard shown in the inspiration image.
4. How do I make the felt hat stand upright?
Use medium-weight felt or wool felt. Shape it into a cone and secure the seam carefully. If the hat is too floppy, add a little lightweight stuffing or a small piece of flexible craft material inside.
5. Can I make these gnomes in different sizes?
Yes! You can use short wood slices for miniature decorations and taller logs for larger statement pieces. Just adjust the beard and hat measurements to match each log.
6. Can I use a wooden log gnome outdoors?
It’s best to display this decoration indoors or in a sheltered, dry area. Moisture can damage the wood, loosen the glue, and affect the felt and faux fur.
7. Are wooden log Christmas gnomes good handmade gifts?
Definitely! They are lovely handmade gifts for friends, family, teachers, neighbors, and anyone who enjoys rustic Christmas decorations. You can personalize the hat colors to match the recipient’s decorating style.
Final Thoughts
Making a DIY wooden log Christmas gnome is such a lovely way to bring a little handmade charm into your holiday decorating. I love how a simple piece of natural wood can be transformed into something so sweet with just a few basic craft supplies.
Whether you choose a traditional forest-green hat, a soft neutral design, or a pretty blush version, each gnome has its own personality. You can make one as a little Christmas keepsake, create a whole woodland-inspired collection, or give one as a thoughtful handmade gift.
So gather your wooden logs, fluffy faux fur, and favorite felt colors, and enjoy creating your own little Christmas woodland friend. Sometimes the simplest handmade decorations are the ones that make our homes feel the most special!