How to Crochet Iris Stitch – Free Pattern + Video for Beginners
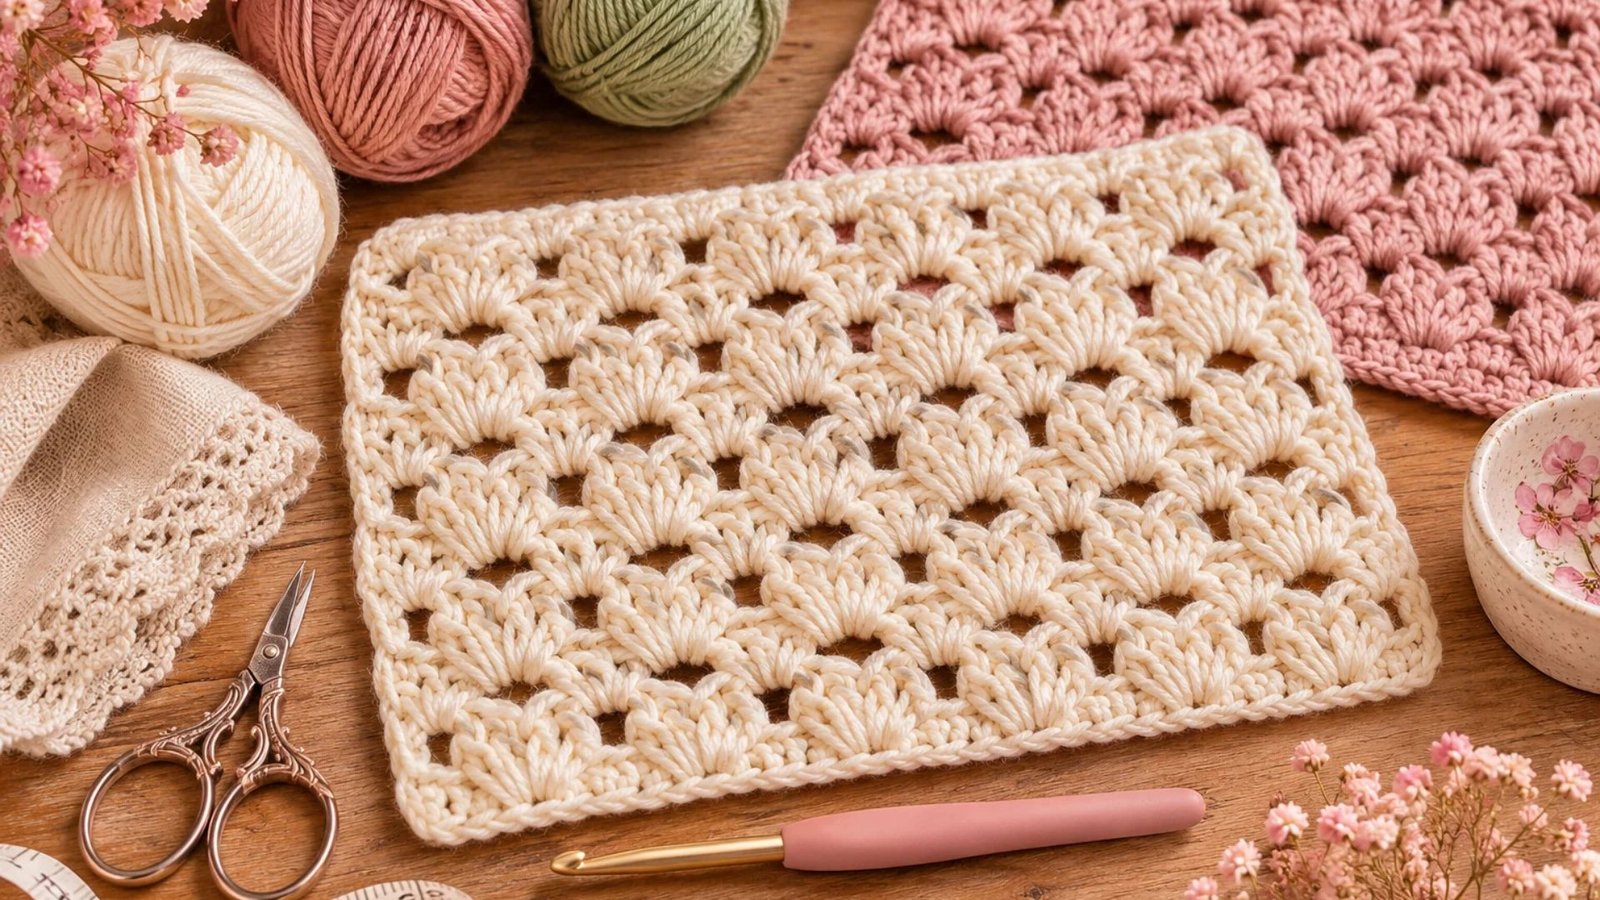
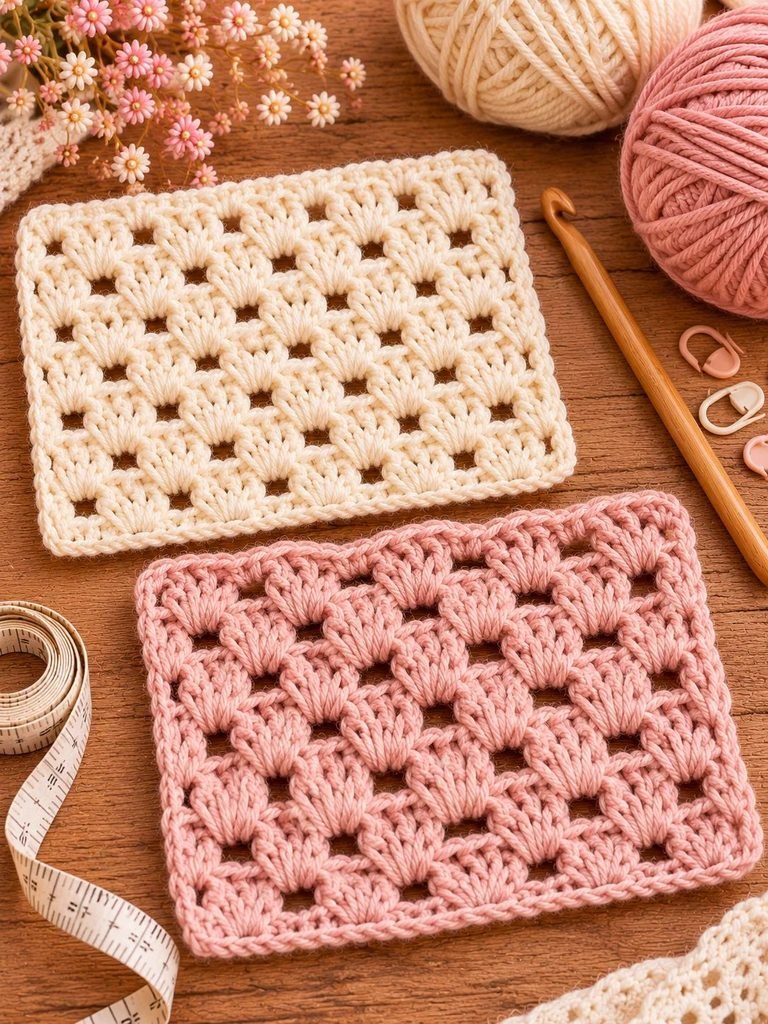
The Iris Stitch is a beautiful crochet stitch that creates a delicate, lacy texture using simple stitches. It is made with groups of double crochet stitches separated by small chain spaces, giving the finished fabric a lovely openwork appearance.
If you are looking for a crochet stitch that looks intricate but is surprisingly easy to learn, this is a wonderful one to add to your collection. Whether you want to make a lightweight blanket, a pretty scarf, a decorative shawl, or even a crochet cushion cover, the Iris Stitch is versatile enough for so many lovely projects.
In this tutorial, I’ll show you how to crochet the Iris Stitch step by step, explain the stitches you’ll need, and share helpful tips for keeping your rows neat and even. You’ll also find a free written pattern that you can follow at your own pace.
What Is the Crochet Iris Stitch?
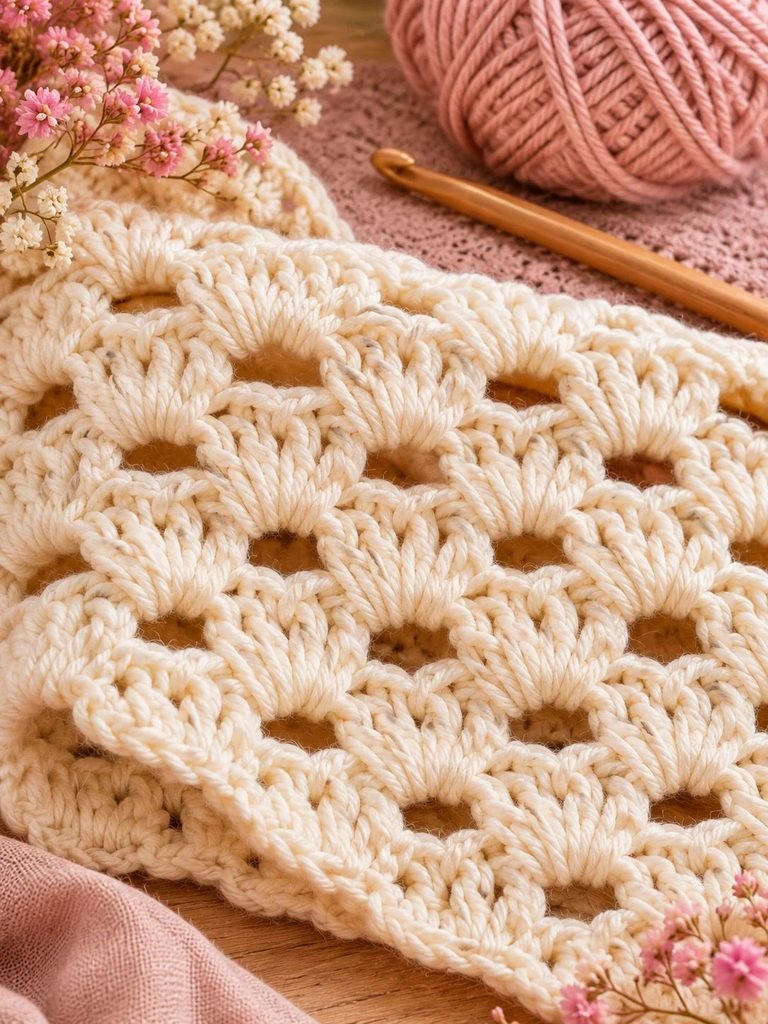
The Iris Stitch is a decorative crochet stitch known for its pretty clusters and delicate open spaces. It creates a repeating pattern of small shell-like groups, giving the fabric a soft, textured appearance.
Although it looks quite detailed, the stitch is made using only two basic crochet techniques:
- Chain stitch (ch)
- Double crochet (dc)
The secret to its lovely texture is working four double crochet stitches into the same space, with a chain stitch separating the two pairs. These little clusters create the signature Iris Stitch pattern.
One of the things I particularly love about this stitch is how easily it can transform simple yarn into something beautiful. You don’t need complicated techniques, fancy tools, or years of crochet experience to achieve a lovely result.
The Iris Stitch is also a great option if you want something a little more interesting than ordinary rows of double crochet. Once you understand the repeating pattern, it becomes wonderfully rhythmic, making it an enjoyable stitch for relaxing crochet sessions.
Why You’ll Love the Iris Stitch
There are plenty of reasons to give this pretty crochet stitch a try, especially if you enjoy making projects with beautiful texture.
1. It is beginner-friendly
You only need to know how to make chain stitches and double crochet stitches. If you already understand these basics, you are ready to learn the Iris Stitch.
2. It creates beautiful texture
The small clusters give the fabric a delicate, decorative appearance without requiring complicated stitch combinations.
3. It works up relatively quickly
Once you get comfortable with the pattern repeat, the rows become easy to remember. This makes it a lovely choice for projects that need a little texture without taking forever to complete.
4. It is versatile
You can use the stitch for blankets, scarves, shawls, wraps, cushion covers, and other decorative crochet projects.
5. It looks beautiful in different colours
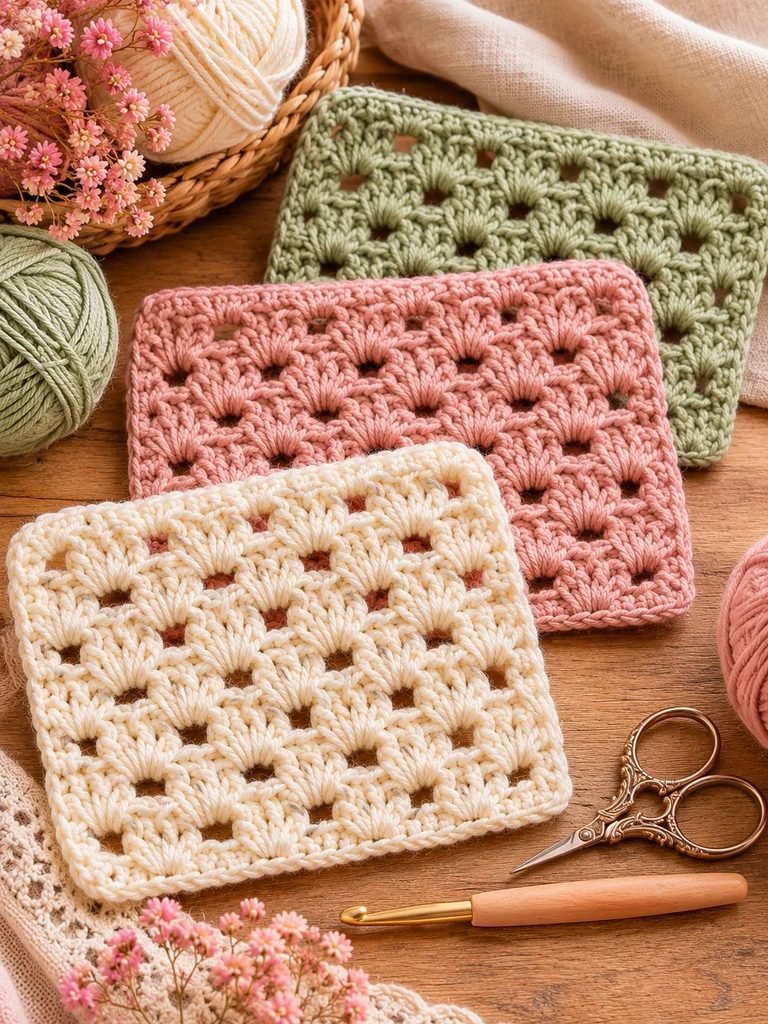
The Iris Stitch works wonderfully in solid colours, soft pastels, rich jewel tones, and even colour-changing yarn. You can keep things simple or experiment with different colour combinations.
Materials You’ll Need
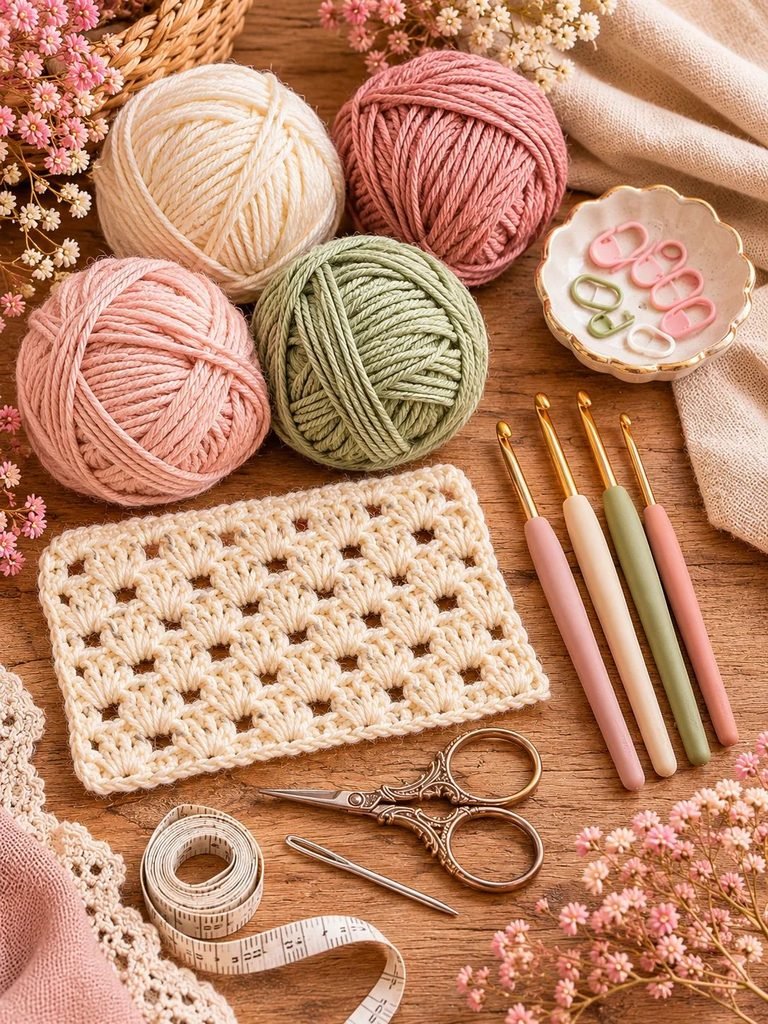
Before starting, gather your crochet supplies. You don’t need anything complicated for this pattern, which makes it a lovely project to begin with whatever yarn you already have at home.
- Yarn: Choose your preferred yarn weight. DK, sport, worsted, and cotton yarn can all work, depending on your desired fabric.
- Crochet hook: Use the hook size recommended on your yarn label.
- Scissors: For cutting your yarn when finishing.
- Yarn needle: For weaving in the loose ends.
- Stitch markers (optional): Helpful for marking the edges of your work.
- Measuring tape: Useful if you are making a project that needs specific measurements.
Choosing the Right Yarn
Yarn choice can make a noticeable difference to the finished appearance of the Iris Stitch.
For a light and airy fabric, consider using cotton or a soft DK-weight yarn. These options help show the stitch definition while keeping the finished piece comfortable and flexible.
If you want a warmer, thicker fabric for a blanket, a soft acrylic or acrylic blend can be a lovely choice. A medium-weight yarn will create more substantial clusters and a slightly fuller texture.
Here are a few yarn ideas:
- Cotton yarn: Great for lightweight accessories, summer projects, and decorative home items.
- DK yarn: A lovely middle-ground option for blankets, scarves, and wraps.
- Worsted-weight yarn: Suitable for warmer blankets and thicker crochet projects.
- Soft acrylic yarn: Affordable, easy to find, and available in plenty of beautiful colours.
Always check the yarn label for its recommended hook size, and make a small sample before starting a larger project.
Crochet Skill Level
Beginner
The Iris Stitch is suitable for beginners who are comfortable making chain stitches and double crochet stitches.
You should know how to:
- Make a slip knot.
- Crochet a foundation chain.
- Work a chain stitch.
- Work a double crochet stitch.
- Turn your work at the end of a row.
If you are still practising these techniques, don’t worry. Take your time and work through the instructions slowly. Once you have completed a few clusters, the pattern will begin to feel much more natural.
Crochet Abbreviations (US Terms)
This tutorial uses standard US crochet terminology.
| Abbreviation | Meaning |
|---|---|
| ch | Chain |
| dc | Double crochet |
| st | Stitch |
| sts | Stitches |
| sp | Space |
| sk | Skip |
| rep | Repeat |
| … | Repeat the instructions between the symbols |
Important: US double crochet is not the same as UK treble crochet. If you normally follow UK patterns, remember to adjust your stitch terminology.
Special Stitch: Iris Stitch Cluster
The main feature of this pattern is the Iris Stitch cluster.
To make one cluster:
- Yarn over and insert your hook into the indicated stitch or chain space.
- Yarn over and pull up a loop.
- Yarn over and pull through two loops.
- Yarn over and pull through the remaining two loops. This completes your first double crochet.
- Make another double crochet into the same space.
- Chain 1.
- Work two more double crochet stitches into that same space.
You should now have four double crochet stitches with a small chain space between the two pairs.
Written shorthand:
(2 dc, ch 1, 2 dc) in the same stitch or space.
This cluster is repeated across the row to create the lovely open texture.
How to Crochet Iris Stitch Step by Step
Now let’s get to the fun part! Once your yarn and hook are ready, you can start making your first Iris Stitch swatch.
Step 1: Make a Foundation Chain
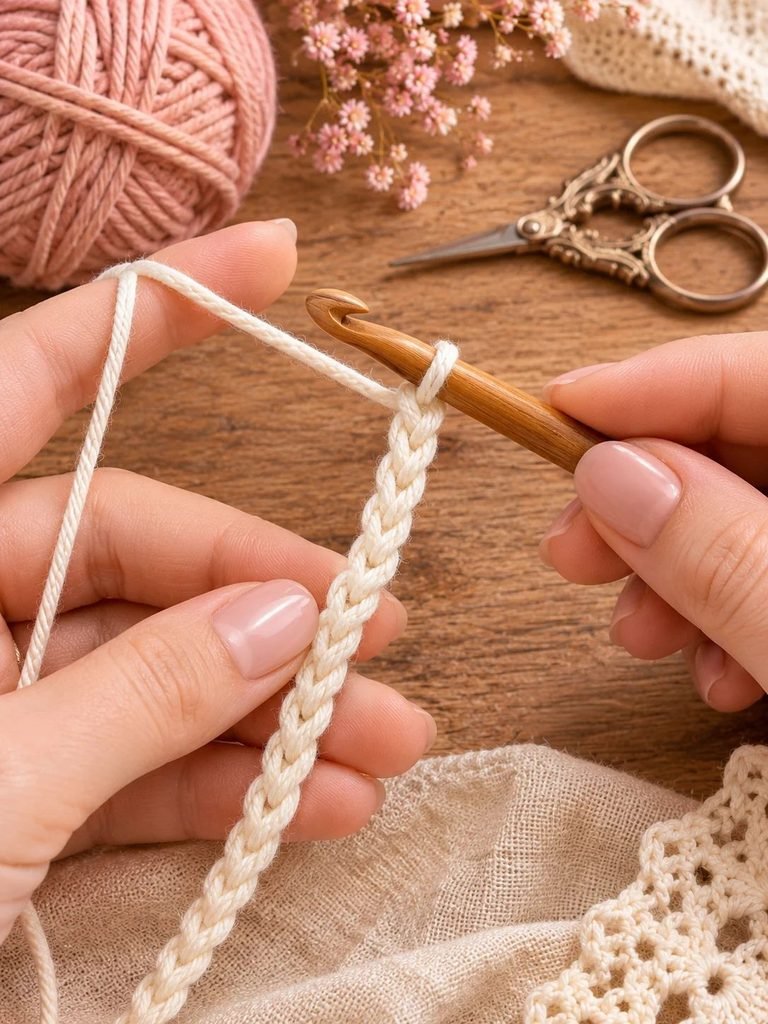
Begin by making a slip knot and placing it on your crochet hook.
Next, crochet a foundation chain in a multiple of 4.
For your first practice swatch, you can begin with 20 chains. This gives you a manageable piece to practise the stitch before moving on to a larger project.
Remember that your starting chain determines the width of your finished crochet fabric. If you want a wider piece, simply make a longer foundation chain, keeping the multiple of 4 in mind.
Try not to pull your chains too tightly. A relaxed foundation chain will make it easier to insert your hook into the stitches when working the first row.
Step 2: Work Row 1
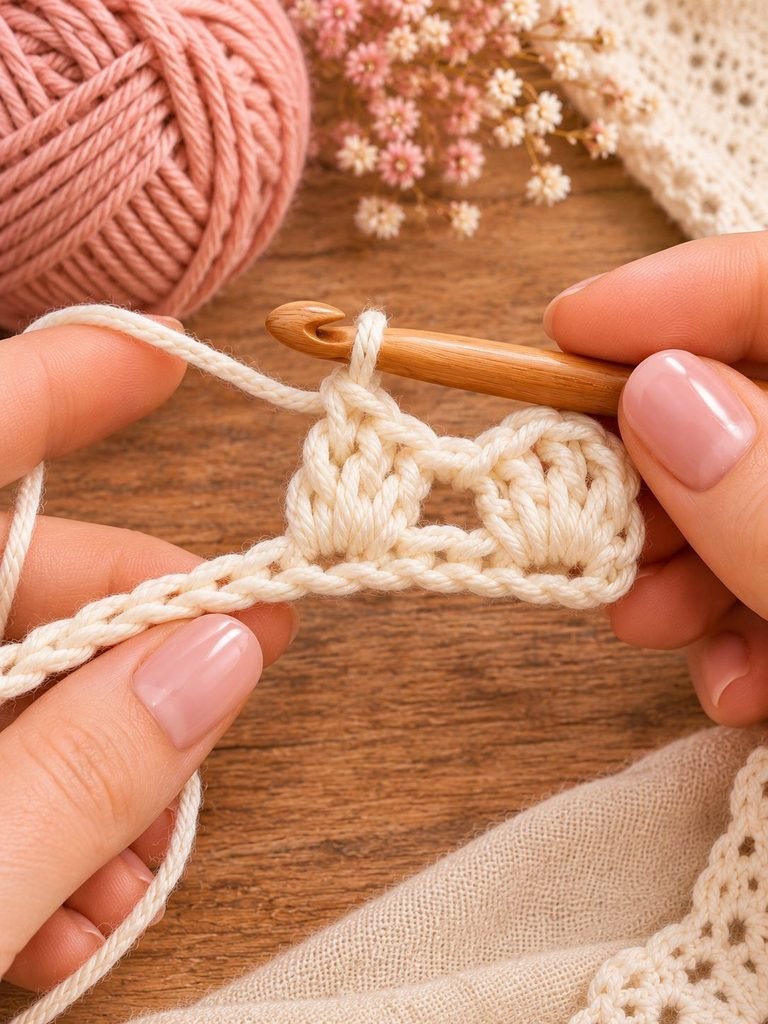
Chain 3. This will count as your first double crochet and help create the height needed for the next row.
Now, insert your hook into the fifth chain from your hook and work the following stitches into that same chain:
- 2 double crochet stitches.
- Chain 1.
- 2 double crochet stitches.
You have now made your first Iris Stitch cluster.
Next, skip 3 chains and repeat the cluster in the next designated chain.
Continue repeating the following instructions across the foundation chain:
(2 dc, ch 1, 2 dc) in the same stitch, skip 3 chains.
When you reach the end of the row, work 1 double crochet into the final stitch as instructed.
Take a moment to look at your work. You should begin to see small groups of double crochet stitches with open spaces forming between them.
Don’t worry if your first row looks a little uneven. It can take a few attempts to become comfortable with the spacing.
Read How to Crochet a Double-Thick Potholder – Thermal Stitch Single Crochet, Free Pattern
Step 3: Work Row 2
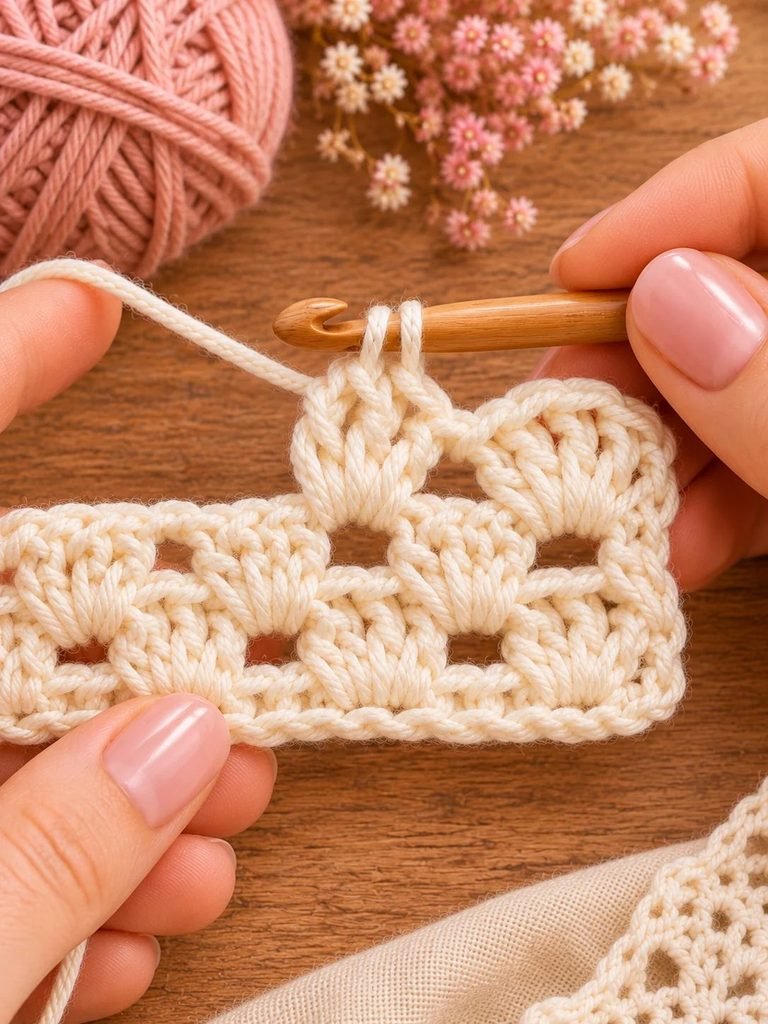
This is where the Iris Stitch starts to become really pretty!
Chain 3 and turn your work.
The next clusters will be worked into the chain spaces between the pairs of double crochet stitches from the previous row.
Find the small chain-1 space in the middle of your first cluster.
Into that space, work:
- 2 double crochet stitches.
- Chain 1.
- 2 double crochet stitches.
This creates another Iris Stitch cluster.
Continue working the same cluster into every chain-1 space across the row.
When you reach the end, finish with 1 double crochet into the top of the turning chain from the previous row.
Your second row should now have the same repeating texture as the first, but the clusters are worked into the spaces rather than individual foundation chains.
Step 4: Repeat the Pattern

Once you have completed Row 2, you have learned the main stitch repeat!
For every additional row:
- Chain 3.
- Turn your work.
- Find the chain-1 space in the middle of the next cluster.
- Work (2 dc, ch 1, 2 dc) into that space.
- Repeat across the row.
- Finish with 1 dc into the top of the turning chain.
Continue repeating this row until your project reaches the length you want.
The more rows you make, the more noticeable the delicate Iris Stitch texture becomes.
For your first attempt, I recommend making a small square or rectangular swatch. It gives you an opportunity to practise the pattern, check your tension, and see how your chosen yarn behaves.
Read The All-Purpose Waffle Stitch Crochet Dishcloth Pattern
Free Crochet Iris Stitch Pattern

Here is the written pattern in a shorter format so you can easily refer to it while crocheting.
Pattern Details
- Stitch: Iris Stitch
- Skill level: Beginner
- Terms: US crochet terms
- Pattern type: Repeating rows
- Foundation chain: Multiple of 4
- Main stitches: Chain and double crochet
START:
Make a foundation chain in a multiple of 4.
ROW 1:
Ch 3. Insert hook into the 5th ch from hook and work (2 dc, ch 1, 2 dc) in the same ch. Sk 3 ch. Repeat the cluster and skipping sequence across the row as directed. Finish with 1 dc in the last stitch.
ROW 2:
Ch 3 and turn. Work (2 dc, ch 1, 2 dc) in each ch-1 sp between the double crochet pairs across the row. Finish with 1 dc in the top of the turning chain.
ROW 3 AND BEYOND:
Repeat Row 2 until your project reaches the desired length.
FINISHING:
Fasten off, leaving a suitable yarn tail. Pull the yarn through the final loop and weave in all loose ends using a yarn needle.
Tips for Getting Beautiful Iris Stitch Results
Although this is a simple stitch, a few little details can make a big difference to the final result.
1. Keep Your Tension Consistent
Try to maintain an even tension throughout your work. If some clusters are very tight while others are loose, your fabric may look uneven.
You don’t need to crochet tightly to achieve a neat result. In fact, slightly relaxed stitches can help the open spaces remain visible.
2. Count Your Foundation Chains Carefully
The foundation chain should be a multiple of 4. Taking a moment to check your chain before starting will help prevent unnecessary frustration later.
If you are making a larger project, write down your starting chain count so you can refer to it if needed.
3. Find the Correct Chain Spaces
This is probably the most important part of maintaining the Iris Stitch pattern.
From Row 2 onward, your clusters belong in the small chain-1 spaces between the pairs of double crochet stitches.
Avoid accidentally working into the top of a double crochet stitch. Doing so can change the appearance and spacing of your pattern.
4. Use Stitch Markers at the Edges
If you sometimes struggle to identify the turning chain or the final stitch, a stitch marker can be very helpful.
Place one in the first or last stitch of a row to make it easier to recognise where your next row should begin and end.
5. Make a Gauge Swatch
If you are planning to make a blanket, scarf, or another project with specific measurements, make a small swatch first.
Crochet a few rows, measure the width and height, and check whether you like the fabric.
You can adjust your hook size if the fabric feels too tight or too loose.
Common Iris Stitch Mistakes and How to Fix Them
Even experienced crocheters occasionally make mistakes, especially when learning a new stitch. The good news is that most Iris Stitch problems are easy to correct.
Problem: My crochet piece is getting wider or narrower.
This usually happens when you accidentally add or miss a stitch at the edges.
Solution: Check that you are finishing every row with one double crochet in the top of the turning chain. Also make sure you begin each new row correctly.
Problem: My clusters look uneven.
Uneven tension or working into the wrong spaces can cause this problem.
Solution: Make sure all four double crochet stitches in each cluster are worked into the same stitch or chain space. Try to keep your yarn tension consistent.
Problem: I cannot find the chain-1 spaces.
The little openings can sometimes be difficult to see, especially when using fuzzy or dark yarn.
Solution: Gently spread the fabric with your fingers to reveal the spaces. A lighter-coloured yarn can also make it easier to see the stitch structure while practising.
Problem: My edges look wavy.
This can happen if the number of clusters changes from one row to another or if the turning chain is handled inconsistently.
Solution: Count your clusters at the end of each row and make sure your final double crochet is placed in the correct turning chain.
Problem: My foundation chain feels too tight.
A tight foundation chain can make the bottom edge of your project look smaller than the rest of the fabric.
Solution: Try using a hook one size larger just for the foundation chain, then switch back to your regular hook for the remaining rows. You can also practise making your chain stitches a little more loosely.
Best Projects to Make With the Iris Stitch
One of the nicest things about learning a new crochet stitch is discovering all the different ways you can use it.
The Iris Stitch has a lovely balance of texture and openness, making it suitable for many projects.
1. Crochet Iris Stitch Blanket
A blanket is one of the prettiest ways to show off this stitch. The repeating clusters create a delicate texture that looks lovely in both neutral and colourful yarn.
For a cozy blanket, consider using cream, oatmeal, dusty pink, sage green, or soft lavender.
You can make a baby blanket with lightweight yarn or create a larger throw using a medium-weight yarn.
2. Lightweight Crochet Scarf
If you want something pretty to wear during cooler mornings, an Iris Stitch scarf is a lovely idea.
The open spaces give the scarf a lighter appearance than a solid crochet fabric, while the clusters add enough texture to make it visually interesting.
Try a soft cotton or acrylic blend for a comfortable finish.
3. Crochet Shawl or Wrap
The decorative texture makes this stitch especially pretty for shawls and wraps.
A soft gradient yarn can create a beautiful colour transition throughout the fabric, while a single colour gives the finished piece a timeless appearance.
You can also experiment with a slightly larger hook to create a more open, airy fabric.
4. Decorative Cushion Cover
If you enjoy making handmade home decorations, consider using the Iris Stitch for a cushion cover.
The repeating clusters create a lovely textured surface that can add a handmade touch to a bedroom, reading corner, or living room.
For a cozy cottage-inspired look, try warm ivory, beige, blush pink, or muted sage.
5. Crochet Table Runner
A lightweight table runner is another lovely project for this stitch.
Its openwork appearance can look particularly beautiful on a wooden dining table or a neutral linen tablecloth.
Choose cotton yarn for a more structured finish and a colour that complements your home decor.
6. Baby Blanket or Nursery Decor
The soft appearance of the Iris Stitch makes it a lovely option for handmade nursery projects.
Pastel shades, warm cream, and gentle neutral colours can create a sweet and timeless look.
If you are making a baby blanket, choose a soft, washable yarn suitable for baby items and follow the manufacturer’s care instructions.
How to Change Colours in Iris Stitch
Changing colours is a simple way to give your Iris Stitch project a completely different look.
You can work the entire project in one colour, alternate colours every few rows, or create a beautiful striped effect.
For a neat colour change, complete the final double crochet of the row before the change, stopping just before the final yarn-over and pull-through. Use your new colour to complete that final step.
Then continue with the new colour.
Here are a few colour combinations worth trying:
- Soft cottagecore: Cream, sage green, dusty pink, and oatmeal.
- Pretty spring palette: Lavender, butter yellow, pale pink, and soft green.
- Elegant neutrals: Beige, ivory, taupe, and warm brown.
- Autumn-inspired: Rust, mustard, deep burgundy, and cream.
- Calming coastal colours: Soft blue, seafoam green, ivory, and sandy beige.
If you are making stripes, remember to weave in your yarn ends neatly so the back of your project looks tidy.
How to Finish Your Iris Stitch Project
When you have reached your desired length, it is time to finish your work.
Fasten off your yarn by cutting it, leaving a tail long enough to weave in securely.
Pull the cut end through the final loop on your hook and gently tighten it.
Using a yarn needle, weave the loose end through several stitches on the wrong side of your fabric. Change direction once or twice to help secure it.
If your project has uneven edges, you can add a simple border.
A row of single crochet stitches around the edges is a lovely option because it creates a cleaner, more defined finish. Work carefully along the sides, adding stitches evenly so the fabric does not become too tight or start to ripple.
For a larger blanket or shawl, you may also want to block your finished project according to the yarn’s care instructions. Blocking can help even out the stitches and give the fabric a more polished appearance.
Frequently Asked Questions
Is the Iris Stitch easy for beginners?
Yes! The Iris Stitch is beginner-friendly because it uses basic chain and double crochet stitches. If you already know how to make these stitches, you can learn the pattern with a little practice.
How many chains do I need for Iris Stitch?
The foundation chain should be made in a multiple of 4. You can make a longer or shorter chain depending on the width you want for your project.
Can I use any type of yarn?
Yes, you can experiment with different yarn weights and fibres. Cotton, acrylic, DK, and worsted-weight yarn can all work. However, the finished texture and size will vary depending on your yarn and hook.
Is Iris Stitch suitable for blankets?
Absolutely! It is a lovely stitch for blankets because the repeating clusters create a decorative openwork texture. Choose a comfortable yarn and make a swatch before starting a full blanket.
Does Iris Stitch use a lot of yarn?
The openwork design means that it can use less yarn than some dense crochet stitches, although the exact amount depends on your yarn weight, hook size, tension, and project dimensions.
Can I crochet Iris Stitch in multiple colours?
Yes! You can change colours after every row, every few rows, or whenever you want to create a different effect. It looks beautiful in both solid and multicoloured designs.
How do I keep the edges straight?
Make sure you chain 3 at the beginning of each row and finish with one double crochet in the top of the previous row’s turning chain. Counting your clusters can also help you keep the edges consistent.
Final Thoughts
The Iris Stitch is one of those lovely crochet techniques that reminds me how beautiful simple stitches can be. With just chain stitches and double crochet, you can create a delicate, textured fabric that works for so many different handmade projects.
I especially love how easy it is to experiment with colours and yarn types. You can keep things soft and neutral for a cozy blanket, choose pretty pastels for a spring-inspired wrap, or use bold colours to create something a little more eye-catching.
If you are new to this stitch, start with a small swatch and give yourself time to get comfortable with the repeating pattern. Once you have mastered the clusters, you’ll find it much easier to work through longer projects.
I hope this free Iris Stitch pattern inspires you to pick up your crochet hook and create something beautiful. Happy crocheting!