Vintage Shell Stitch Christmas Bauble: A Beautiful Crochet Christmas Ornament
One of my favourite things about Christmas decorating is adding little handmade touches that make the home feel warm, personal, and extra special. I especially love crochet decorations because they bring so much texture and charm to a Christmas tree.
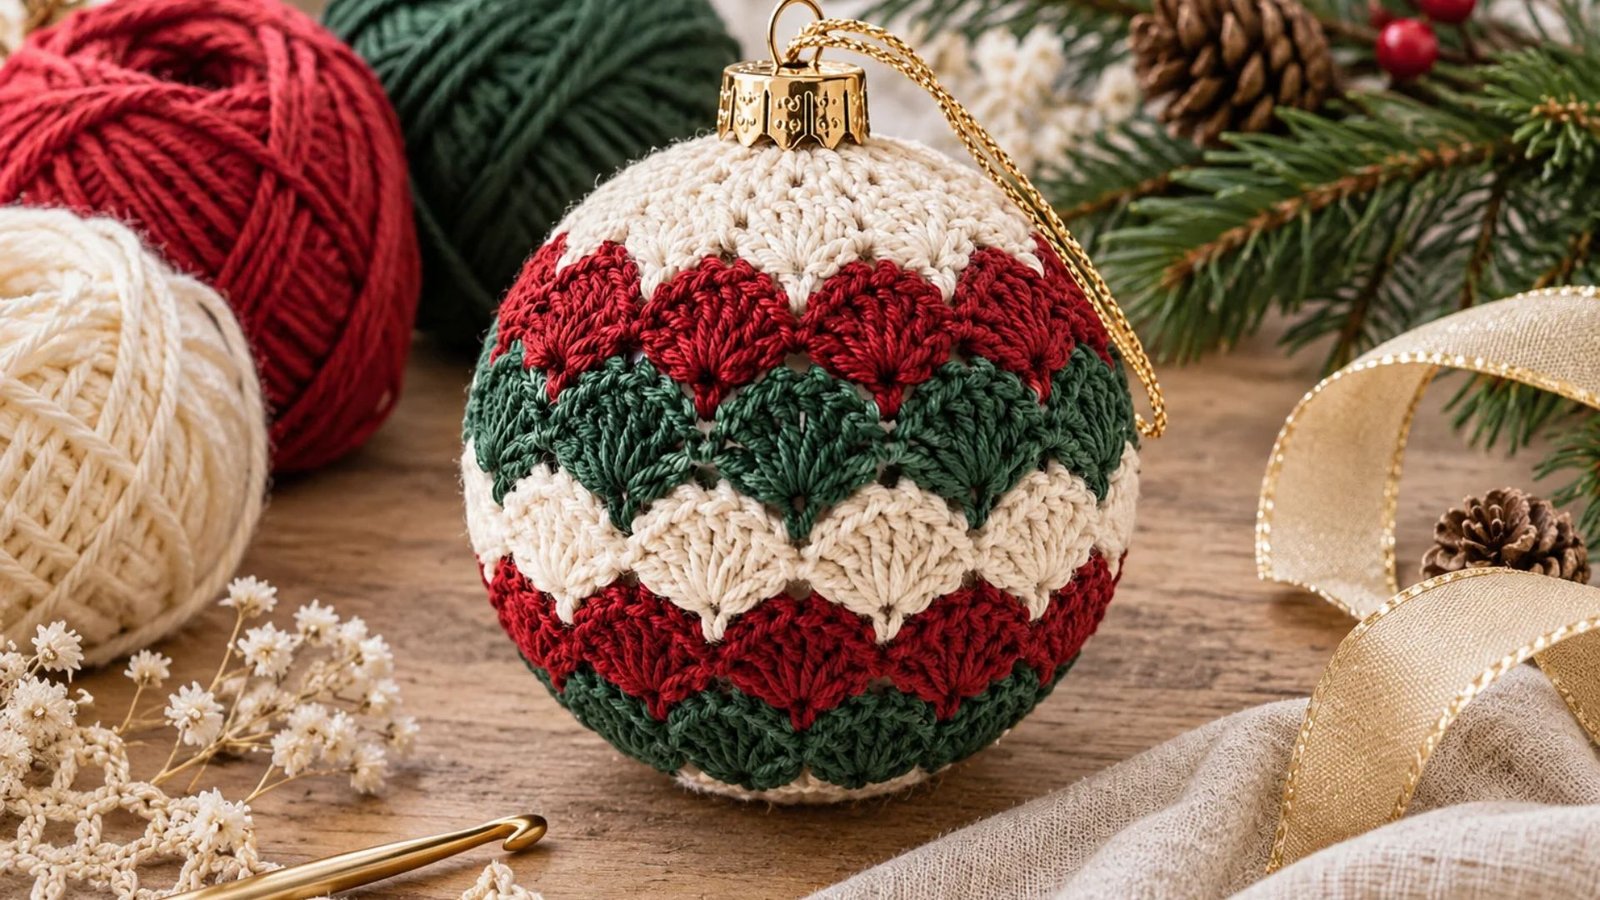
This beautiful crochet Christmas bauble caught my eye with its lovely combination of deep red, forest green, and creamy white yarn.
The layered shell-like stitches give it such a pretty, vintage-inspired look. If you enjoy making your own festive decorations, this crochet ornament is a wonderful project to add to your holiday crafting list.
Why You’ll Love This Crochet Christmas Ornament
Handmade Christmas decorations have a special way of making a Christmas tree feel more meaningful. Instead of decorating with ornaments that look exactly like everyone else’s, you can create something unique using your favourite yarn colours and crochet stitches.
This vintage shell stitch Christmas bauble is a lovely example. Its combination of deep cranberry red, forest green, and warm ivory gives it a traditional festive appearance, while the raised shell stitches add beautiful texture and dimension.
I particularly love how the different colours form little decorative bands around the bauble. The finished ornament looks almost like a miniature knitted Christmas sweater wrapped around a Christmas tree decoration!
It is also a lovely project for using leftover yarn. You only need small amounts of each colour, making it an affordable addition to your handmade Christmas collection.
Whether you are making decorations for your own tree, preparing thoughtful handmade gifts, or adding something special to your holiday craft collection, this crochet Christmas bauble is definitely worth trying.
What Is a Vintage Shell Stitch Christmas Bauble?
A vintage shell stitch Christmas bauble is a decorative crochet ornament made by working textured shell stitches around a round base.
Unlike a traditional flat crochet decoration, this project has a three-dimensional spherical shape. The centre is supported by a small foam ball or polyester stuffing, while the crocheted exterior creates the beautiful textured finish.
The shell stitches are made by working several double crochet stitches into the same stitch. This creates a fan-shaped design that naturally forms attractive raised sections.
For this particular colour combination, the shells alternate between cranberry red, forest green, and ivory. The result is a charming Christmas decoration with a nostalgic, handmade appearance.
A small gold crochet cap and matching hanging loop complete the design.
Materials You’ll Need
Before getting started, gather your crochet supplies. Having everything nearby makes the project much easier and helps you enjoy the process.
Here is what you will need:
- Off-white sport-weight cotton yarn: This creates the soft cream sections and provides a lovely contrast against the darker colours.
- Deep red sport-weight cotton yarn: Choose a rich cranberry or burgundy shade for a traditional Christmas appearance.
- Dark pine-green yarn: A deep forest green gives the bauble its beautiful festive character.
- Metallic gold yarn: Use this for the decorative ornament cap and hanging loop.
- 2.5 mm crochet hook: A small hook helps create neat, compact stitches.
- 60 mm foam sphere: This provides a firm, rounded structure inside the ornament. Alternatively, you can use polyester fiberfill.
- Tapestry needle: Useful for sewing the ornament cap and weaving in loose ends.
- Scissors: For trimming yarn.
- Stitch marker: Helps you keep track of your rounds.
Cotton yarn is particularly lovely for this project because it gives the shell stitches crisp definition. However, sport-weight acrylic yarn can also be used if that is what you have available.
Choosing the Best Christmas Colours
One of the prettiest things about this ornament is its traditional colour combination.
You can follow the original colour inspiration or make a few adjustments to suit your Christmas decorating style.
1. Cranberry red
A rich cranberry red gives the ornament warmth and creates a beautiful contrast against the cream and green sections. It is a lovely alternative to brighter Christmas red.
2. Forest green
Deep pine green brings a natural woodland feeling to the design. It also makes the raised shell pattern stand out beautifully.
3. Warm ivory
Cream or ivory yarn softens the overall appearance and helps balance the darker colours. It gives the finished bauble a cosy, vintage-inspired look.
4. Metallic gold
A little gold adds an elegant finishing detail. It works beautifully for the top cap and hanging loop without making the ornament look overly decorative.
If you prefer a softer Christmas palette, you could also experiment with dusty rose, sage green, beige, and champagne gold.
Understanding the Crochet Stitches
Before making your bauble, it helps to understand the stitches used in the design.
The original pattern uses standard US crochet terminology.
- Chain (ch): A basic crochet stitch used to begin certain rounds.
- Single crochet (sc): A compact stitch that helps create a firm, rounded base.
- Double crochet (dc): A taller stitch used to form the decorative shell sections.
- Increase (inc): Working two single crochet stitches into the same stitch to expand the circle.
- Single crochet two together (sc2tog): A decrease stitch that helps close the rounded shape.
- Slip stitch (sl st): Used to join rounds neatly.
- Back loop only (BLO): Working through the back loop of a stitch.
- Front loop only (FLO): Working through the front loop of a stitch.
- Shell stitch: Five double crochet stitches worked into the same stitch to create a fan-shaped detail.
The shell stitch is the star of this project. It creates the raised decorative pattern that makes the finished ornament look so beautiful.
How to Make a Vintage Shell Stitch Christmas Bauble
The bauble is crocheted in joined rounds, beginning with a small circular base. The pattern gradually increases to create a rounded shape before the shell-stitch colour sections are added.
Here is an overview of the process.
Step 1: Crochet the Circular Base
Begin with your off-white yarn and create a magic ring.
Work six single crochet stitches into the ring, then join the round with a slip stitch.
Continue increasing evenly in each round. The first six rounds gradually expand the circle until you have 36 stitches.
Try to keep your tension consistent throughout this section. Even stitches will help the finished ornament maintain its shape.
If you are unfamiliar with magic rings, practise with a small yarn sample before beginning the ornament.
Step 2: Add the Cranberry Red Shell Stitches
Once the circular base is ready, introduce your deep red yarn.
This is where the ornament starts developing its beautiful decorative appearance.
The shell stitches are made by working five double crochet stitches into a designated stitch. You then skip the next stitches and work a single crochet between the shells.
Continue around the circle, maintaining an even arrangement.
The red section creates the first striking decorative band.
Step 3: Introduce the Ivory and Forest Green Colours
Next, alternate between ivory and dark pine-green yarn to build the remaining decorative sections.
The ivory stitches provide a lovely contrast, while the green shell stitches create a rich, woodland-inspired appearance.
Pay attention to where each new round begins. The original pattern alternates the shell placement so that the fans sit neatly between the previous round’s decorative stitches.
This creates the layered, almost scalloped appearance visible in the finished photograph.
When changing colours, keep your joins neat and avoid pulling the yarn too tightly.
Step 4: Prepare the Rounded Shape
After completing the decorative shell sections, work an additional round of single crochet stitches.
This helps create a firm foundation for the closing section.
At this point, you should have a beautifully textured crochet covering with enough room to insert your foam sphere or stuffing.
If you are using a foam ball, gently position it inside before beginning the decrease rounds.
If you prefer fiberfill, distribute it evenly so that the bauble remains round rather than developing flat or lumpy areas.
Step 5: Close the Bauble
Once the inner filling is in place, begin decreasing the stitches.
Work the single crochet decreases gradually around the ornament to close the opening.
Take your time during this stage. You want the crochet fabric to sit comfortably around the filling without becoming overly stretched.
When only a small opening remains, fasten off and use your yarn tail to close the remaining stitches.
Weave in the loose end carefully so that it is hidden inside the ornament.
Step 6: Make the Gold Ornament Cap
The gold cap is a lovely finishing detail that gives the bauble the appearance of a traditional Christmas tree ornament.
Using metallic gold yarn, crochet a small circular piece.
The original design begins with six single crochet stitches in a magic ring, increases to twelve stitches, and then works additional rounds to create the little cap.
Pay attention to the back-loop-only round, as it helps create a defined edge.
Once the cap is complete, leave a long yarn tail for sewing.
Position it neatly over the top opening of the bauble and sew it securely in place using your tapestry needle.
Step 7: Add the Hanging Loop
Finally, cut a length of metallic gold yarn and thread it through the centre of the cap.
Tie the ends securely to form a hanging loop.
Make sure the loop is firmly attached before placing your ornament on the Christmas tree.
You can also use a separate decorative gold cord or thin ribbon if you prefer a slightly different finish.
Helpful Tips for a Beautiful Finished Ornament
A few small details can make a noticeable difference to the appearance of your crochet bauble.
Keep your tension firm and even.
Loose stitches can allow the foam sphere or stuffing to show through. Try to maintain consistent tension, especially when working the shell sections.
Make your colour changes neat.
The colour bands are an important part of the design. Tighten your joining slip stitches gently and keep the yarn tails tucked away.
Avoid overfilling the ornament.
If you are using polyester stuffing, add it gradually. Too much stuffing can distort the shell pattern and make the ornament look uneven.
Use a foam sphere for a smooth finish.
A firm foam centre is a convenient option if you want your bauble to maintain a consistent round shape.
Check the placement of your cap.
Before sewing the gold cap into place, make sure it sits centrally over the top opening.
Common Mistakes to Avoid
Even a relatively small crochet project can have a few tricky moments.
Here are some things to watch out for:
- Uneven shell stitches: Make sure you work the correct number of double crochet stitches into each shell. Consistency gives the decorative bands a balanced appearance.
- Visible stuffing: If you can see the filling through the crochet fabric, your tension may be too loose.
- Messy colour joins: Take extra care when introducing each new yarn colour so that the transition looks clean.
- Incorrect stitch placement: Shell stitches need to be positioned correctly in relation to the previous round. Use stitch markers if necessary.
- Closing the bauble too early: Insert the foam sphere or stuffing before beginning the final decrease rounds.
Working slowly and checking your stitch counts will help you achieve a much neater finish.
Creative Ways to Decorate Your Crochet Christmas Bauble
Although the traditional red, green, and ivory combination is beautiful, you can make this project your own.
Here are a few ideas to inspire you.
Create a soft neutral version: Use cream, oatmeal, beige, and champagne gold for a subtle Christmas decoration that looks lovely on a neutral tree.
Try a snowy winter palette: Combine white, pale blue, silver, and icy grey for a frosty seasonal appearance.
Make a blush pink version: Soft pink, ivory, and sage green create a delicate feminine colour combination.
Add a personalised touch: You could attach a tiny initial charm or a small decorative tag to make the bauble a thoughtful handmade gift.
Make a matching collection: Crochet several baubles in different colour combinations and display them together for a coordinated Christmas tree.
How to Care for Your Crochet Christmas Ornament
Because crochet ornaments are made from yarn, they benefit from gentle storage and handling.
After Christmas, remove the baubles from the tree carefully and check that their hanging loops are still secure.
If the ornament needs cleaning, gently remove surface dust with a soft, dry brush.
Avoid soaking the ornament, especially if it contains a foam sphere or metallic yarn. Excess moisture can affect its shape and finish.
Store your finished baubles in a clean, dry container. Wrapping each one in soft tissue paper can help prevent the textured stitches from snagging on other decorations.
Keep them away from direct heat and damp storage areas so they remain beautiful for future Christmas seasons.
Frequently Asked Questions
Is this crochet Christmas bauble suitable for beginners?
The original pattern is described as intermediate. Beginners who already understand basic crochet stitches, increases, decreases, and joined rounds may enjoy trying it, but the shell placement and colour changes require some attention.
What yarn is best for crochet Christmas ornaments?
Sport-weight cotton yarn is a lovely choice because it provides excellent stitch definition and helps the decorative shells stand out. Sport-weight acrylic can also work.
Can I use stuffing instead of a foam ball?
Yes! Polyester fiberfill is an alternative to a foam sphere. Add it gradually and distribute it evenly to maintain a rounded shape.
How big is the finished crochet bauble?
The original Textured Shell Bauble pattern gives a finished diameter of approximately 2.5 inches (6.5 cm).
How long does it take to crochet?
The original pattern estimates approximately one hour, although your actual time will depend on your crochet experience and working speed.
Can I change the colours?
Absolutely. This design is lovely in traditional Christmas shades, but you can experiment with pastels, neutrals, metallics, or any colours that complement your holiday decorations.
Final Thoughts
I absolutely love how a simple combination of yarn and crochet stitches can become such a charming Christmas decoration. This vintage shell stitch Christmas bauble is a beautiful little project that brings together traditional holiday colours, lovely texture, and handmade character.
It is small enough to make without committing to a large crochet project, yet detailed enough to stand out among your other Christmas decorations.
You can make several in matching colours for a coordinated tree, experiment with different shades, or create a few to give as thoughtful handmade gifts.
If you enjoy crocheting for Christmas, this is a lovely design to add to your seasonal crafting list. Gather your favourite yarn colours, make yourself a cosy drink, and enjoy creating something special for the holidays!
Pattern inspiration: The original Textured Shell Bauble is pattern 15 in the 15 Crochet Christmas Ornaments Free Pattern Collection. Visit the original source for its complete stitch-by-stitch instructions.